Every purchase made through our Amazon Affiliate Page helps support this site

Jamie
-
Posts
1,467 -
Joined
-
Last visited
-
Days Won
54
Content Type
Profiles
Forums
Downloads
Gallery
Events
Store
Articles
Blogs
Everything posted by Jamie
-
Thanks! The color wasn’t my choice I must admit, wife won that one! The upholstery guy has been awesome to work with on these. He took a picture in my head and molded it out perfectly. I actually took him a chair once I could get the front connected to the back so he could guide me in sizing the seat. I can’t complain about the price he told me as well. $30-40 a seat. I am suppling a 3/4 base and he does the rest.
-
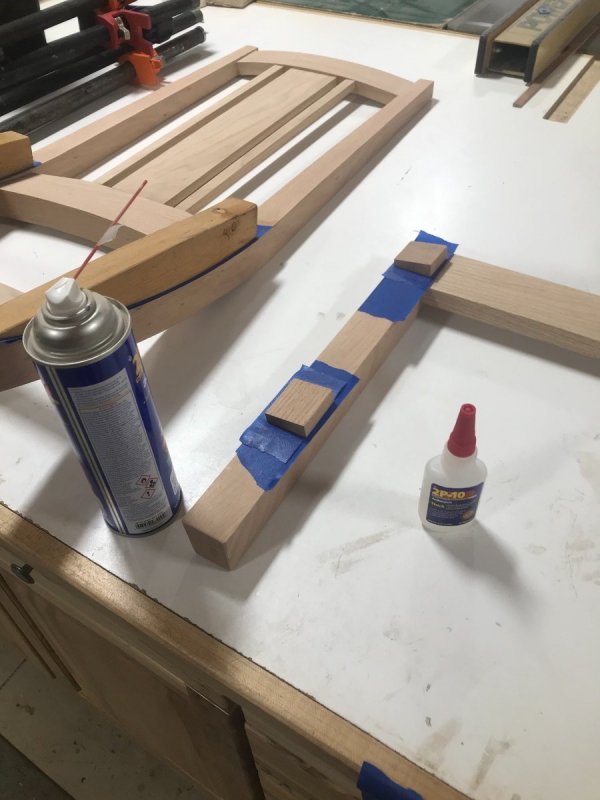
Did get a chance the other day to try the ca glue and tape trick. What a easy process! @Kev I must say it worked amazing! Didn’t take long and made clamping a breeze. Did run into a little trouble when I removed the clamps.....a little ca glue seeped through the tape and is now firmly attached to the chair. Should be able to sand it off.

-
To replace or add to the collection? Looks like a quality item. Like the large table size and how heavy it is. Don’t think you could go wrong with it.
-
Yes they will be stained to match the table
-
Will do! Hopefully tomorrow by midday I have it glued up. Have to get out on the ice to see if I can catch a few early on ? I don’t know who thought of it but it seems like a pretty good idea and should be a perfect approach for this. On the second or third one I did by myself I ended up using a Irwin hand clamp to hold the back block on, learned to position that clamp at the height where I wanted the pipe clamp to be. Didn’t work to bad but having the extra set of hands sure made it a lot easier.
-
Thanks! If I would’ve only known about you wanting 4 a couple months ago! Ya know I did try to tape them in place, only to have them fall off. Think that’s where the new language came into play. I very seldom think about using ca glue. Not sure why I didn’t think of that. Good advice. With only one chair to go I’m going to use that method to do it. Maybe that way I will realize how valuable that trick is. Thanks!
-
I also agree with the guys on the knee wall. I think that angled wall would stand out and overpower the design of the room. I think it would look like a brace holding the house up.
-
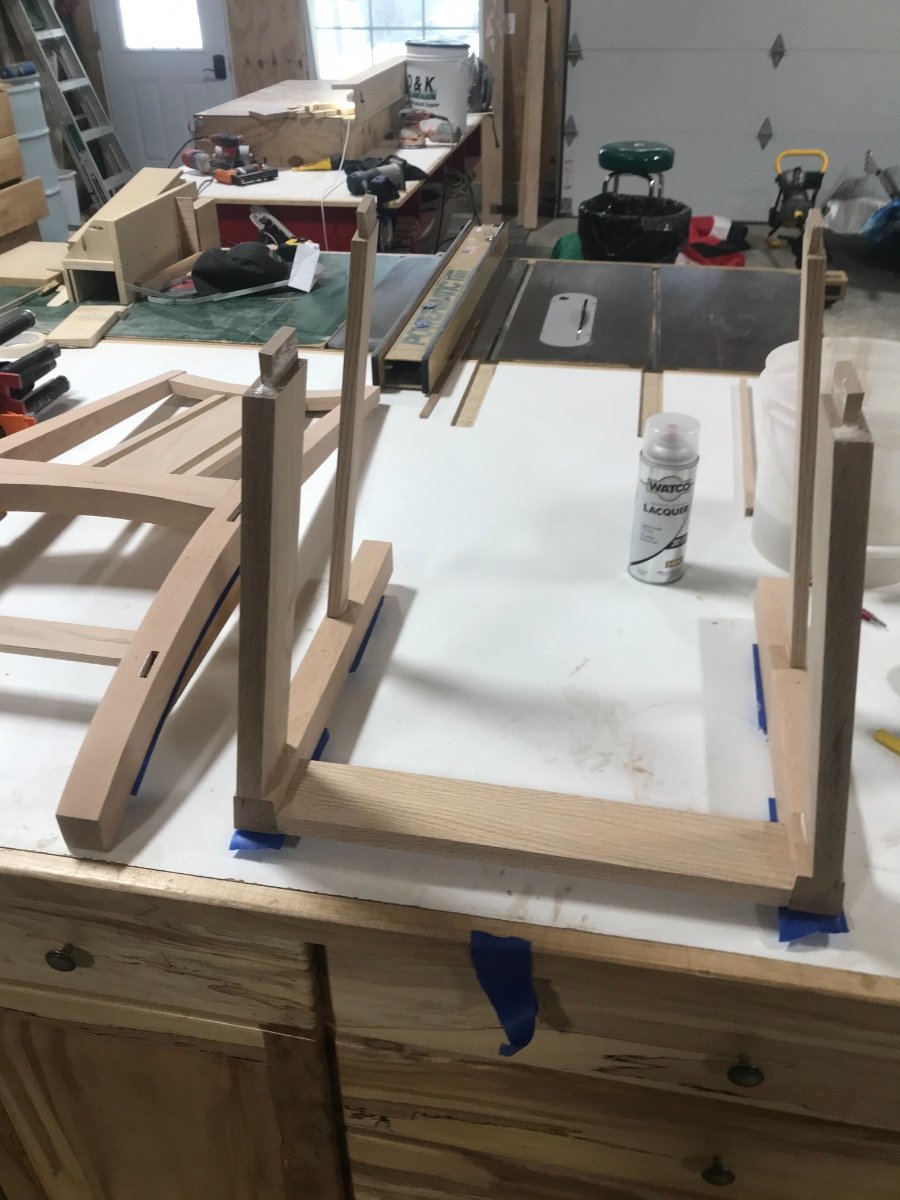
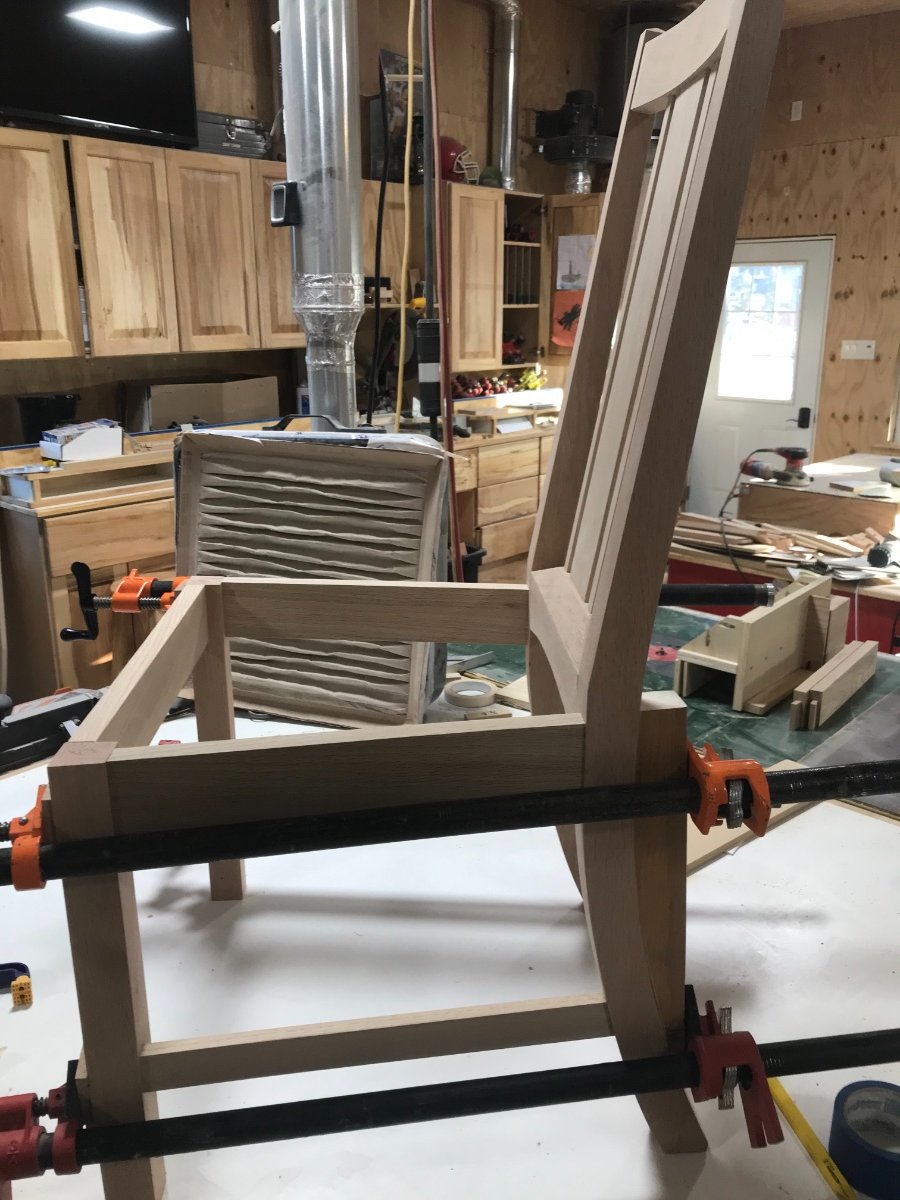
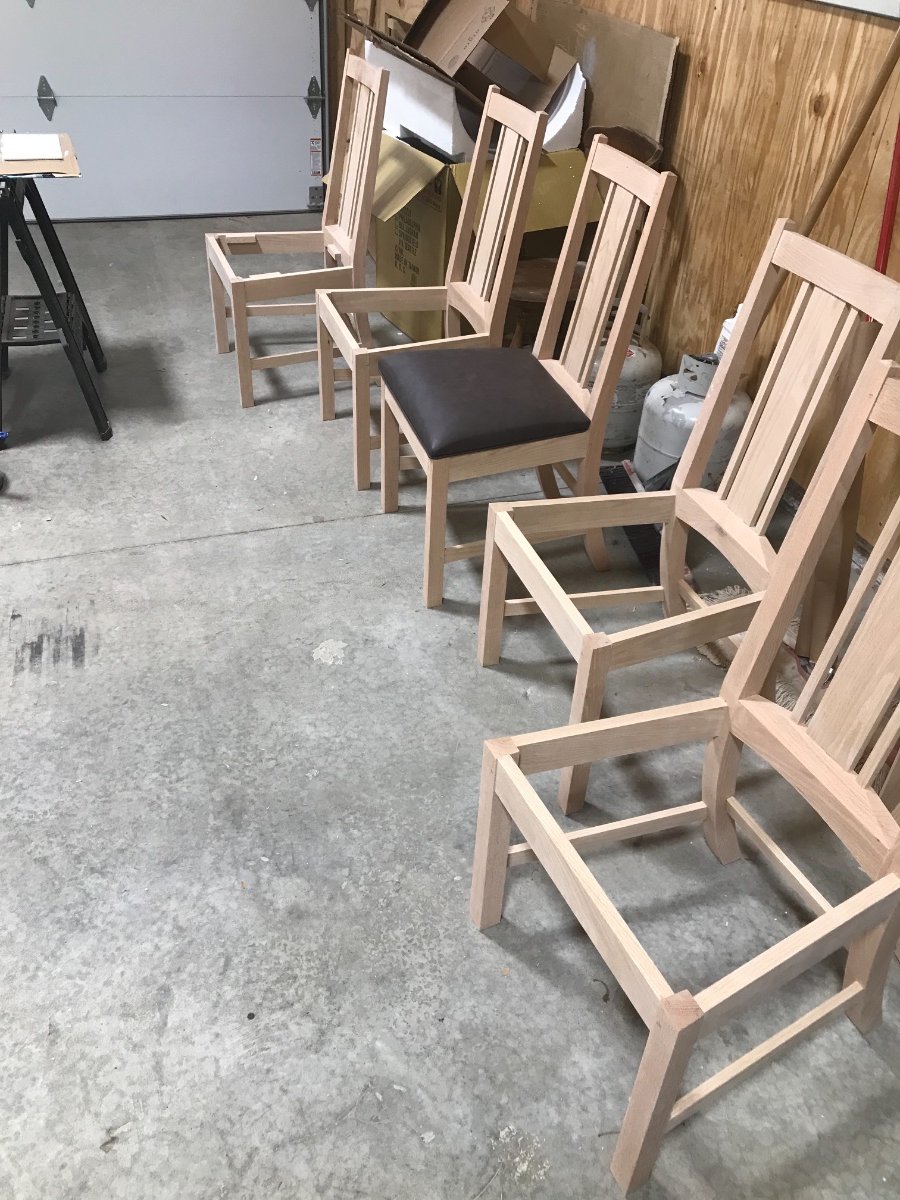
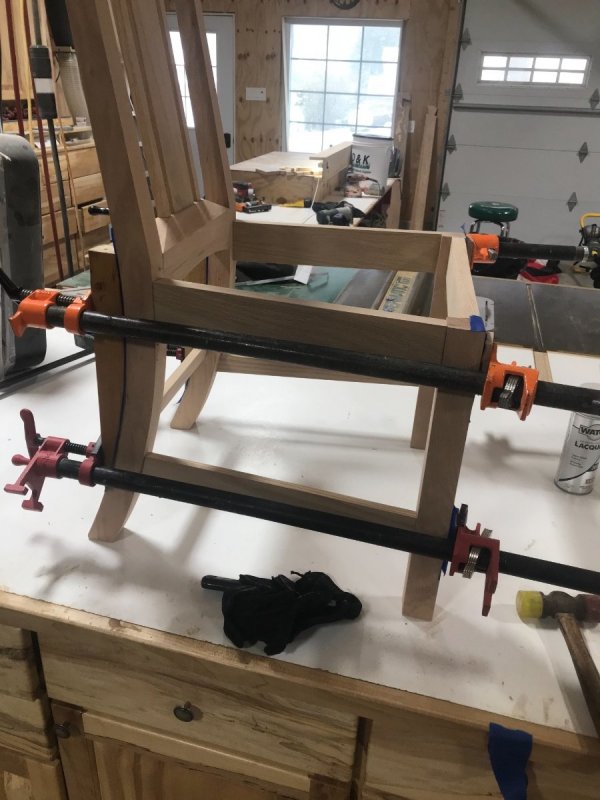
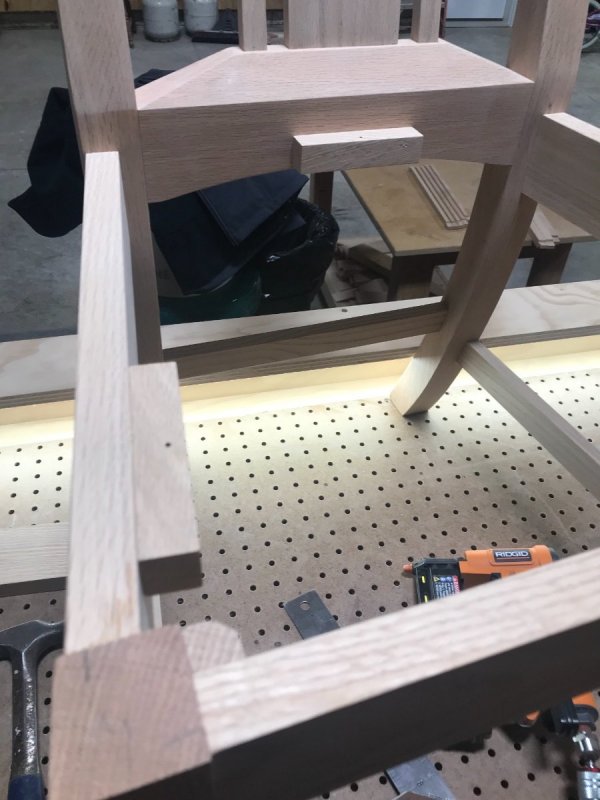
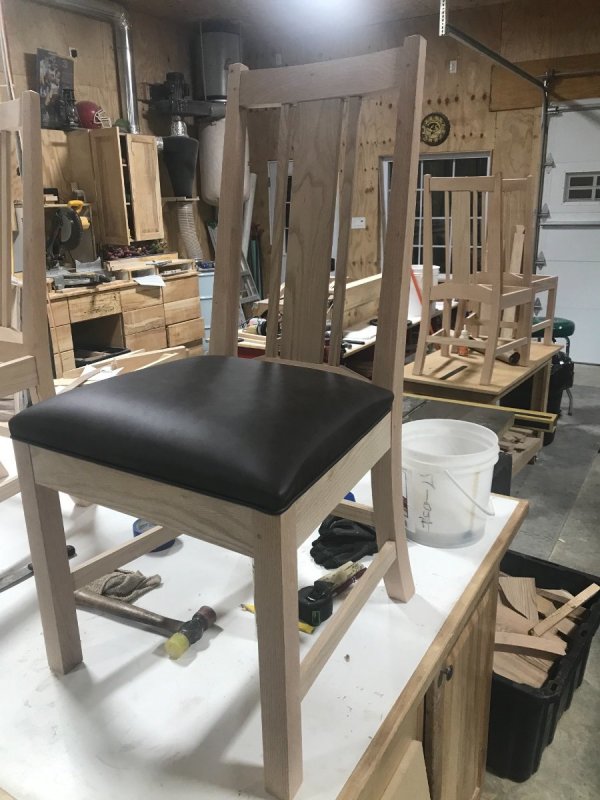
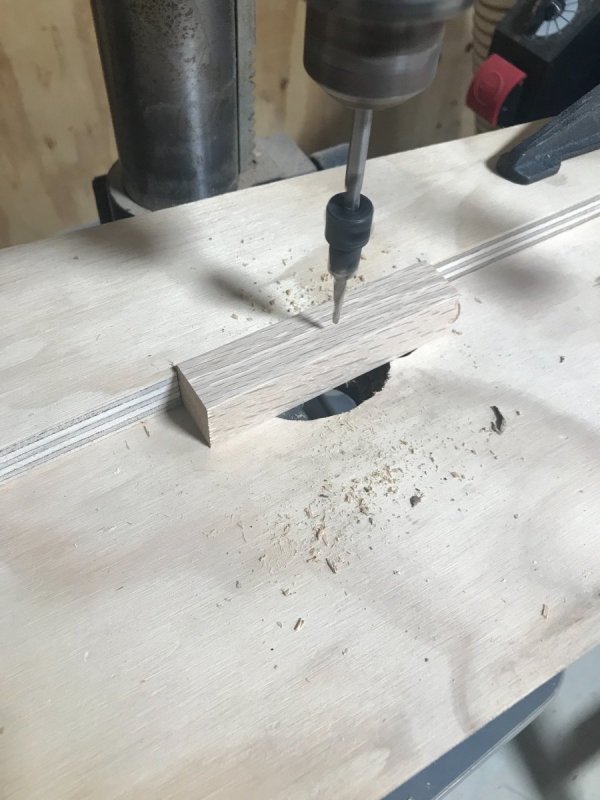
Life has been a little busy since my last update on the chairs. Have been getting in a little shop time the last couple weeks and have chairs all over the place! Have been getting fronts attached to the backs of them. Takes a little time to get the parts sanded and cleaned up before mating them. Figured this would be quite a bit easier to have 95% of the finish sanding completed before the chair was final assembled. With all the parts not being that easy to get good clamping pressure I made a few little blocks to help. They work well but trying to get the glue spread and blocks in place can be a little stressful. Have had some assistance in just holding an end of a clamp from my neighbor, wife and daughter. Did a couple on my own and invented a new language while doing so. Made some cushion hold downs out of the messed up side stretchers, didn’t use them all up but shrunk the fire wood pile some. Marked a couple lines which are hard to see on the fence to center them up. with the chair out of the clamps I installed the hold downs along with a glue block in the front corner for a little added support. Also after they are out of the clamps the side stretchers also get a dowel pin installed in them. Didn’t get any pictures of that as it’s the same process that was used on the leg sections. Got a seat back from the upholstery guy! He wanted to take a stab at one to see how we liked it. Must say he has gone way over my expectations, the day after I picked this seat up he called me up asking how I liked it and if any changes need to be made. You can’t see it in these pictures but a slight adjustment is going to be needed on the fit of the back of the seat, nothing major just the corner where the fabric is a couple layers thick it bumps the back of the seat out a touch from the back of the chair. He wants me to bring him a chair down when I bring the remaining plywood bases for the seats. Currently I have 7 chairs matted 2 ready for stain. I will admit it was nice to sit on the chair with the seat cushion on.


-
Nothing quite like a good cigar.
-
Am really curious on the iron, was just explaining them to my wife the other day. Very nice touch with the granddaughter doing the design ?
-
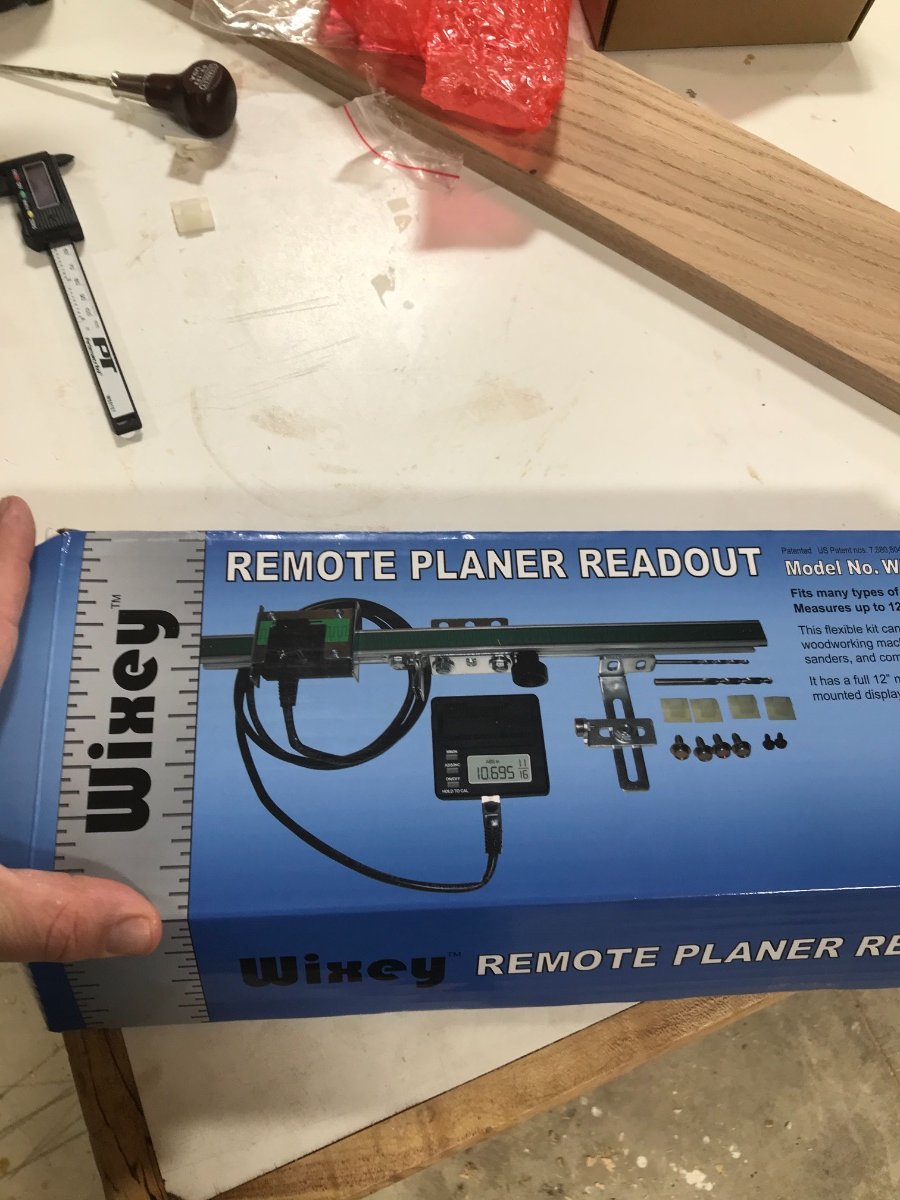
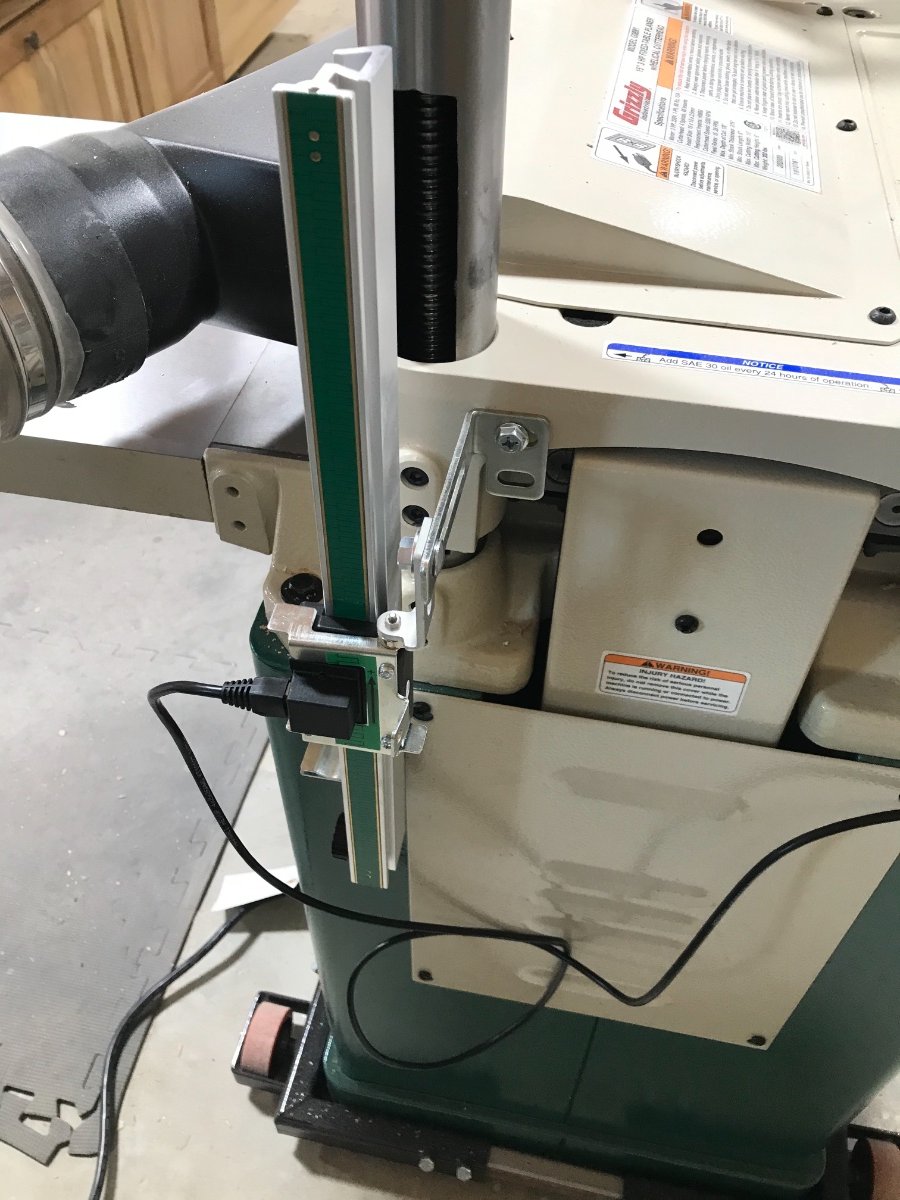
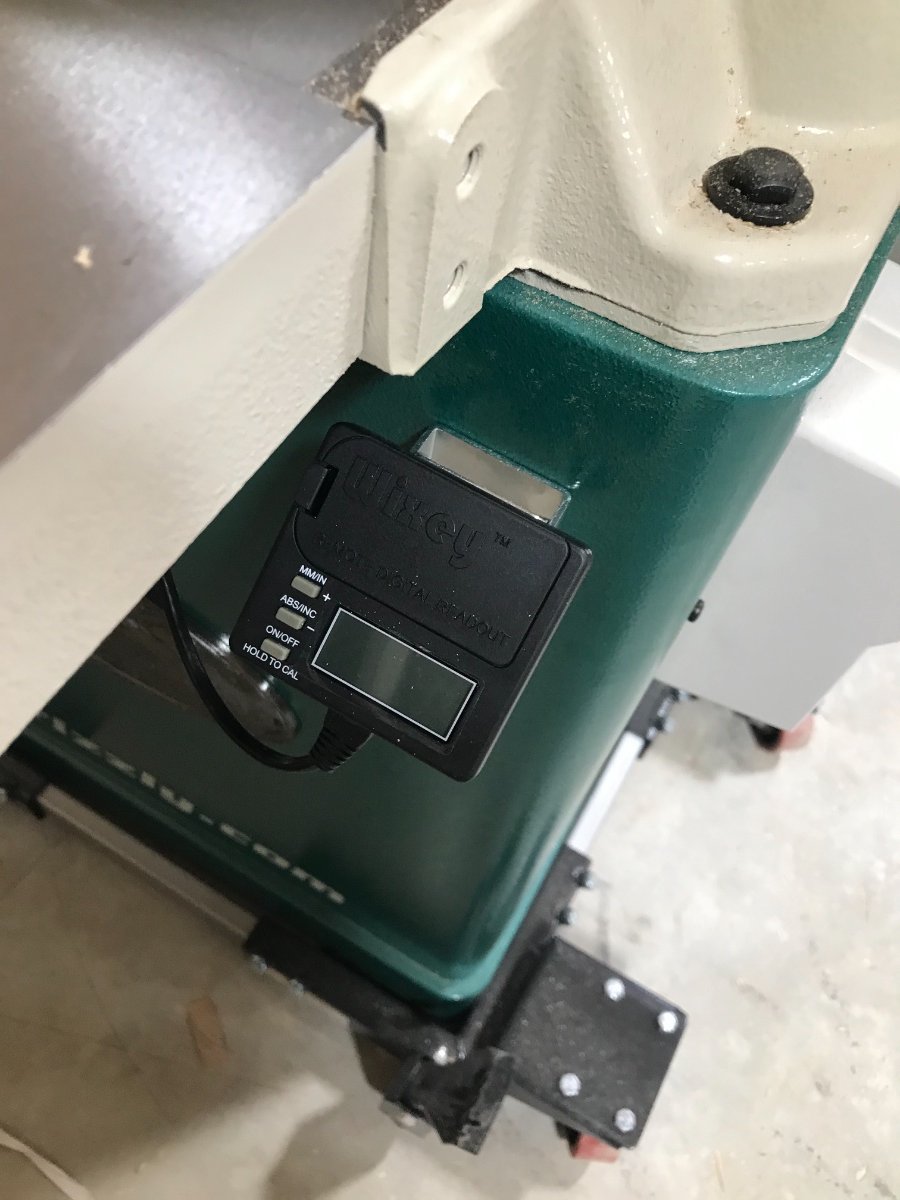
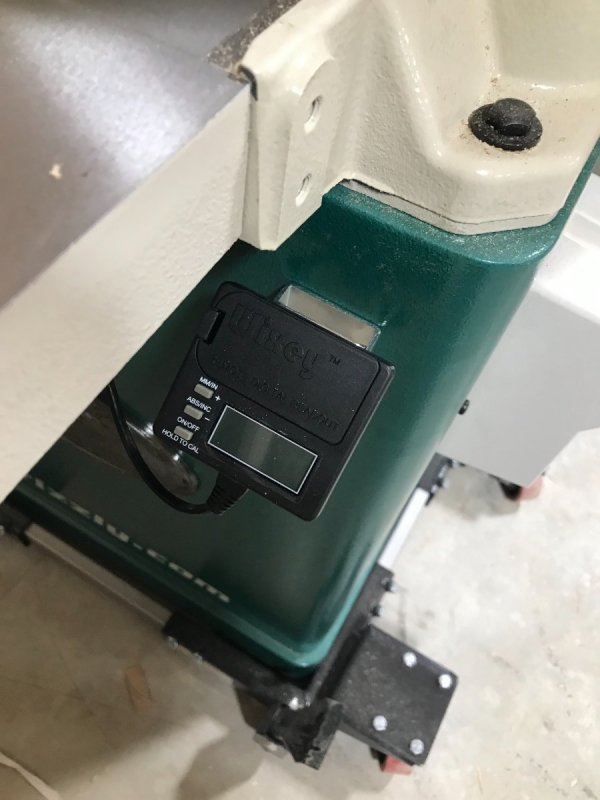
I will give it a run and let you know what I think. The reason I liked the idea of it is for repeating depth of cut throughout a project. Also the depth gauge on the planer itself wasn’t impressive at all. With how easy the handle turns can shoot way past your desired depth of cut. I think as well coming from a cabinet building background where a lot of the time we worked in thousandths for thickness it’s a familiar process. I am always checking with a caliper coming out of the planer that this should take that step away.
-
I had a really good haul this year! The girls got me a Milwaukee m18 blower which I had to try out in the house. You guys would be amazed how far barbies can fly! They also found me a wixey for the planer. My mom got me a remote switch for the dust collector and a 4” sliding square. All really nice thing but time spent with the family was worth way more. Did even find a few moments to get the gauge on


-
Same. Haven’t been able to get on for a few days on my computer. Only way I can is on the iPad.
-
Awesome!
-
Nice tool and great review!
-
Top notch!
-
Nice job! Very interested in seeing the outfeed table. Welcome!
-
I’m a face frame first guy. Quick easy way is dare I say pocket holes. You never see the back of a face frame unless you are guys like us who stick their heads inside if cabinets.
-
Anyone ever try the kreg? Seems like a way better price point. Here is the cheap Jamie coming out again
-
Welcome!
-
You have to have a secret on keeping all those joints perfectly inline. I have watched a ton of board videos and am disappointed with a lot of them how the joints don’t perfectly line up. Having built a few I know how challenging it can be, great job! Very impressive workmanship
-
They are built out of three separate pieces. The taller piece being one board with the shorter ones being the other two pieces. Used the bandsaw to rough out the shape and made a template to cut the branches. Used a drill bit to cut the upper portion of the branch then the angle back to it on the bandsaw. Very little clean up with a ro sander and glued them together. Used ca glue along with titebond. I didn’t sign and date this one as it was just a prototype. Also wasn’t very impressed by the quality of craftsmanship in this. Few glue spots and some bandsaw mill marks left behind. That is an excellent idea!
-
That is a cool looking board!
-
Yea I will say I was very proud of it! It’s was very demanding of attention cutting these stretchers. It was over 5 hours of concentration and test cuts. Couldn’t really test fit till they were completed, which added to the stress. Still have to cut a little off the height to make them fit the mortises which is also at an angle. Did the one set just to check the fit.
-
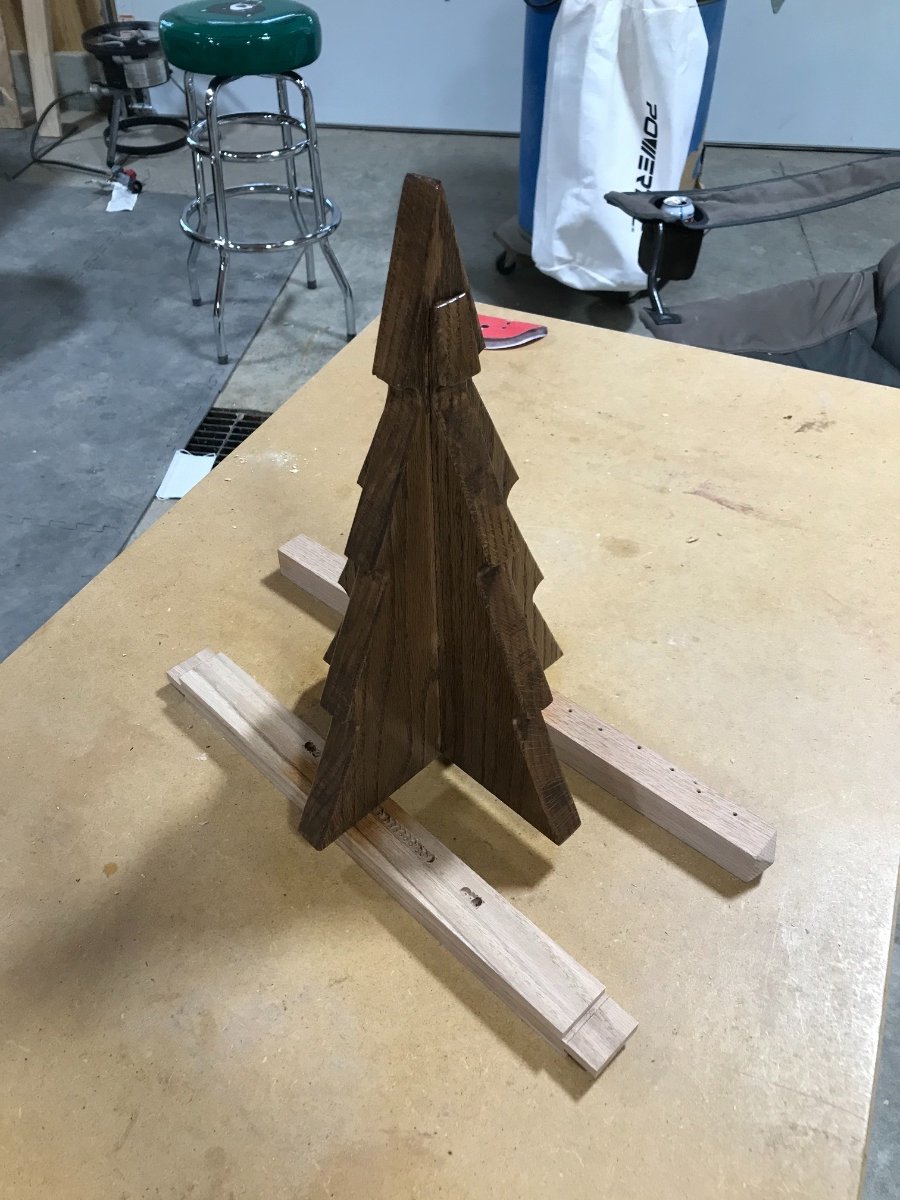
My mom gave me a call yesterday and asked if I could make her something quick. She brought over a picture of some little Christmas trees she found online. I was gonna spend my day just picking up the shop and doing some things before we get covered in snow. But how often do you get to spend an hour or so with your mom in the shop?! We drew this little tree out and put a prototype together. Quick little project....then she explained how she wanted 3 made of different heights and different colors. Also she wanted a set for her, my sister, sister in law and a set for my wife. I’m going to try to get a set done for her before Christmas hits. Don’t judge on the craftsmanship on this one. Just a prototype but she loved it!