Every purchase made through our Amazon Affiliate Page helps support this site
Kev
-
Posts
6,303 -
Joined
-
Last visited
-
Days Won
575
Content Type
Profiles
Forums
Downloads
Gallery
Events
Store
Articles
Blogs
Everything posted by Kev
-
I'll be the first to admit that I haven't looked in the manual but, I think @Chet did and made comment that the metric stuff was best suited... Now, with that said, I have an SAE alternative figured out (and currently mounted) and the metric stuff on order. So, I'll have options for both this up coming weekend.
-
Well, this is certainly a question I didn't expect....lol Another consideration is the amount of times you're washing/sanitizing your hands in the "Covid era"...
-
When I build my first shop - it was then a recording studio - I paid 6 bucks a sheet...lol.
-
I added a 0 clearance today using the SAE stuff and it worked fine! I agree, it's quite a bit better than the Incra! Looking forward to getting the metric bits and offering an informed opinion on the best option with links for the hardware..
-
Yea.. It's pretty aggressive.. I made a quick mounting bracket for the Bandi-clamps and the corners of the 3/4" ply rounded before they even touched the paper... ?
-
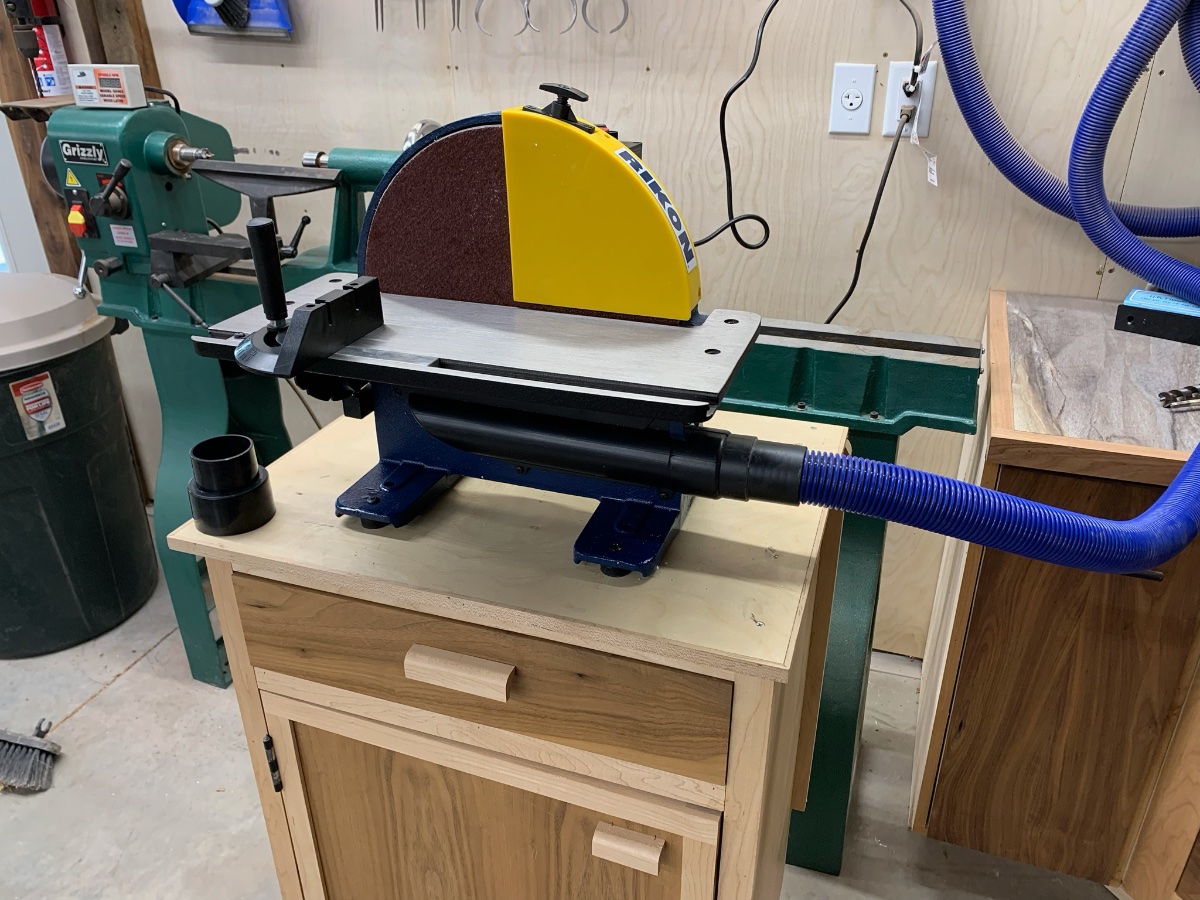
I haven't had a disc sander in my shop since 2 shops ago.. There's been a few times that I really wish I'd of had one so, it was on my list. I'm getting to the point where finding space for "additional" equipment is becoming difficult but I'd been thinking about this one for a while now..
-
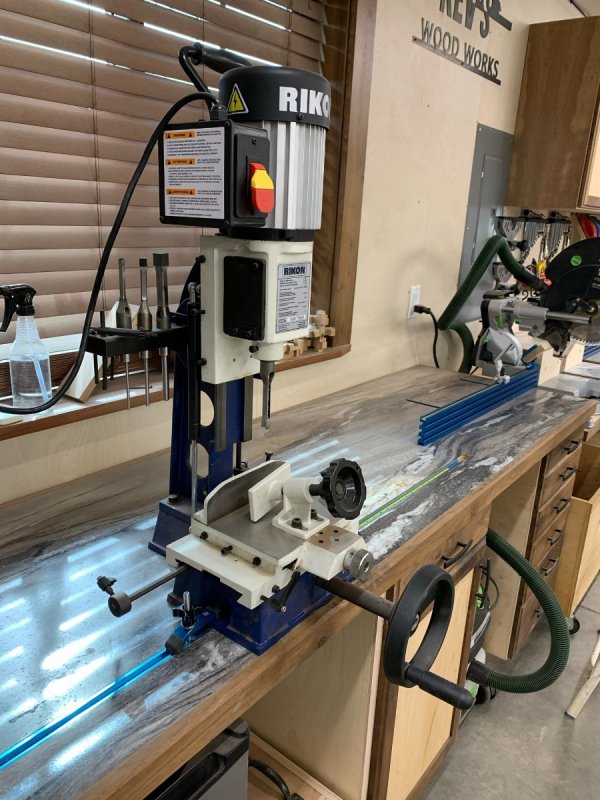
This is just an initial tool review as I haven't had any real project time with the machine yet. Unboxing: Was packaged very well! Even though the box really looked like it took some abuse in travel, there was a lot of styrofoam in the box and the ends were protected with 1/4" plywood. No damage to the machine in shipping! Initial Impression: It's heavy! I've left a link below to what I ordered on Amazon. The first thing that jumped out at me was the Amazon didn't show the guard that covers 1/2 of the disc. I'll be removing this for my needs but, just thought it odd that it wasn't pictured with the "safety guard" on the machine. Additionally, the machine wasn't loaded up with the normal cosmoline you see on most machines with cast iron. No assembly other than setting the table to 90 degrees and installing the T Handle on the top - I'll cover this shortly. https://www.amazon.com/gp/product/B002FB74Y2/ref=ppx_yo_dt_b_asin_title_o07_s00?ie=UTF8&psc=1&fbclid=IwAR0frszeJdH-GM3tr-2cPq1CYvW8b58tZPKR3hhjch8-q7J-75ge21lOqP8 Dust Collection: The machine came with an adaptor but, my 2" Rockler hose hooked right up to the machine so, won't need the adaptor. I also suspect that once I remove the yellow guard, the DC will not be at full potential ? Miter Gauge: No real surprise here, it's the same cheap one that comes with all machines of this sort. However, the miter slot will accept most common miter gauges. I was able to put the Harvey in it as well as the Incra but, some fine adjustments were needed. What the hell is the T-handle on the top?: It's actually one of the cool features! It's a brake for the wheel and it actually works very well! Spring loaded T-Handle with a brake pad attached to slow the wheel. Noise: The machine is surprisingly quiet! I certainly wouldn't hear it over my DC! Paper: Looks like it comes with some pretty aggressive paper on it, I'm guessing 40 or 60 grit. I don't currently have any replacement paper so, I'm not sure what the change out process is going to look like.. I'll update this review when I finally get around to changing the paper. My past experience was that the first change is a PITA because of all the sticky residue that had to be removed. Where'd the HCM go? I think long term that I'm going to mount the HCM in my miter bench. That's a project down the road so, I haven't worked out the details yet. For the short term, the T-Track in my miter bench works perfectly to secure the HCM in place for use! So, there's my initial impression of this machine! I'll update as I get some project time with it.. My initial review is that it's pretty impressive considering the price point!

-
I made a trip this morning to try and find locally the metric parts without success.. I ordered again from McMaster the metric parts which are due in on Thursday. I have an SAE option that will work but, I'm going to wait for the metric bits to show up to see if they work a little better. Either way, I should have the video follow up out next weekend.
-
You're probably correct but, I don't have any on hand and didn't order any.. The issue was more with the overall height of the square nut. I was able to find one at McMaster that was 1/16" smaller and still in SAE at 10/32"
-
So.... Some of the items I ordered while I was gone were some nuts of various sizes so that I could do a quick follow up video for adding a 0-clearance fence. Out of everything I ordered, there was one item that will work but, I still wasn't happy with the fit. I went ahead and took some measurements and made an order through McMaster-Carr that I think will be the correct nuts and screws. I'll do a quick video once I know for sure which fasteners are needed.
-
Having been in your shop, I completely understand the pain but, would question some of the things that "need" be moved.. I could see your OF table and bench but, would think your TS should be ok.. I would also ask them to stand on the miter bench rather than move it.. In then end, understanding what they need to get to, some of the moves seem to be a little out of place..
-
Nice job! These web frames can really complicate things! Was interesting to see your issue was with one of your M&T joints..
-
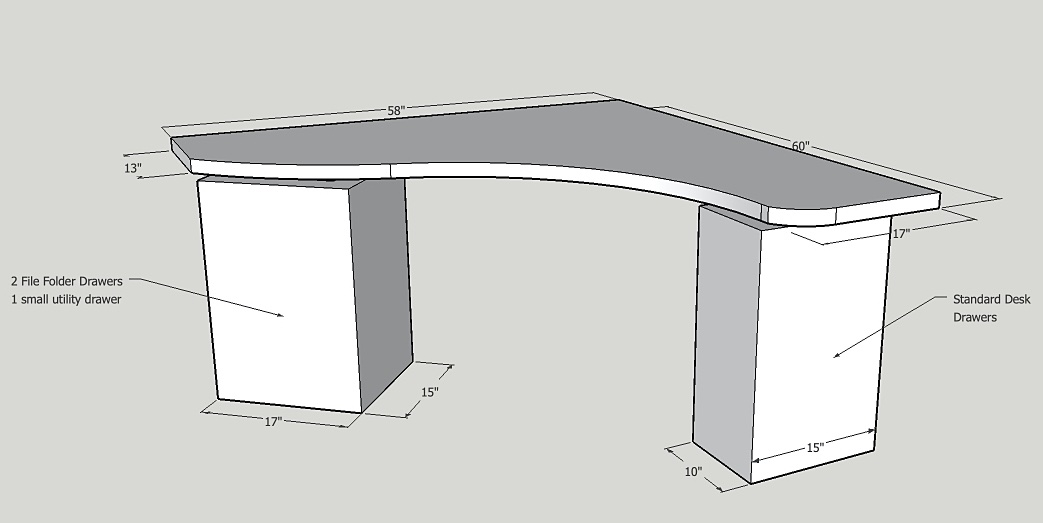
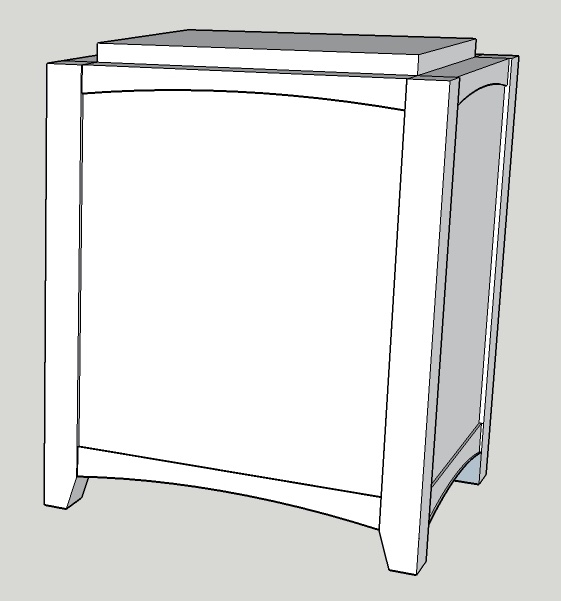
Amazing how much that's looking like the cabinets for under my desk ?
-
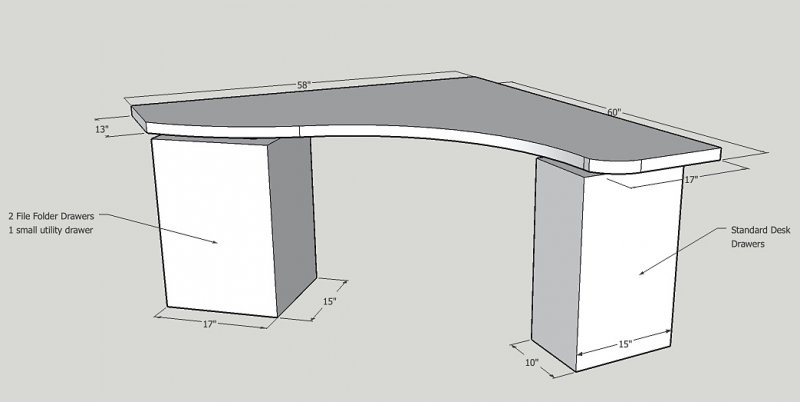
I'm struggling with height, not width.. There's a few things I can do but, I need to be there to get some actual measurements.. I can shorten the feet a little I can make the rails a bit more narrow What I do will depend on how much I need..
-
The right side cabinet isn't wide enough.. Now, that's not to say it can't be..
-
Both great thoughts and ideas! The first one (bottomless drawers) I hadn't considered.. I'm just now sure how that would work with the under mount glides?? I'll also say that I'm not sure that's a requirement either.. It's an interesting concept I'm looking forward to looking into! As for the LED's, I think you're probably correct! However, since this desk lives in our bedroom and I often work when my wife is trying to sleep, I'm curious if this would create the "ambient" light I'm wanting. My current desk light is simply too bright and my wife often requests that I shut my light off.. I also don't want a "gadget" on the desk that just won't be used..
-
As I get closer to getting home, this project is starting to fill my head more and more. I'm grateful that I've had some time to ponder the design concept and think about some details! This was the original design concept... The drawer cabinet on the right is really irrelevant as it just needs to mimic the design of the cabinet on the left which has some specific needs. The cabinet on the left is needed for actual hard copy file storage. I know this is a strange concept to many here but, it's something that I want/need in this cabinet. So, I've created a design that my wife and I really like but, I'm just not sure I can get 2 file drawers in it without being home and grabbing some actual measurements. I know it's close but, I didn't leave a lot of wiggle room so, I'll just have to see when I get home.. Here's the updated file cabinet design. I didn't show the actual drawer fronts but, they should match the dresser nicely... I'm hoping for 2. ? Shortened tapered feet to match the dresser Still a short riser on the top to give the illusion of a floating desk top. - Considering some LEDs in this area as a detail. Interested in thoughts and opinions!
-
Nice job! No gaps to deal with! Personally, I like Dutchment that are more narrow in the middle.. Often times, I freehand them at the bandsaw, clean up the edges, and then cut the mortise to fit..
-
Those look great!
-
It's a little more expensive! I used it on a planter box/fake window frame for the front of my neighbor's house and it has held up well.
-
I think epoxy is fine for holding it in place. You could add a couple screws just for a little assurance over time. I might also consider a coat of either paint or clear on the aluminum to protect it over time. As for finishes, if I were doing this project, I would probably go with epiphanies. It holds up well outdoors and has some UV inhibitors that will make it last a little longer. It will be a bit more of a PITA when it is time to refinish it but, you should be longer between needing to do this task.
-
I should expand on my above comment.. I usually apply before finish sanding.. Reason being is that there is always a little that gets on the top and bottom surfaces so, this allows me to sand that off before finishing.
-
You could put that on now.. I nearly always epoxy the edge of live edge stuff and let it cure before I move on to finish..
-
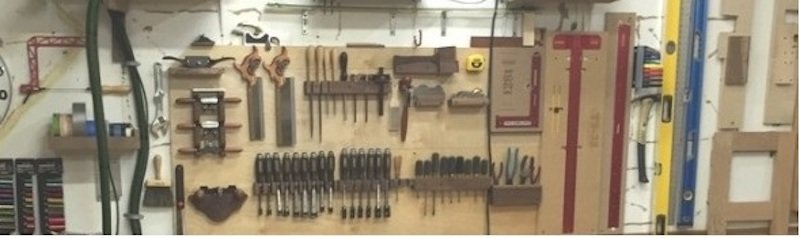
Sweet looking pile!
-
Nice job on the repair!