Every purchase made through our Amazon Affiliate Page helps support this site

Chet
-
Posts
2,277 -
Joined
-
Last visited
-
Days Won
92
Content Type
Profiles
Forums
Downloads
Gallery
Events
Store
Articles
Blogs
Everything posted by Chet
-
I had one get me like that. Its a pretty shocking event the way the pain hits you.
-
Not to poop on the party but isn't there some potential of developing a crack where the grain at the bottom of the apron runs through the legs once the whole thing takes the load of the rest of the cabinet. Wouldn't It be better to have the legs made separate and after being attached to the apron, shape the curve of the apron and legs to match?
-
Yea, I know poplar takes paint pretty well but it just wouldn't be as durable as I would like for the kitchen. If it was just me and Kathy that would be one thing but we have four grand kids. ? T, you are probably looking at the one woodwork that just isn't intrigued by dovetails, I don't know what it is, they've just never been on my list. ? I think part of it is that 99.9999% of the time the drawer is closed and you don't see them and most non-woodworkers don't know what they are. Nothing against anyone else that enjoys them, just me.
-
The drawer boxes are not going to be painted. I wasn't thinking of using hardwood money on the boxes, I was just going to picking up a sheet of birch ply for the boxes.
-
My next project is a re-do of our kitchen. I built the cabinets back some 20 years ago and they were built to last but they do need to be freshened up. When I built them I used red oak because at the time all to cool kids around here had red oak cabinets. My plan is to sand then pore fill and sand again. after this I am going to paint them wit GF milk paint and top coat that with GF High Performance. I am going to build all new doors and drawers and this brings me to my question for the group. I was thinking of using Maple for this because it will still be a durable wood but I won't have to do a pore fill on the maple, just prime and paint. What do you think? I know it is a sacrilege to paint nice wood but the goal is to brighten up the space and I am not building new cabinets so paint is the plan.
-
I agree but like Kev said search out for the straight grain. I think the ones from Festool are beech.
-
Good ol' down and dirty project.
-
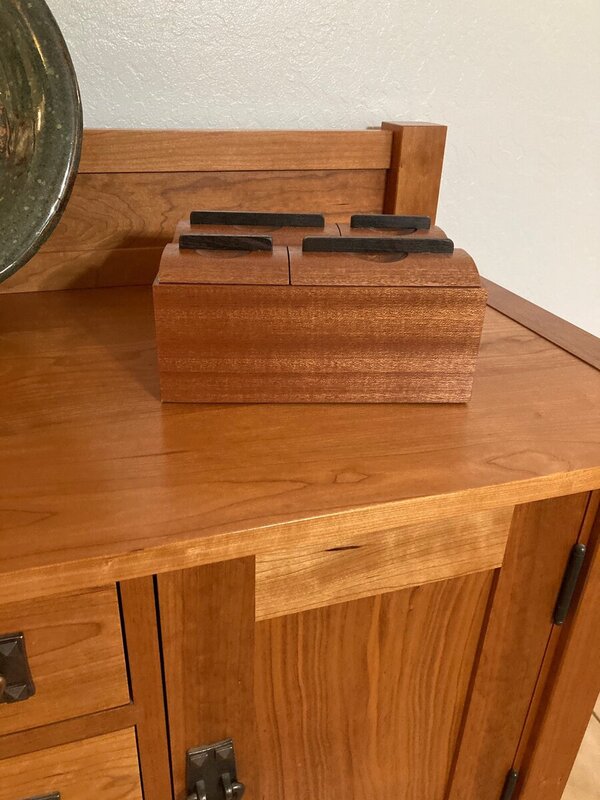
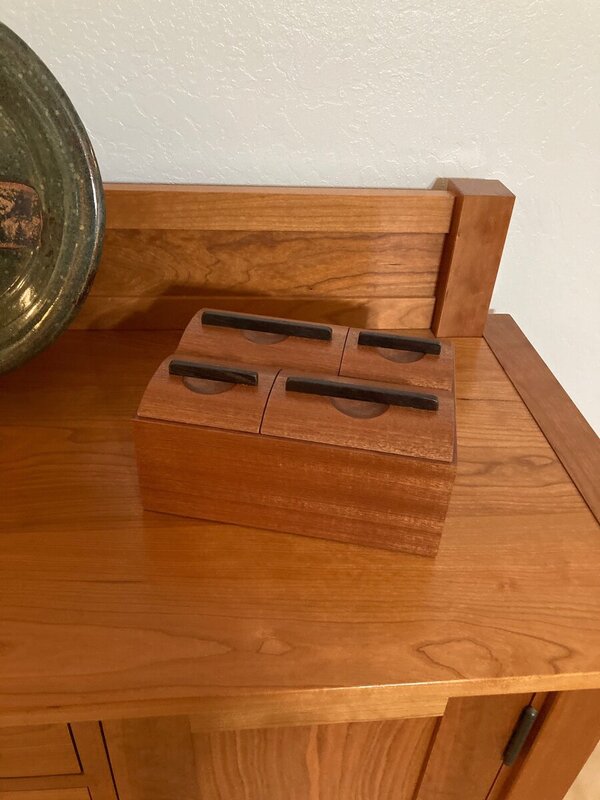
Yea, I didn't like the end result at all. After The glue had dried, I was thinking that something cylindrical maybe a 1/4 inch in diameter in the center the indentation and just barely above the surface of the lid. I do like your idea Bryan. I wasn't going to do this but I decided to stay close to the design of the box that was done in class. I don't like a lot of the handles he does on his boxes, they are too dainty for my taste. My mitts are to big to grab these as they are and the ones on the plans are shorter and narrower. But know I know.
-
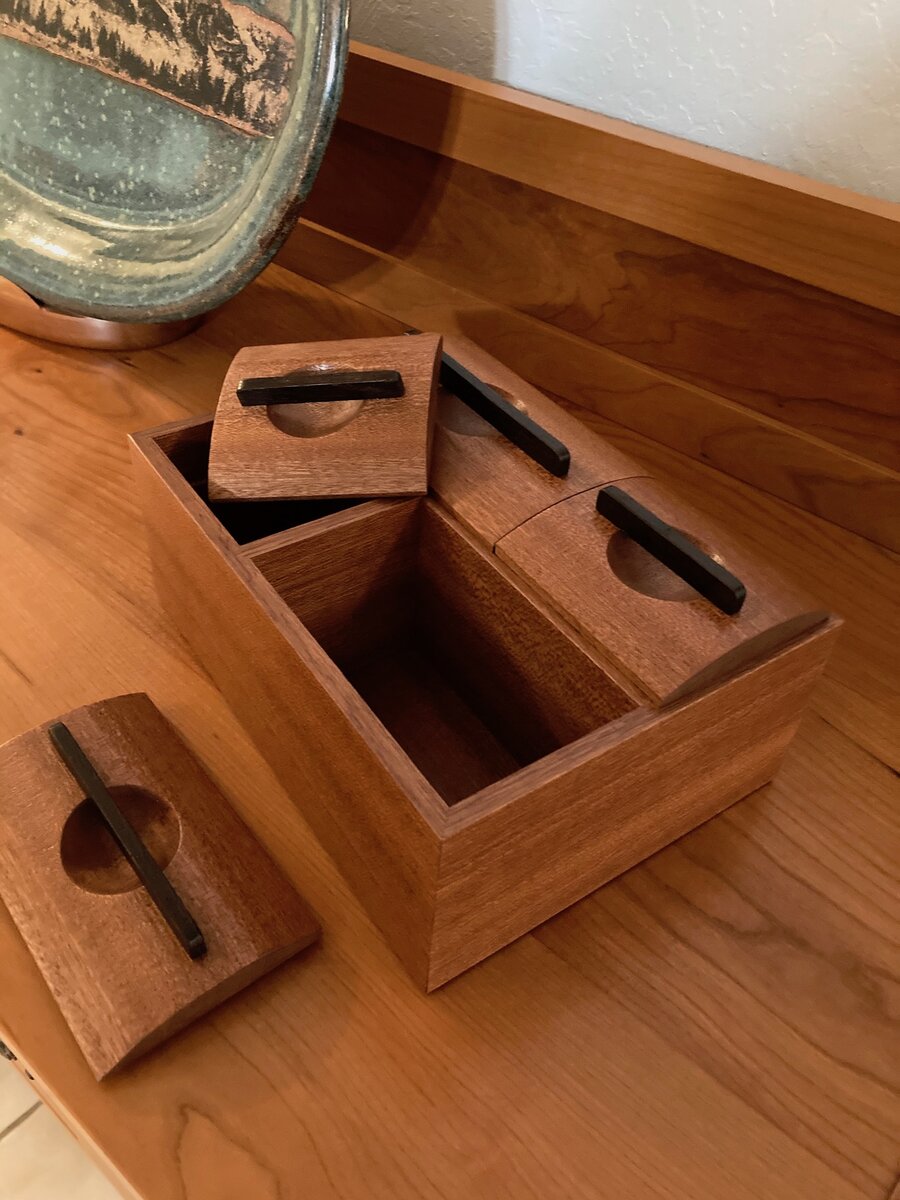
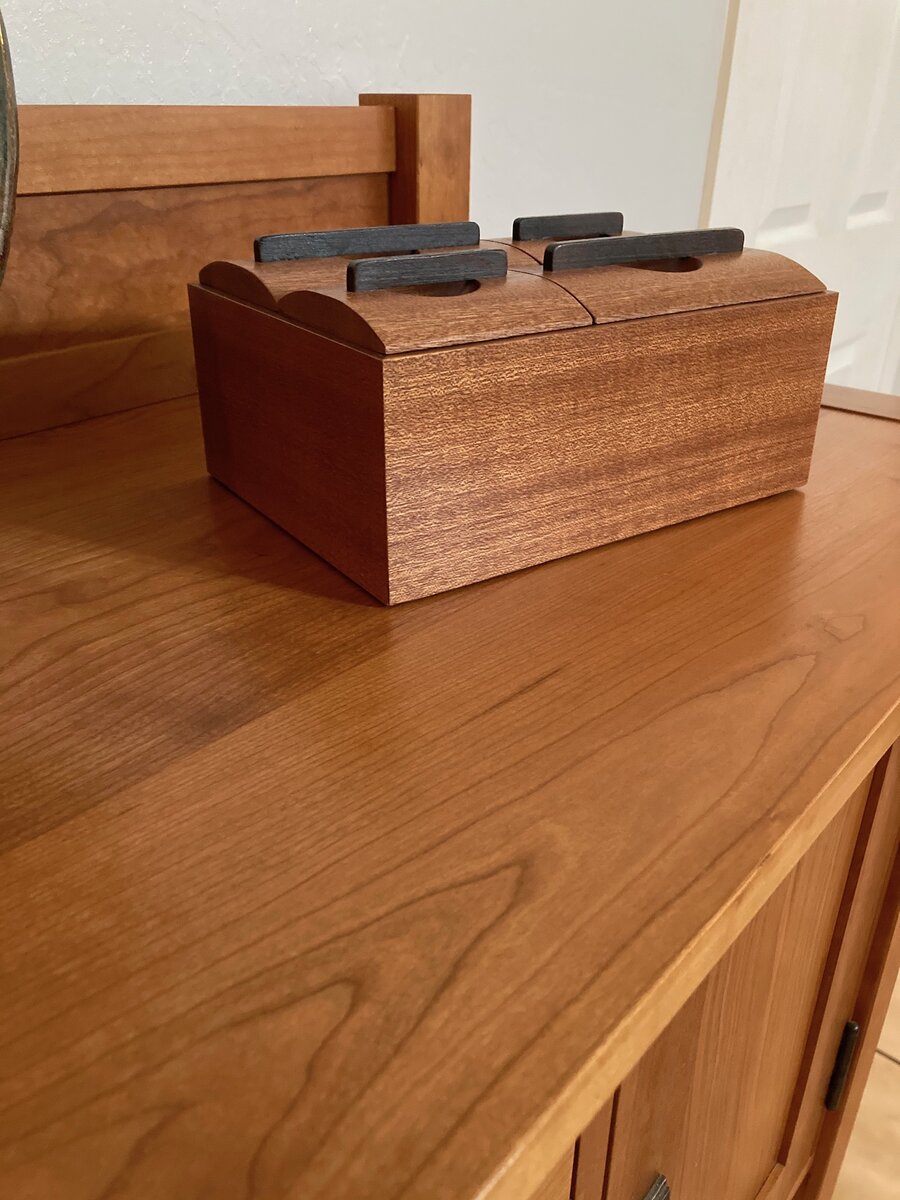
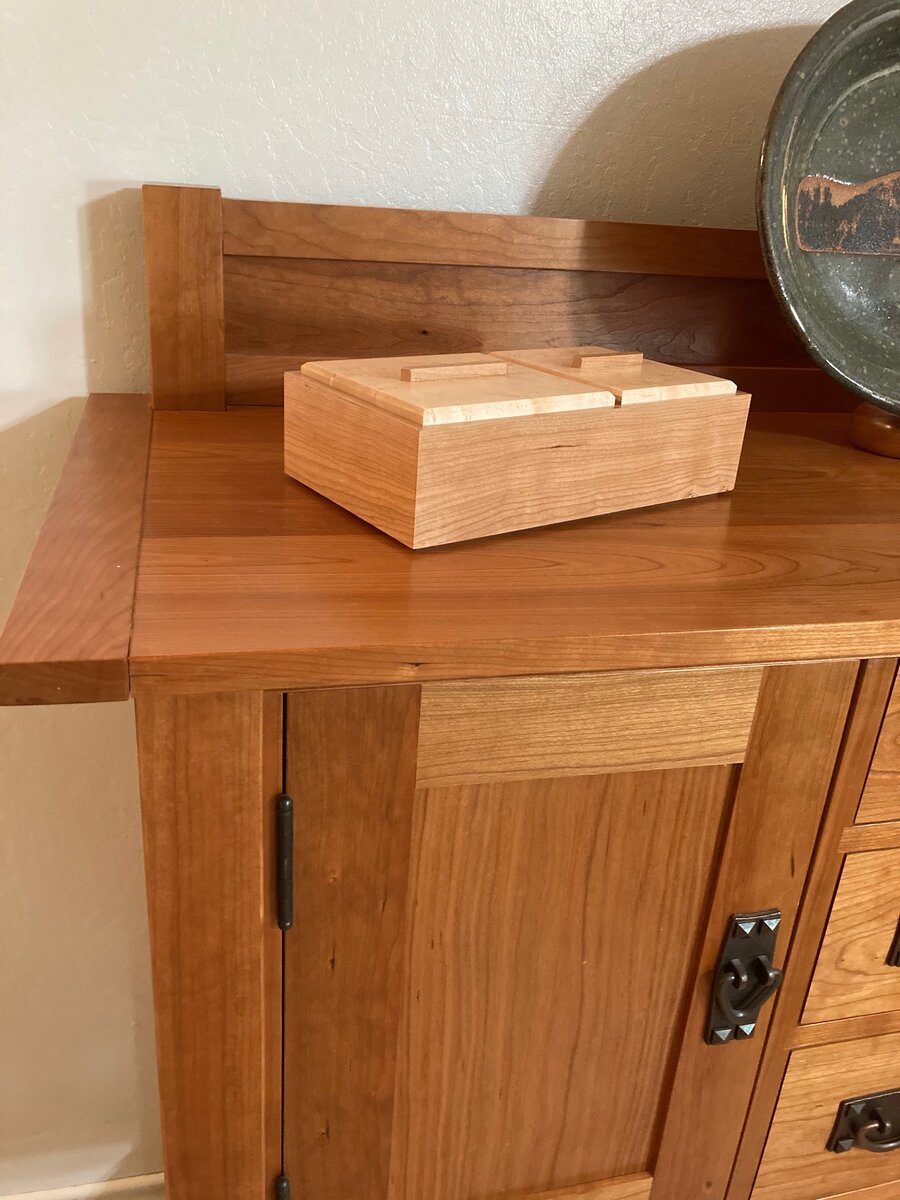
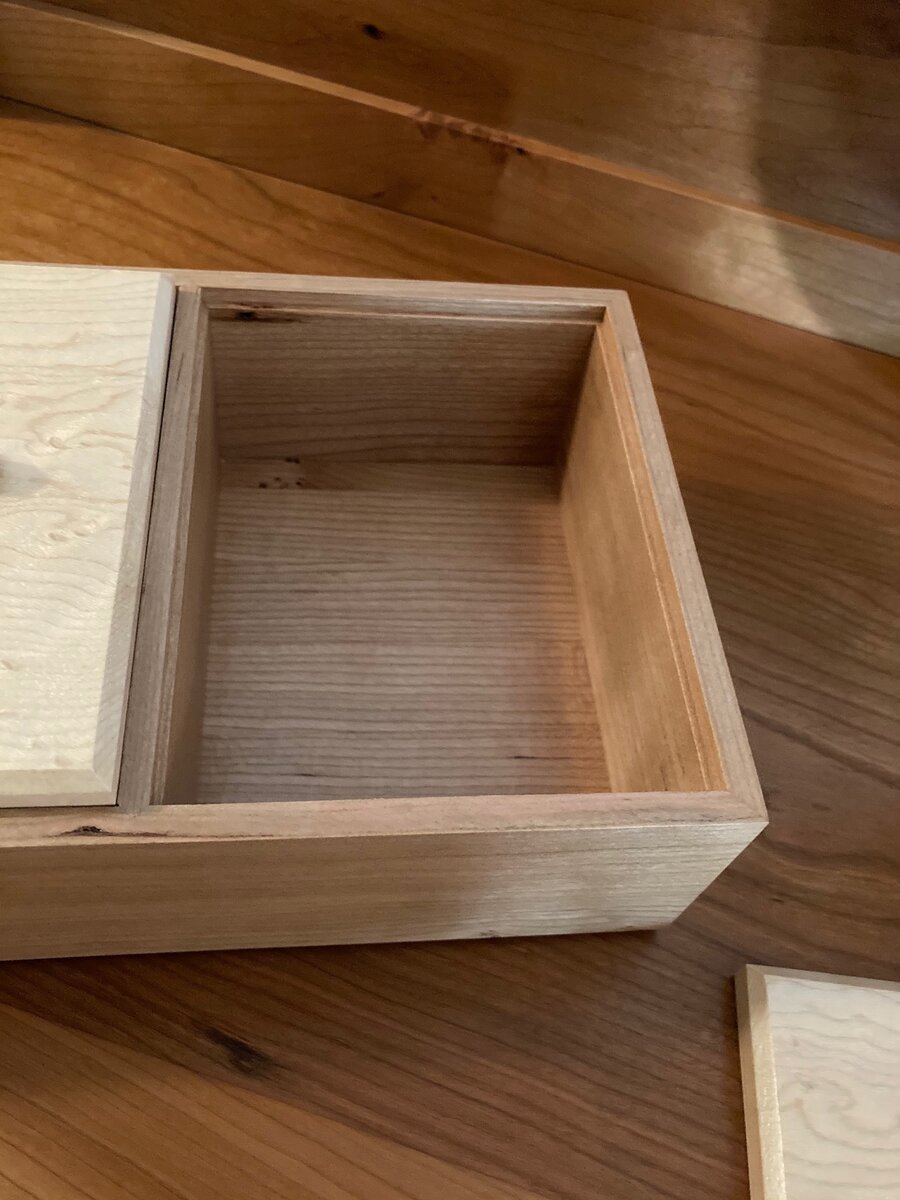
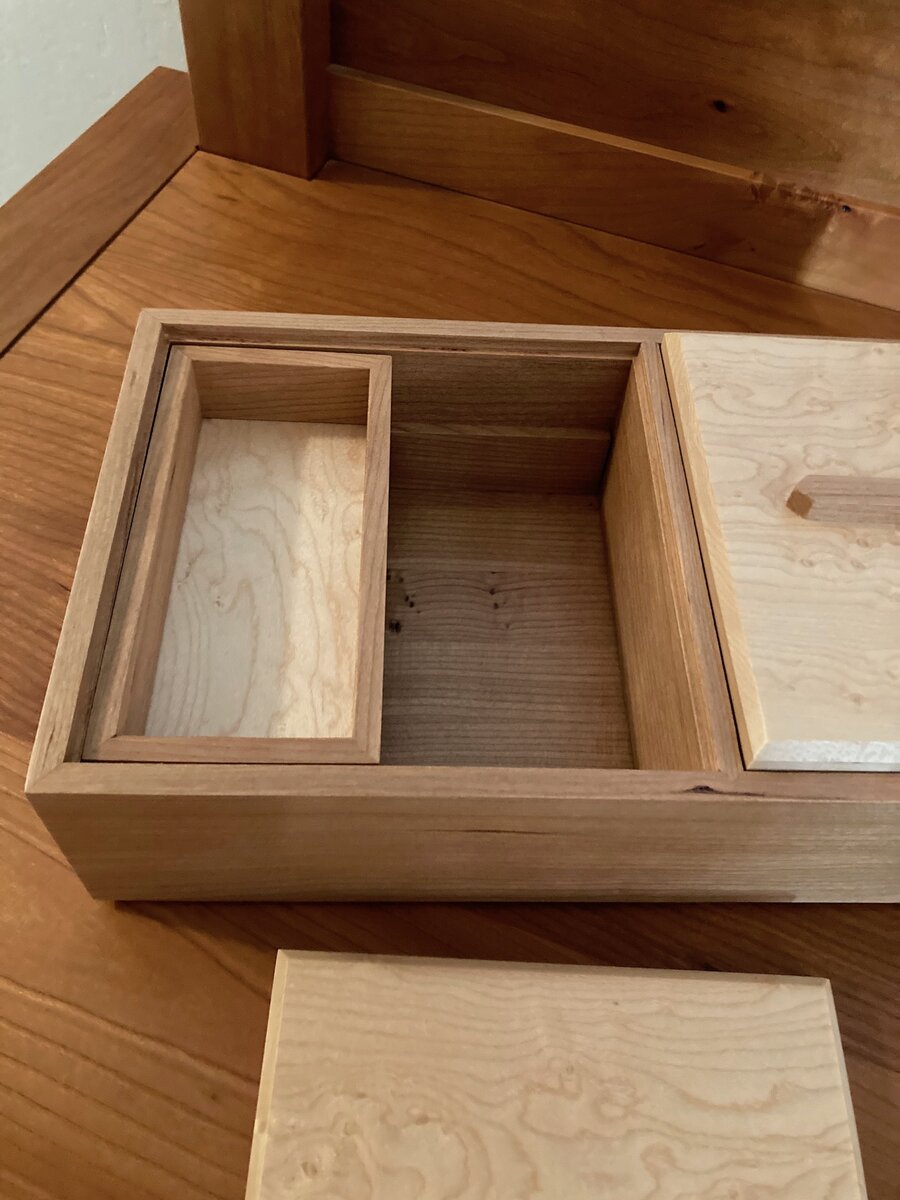
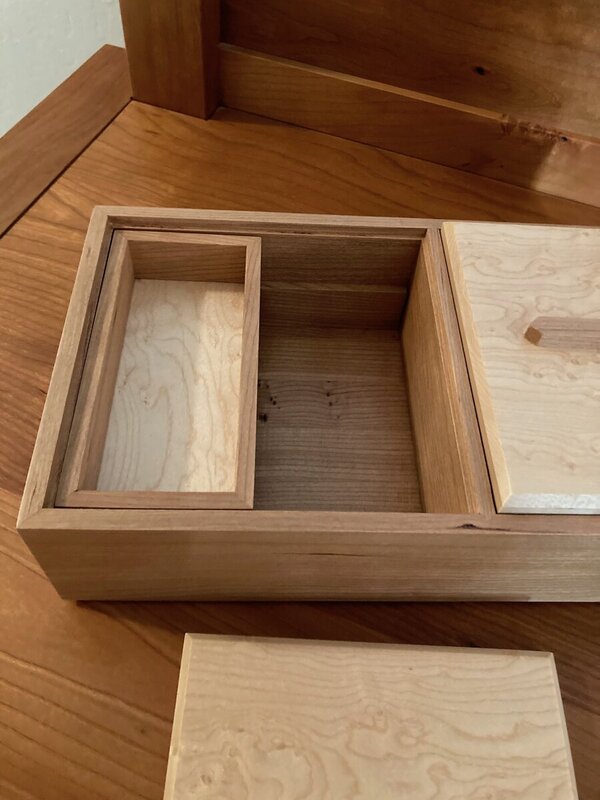
I made this Sepele box because I wanted to try some different ideas. The top is shaped with a spoke shave, the indent in the lid was done with a core box bit and the the joint for the dividers in the box was done with a vee groove bit. I had seem Matt Kenney do this and thought it looked a little more elegant then a regular dado and the angles match the angles of the mitered corners. The lid handles are Wenge. The finish is one coat of blonde de-waxed shellac and a top coat of EnduroVar. Close up of the eve groove. This second box is from a class I took through the Austin School of Furniture Design taught by Matt Kenny. I took the class after I built the Sepele box above. I wanted to take the class for two reasons. First he was teaching how to get the grain to match or follow around all four corners of the box and also I just wanted to pick up on some good tips and techniques for building things of smaller size. The box is Cherry with a Bird's Eye Maple lid and was finished with the same schedule as the other box. Comments and helpful criticism more then welcome.


-
Off topic here. I got tired of this merry go round. The last printer I purchased I got away from the ink jet and went with a laser jet. I have had it for about 5 years and it just keeps chugging along. The other plus it the toner is way cheaper then ink. High yield cartridge cost me $55 prints close to 3000 pages. Last time I replaced it was April of 2018 and there is no clogging of ink nozzles.
-
The only thing I will add is from what I see that is some really nice straight tight grain. Perfect for a door and it looks like it has some nice and differing color to it, that should look really nice when all finished.
-
I would hand carve a picture frame out of Lignum Vitae with a dull pocket knife before using that stuff.
-
Yea the thing I mentioned above was something I heard on this old house many years back and they were talking about fitting door jams in homes with lathe walls was a little different then with sheet rock. After I posted I started to think that I may have missed what they were talking about, and it was a long time back so forget what I said. ?
-
The groove on the back of jams had something to do with door jams and plaster and lathe wall construction but most things are sheet rock these days.
-
The pulls look like they worked out well, flush and functional.
-
Thats down right nice work Ken. Looks like walnut for the beadcock around the drawer fronts, correct?
-
Well first off I don't have to use it for an assembly table.? I clean it probably twice a year using a Scotch Brite pad with mineral spirts, wipe it down and then put a coat of Johnson's paste wax. I wax it pretty often. If friends or family are in the shop I am not shy about asking them not to lean on or put anything on any cast iron surfaces.
-
I use kind of a combo of Coop's shims and Bob's double stick tape.
-

Split Top Workbench (Not really a Roubo)
Chet replied to Woodenskye (Bryan)'s topic in Member Project Journals
I would only sand to 120, for the same reason Kev mentions above, you don't want it slick. -
We have a "legal" disposal depot not to far from us, about 3 miles. You can take a lot of different things there. Partial paint cans, solvents old propane bottles. I have an old empty DNA can and I pour the old stuff in there and when its full I run it to the depot.
-
A little denatured alcohol, soapy water, water. I have heard folks say that it is best to finish you clean up by spray the solvent for the next thing you are going to spray through the gun last. I think i first read this in Jeff Jewett's book So if you knew that the next time you used the gun, the first thing you were going to do was spray shellac, then when cleaning it you would spray a little DNA through the gun last. I think this thinking is more for a gun that is close to constant use I don't think it matters when the gun is stored for a period of time. I would add that the DNA that I spray through after shellac, I spray into a glass jar and save it for next time. I have used it for cleaning up to four times. I usually us it until it starts to darkening from "clear" then I discard it.
-
I am glad I spent your money well. For water borne I just empty the cup, rinse it a little fill, it about have with soapy water spray it out, fill it with clean water spray that out, take all the pieces apart lay them out to dry on a towel then reassemble it for next time. Easy peasy.
-
That came out nice Kev. If you need a plate engraved for it just let me know.
-
You could also have a half moon cut out on the bottom piece of your case right under each pull out then you could put a small recess in the bottom-front area of each pull out to grab with the tip of your finger.
-
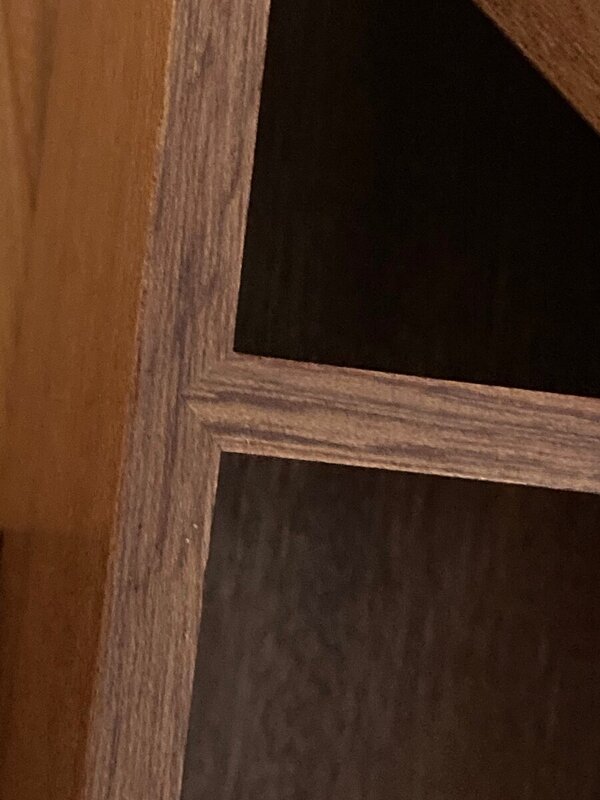
The fact the the door is going to have glass in it, I think I would still go with a double mortise and tenon just for some piece of mind. I don't know how much heavier glass is then wood panels but I do think it would be heavier. So I think the double mortise would give you more strength and help with any possible racking.