Every purchase made through our Amazon Affiliate Page helps support this site


Woodenskye (Bryan)
-
Posts
2,097 -
Joined
-
Last visited
-
Days Won
62
Content Type
Profiles
Forums
Downloads
Gallery
Events
Store
Articles
Blogs
Everything posted by Woodenskye (Bryan)
-

Cutting board and CNC, it's like PB&J
Woodenskye (Bryan) replied to Woodenskye (Bryan)'s topic in General Discussion
I have no clue what this would cost to buy, but there is absolutely no way a knife ever touches that board if I owned it. -
This isn't a debate thread about whether CNC is woodworking, but doing cool inlays in a cutting board, goes together like Peanut Butter and Jelly. This guy does some cool stuff. This is the second design he did and I think it's really cool.
-
It's not hard to imagine Coop setting up a lawn chair at the mailbox waiting for his Pandemic Stimlus check aka Spanky Lumber Fund.
-
This will be some well traveled lumber, hopefully the extra 1,000 miles on the expense report doesn't cause to much of an issue!
-
That's a quality board! I don't even need maple, walnut, and cherry that fancy. If only I had a trailer, the place to store, the money and the time, I would be making a road trip to see Spanky!
-
Kev, thanks for the response. I probably won't hit on everything you typed. 1) if I add a tail vise, it will mostly be the LV like you used, not the benchcrafted. 2) the base and the top are flush in the design. 3) the material I have on hand is just under 8/4 so I'm going to shoot for 1 1/2, I know going to 24" would eliminate this. 4) I downloaded the plans and watched the videos again the other night. 5) I think I will adjust the offset from 15 - 3 to 12 - 6.
-
Chet, thanks for the reply. I have seen your bench so no need for a picture, plus some guy did a video retrofitting your bench with a leg vise.
-
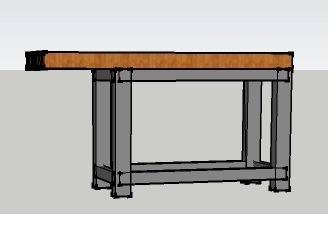
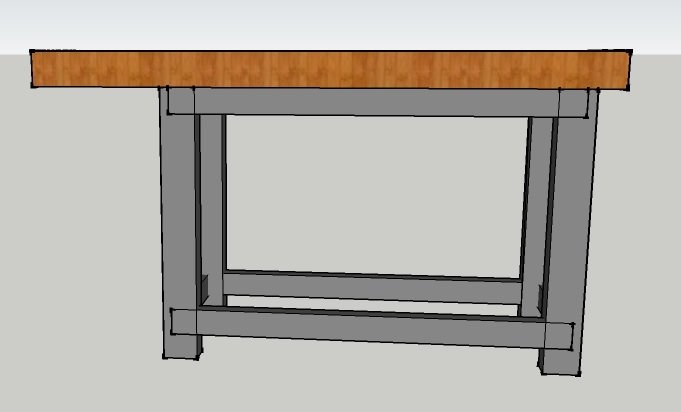
Instead of creating a new topic at this time I figured I would ask my questions here. If I remember to take pictures maybe I will start a journal. A little aspect of design. I have done a sketch model (crayon drawing may be just as good) up of a split top bench (Like Kev did with his son), the base is going to be 48" X 22". The top will be 66" long which is about the max I can really dedicate. I am planning on the top being 4" thick. but may go 3" So my questions: 1) Would you center the top evenly, this would create a 9" overhang on both ends of the bench? Or would you offset so 1 side is 18" over and the other end flush? My last thought was to have 1 end offset by 15" and the other side would hang over the end 3" See 3 Photos 2) I believe I have enough wood on hand to do the legs at either 4" x 3" or 5" x 3", what would most people prefer? 3) My plan based on the 4" top is to do a 2 inch tenon on each leg into a mortise on the underside of the top. Is this overkill or would 1" suffice? 4) So if I can do each board for the top at 1 1/2" wide, I will need 12 boards, plus I would need two 1" boards near the gap in the middle to accomplish 22" wide bench. The gap is planned for 2" at this time. Would I be better to ditch the 1" boards near the gap and make the gap basically 4"? Let me explain the stretchers in the images below. First I messed up in sketchup and this was my work around. Second I am either going to mortise the stretchers into the legs and maybe some type of mechanical fastener or do a dovetail (not sure I will have enough material should I F it up). Fire away with any suggestions. and if I am delusional about my plan just say it! I forgot - I am going to use my grandfathers vise that I just restored as a front vise. I am trying to future proof should I ever want to add the Benchcrafted or Hovarter Leg vise and maybe a tail vise down the road.

-
Hey Spanky. Maybe you need to take a nice piece of maple and tap that boy from Houston where the good Lord split him!
-
I'm trying to get my bench started. I got my grandfathers vise restored over the course of the last week. I downloaded Kevs plan for the bench he and his son built. The plans are excellent. I just need to narrow down what style I like.
-
She's appreciated by me. She works in NYC and the hospital changed her schedule to 12 Hour days, she gets home and basically self isolates until her next shift.
-
It's been removed.
-
Chet this is like Deja vu, I think I moved the post you did on podcasts at the old place yesterday. I may delete that thread this is more complete.
-
Great Job Chet! Giving to the nurse across the street is a great idea! My GF is a nurse and a lot of them are feeling under appreciated at the moment.
-
@Kev See Drew's comment about URL on Facebook page
-
No link, Kev just provided the name: Kev's Woodworks If you search and can't find maybe Kev will leave a link. I am not a FB user.
-
Thread transferred from previous forum - Original Post by Woodenskye Original Post: So the other day I needed to take apart an old treadmill, then was going to have to assemble a new one, but this should make all projects easier in the end. I have tools (wrenches, sockets, screwdrivers, etc.) in 4 different locations, not counting the shop set. So this afternoon, I gathered everything up and consolidated into 1 tool box. Felt good to get this all organized. Now hopefully I don't have to go out and buy a new set of Allen keys cause I don't know where the 3 previous sets I bought were. Follow Up Posts: 1) Lol.. I did this with the new shop build, and you're right! It is nice to have the organization! I have a set of "what I need" in my shop and those items are never removed. Nothing worse than needing something in the shop and I can't find it because a family member has a project and grabbed one of the shop tools. I also have a roll away box that lives in the old shop with a complete set of tools for general use. And, I also have a small tool bag that lives in the house with some misc. stuff like a tape measure and some screw drivers but, nothing elaborate. I've told the family that if they lose what's in the old shop or the house that they need to replace those items. The shop's tools are not a replacement for those items. Now, if something comes up (non shop related) that I don't own a tool for, I may use the shop tool to get that task done but, I'm usually pretty quick to make a trip to town and make sure that that tool lives in the general box for the future. 2) It seemed like life got much better when my two kids moved out on their own about 18 years back. My shop also has my roll around tool chest so everything is in the shop and no matter what the project is or where in the house or if it is a multi day project, at the end of the day everything is back in its spot. Kev used to yell at me because I would put something away that he was going to still be using sometime during the day. 3) It was all with love @chet! 4) Both of you guys would literally throw up your hands and go get a beer if you were in my shop together with me. But I guess my habits were sort of a reverse influence on my son and daughter as they are supper organized. 5) You're never too old to learn new tricks Coop! 6) Always open unless it’s something like Facebook.
-
Thread transferred from previous forum - Original Post by Kev Original Post: Just curious what everyone's using to get their fill of woodworking stuff? I've been fighting myself to expand my social media footprint. To be honest, I'd rather be in the shop than spending my time on social media but, it's something I need to at least consider if I want to meet my retirement goals where I can do the woodworking stuff more full time.. would love input from the group! That includes those that are lurking and reading. It's quite possibly you folks whose answers are the most important. Follow Up Posts: 1) Instagram is the only real social media I use. I thought about Twitter but I know I would type something to get me in trouble. I would suggest Facebook but that has its own issues. 2) I ‘m just too darn old for that stuff. 3) I am like Bryan, I have been doing a little with Instagram. I have pretty much left Facebook in the rear view mirror. But in reality I have been sort of getting a way from all things electronic and just doing more in the shop. But I am not on the same path with my woodworking that you are as you think about retiring 4) Admittedly, I am on the old end of the spectrum and my advice will be outdated yesterday. Tonight, we signed up with Xfinity and nothing was said about the little key bob that we had with with ATT&T. When I asked, he laughed and said that I will use my smart phone. I thought it was for phone calls and pics? 5) At my age, I'll be dead before I could figure out how that stuff works.
-
Transferred from previous forum - Original Post by Kev Original Post: I've received more than a few questions around how I'm able to accomplish as much work as I do. It's a fair question. For those that don't know, I work (primarily) in the oil and gas industry working turnaround to turnaround. A turnaround is simply where a particular refinery brings units down for required maintenance. This usually means that they last from 4 to 8 weeks. This in turn means that I could be on the road from 5 to 9 weeks for a typical turnaround. This is also where I've had the awesome opportunity to spend some time with some of you! So, how do I still complete a video a week? Careful planning on my part to be honest! My reality is that I might get a month home here and there and that equals a lot of dedicated shop time for me. When I'm on the road for work, I'm in constant communication with my wife and various clients about what the upcoming builds will be. Obviously, client project projects come first but, the wife's requests come a very close second! I usually start in the shop the day after I get home but, have been known to go to my HW dealer on the same day I get home to pick up materials for the next build. From there, there's lots of long days in the shop where I work on these projects followed by lots of late nights getting the video edited for release. An average 12 hour day in the shop usually gets me about 5 minutes of useable video. So, the hope is that I'm home long enough to get enough video to cover me when I head out for the next job. To put that in perspective.. I was home for just shy of a month after the last job. In that time, I built the display case, entry level bench, entry/hall table, and the floating picture frames which have not even been released yet. And, of course, my wife is grabbing footage one the new shop going up while I'm gone to show you guys that process as well. This is really why I've recruited Mel to help me out with the design work as I just simply don't have time to pull this off as well. So, if I release a "hiatus" video, it's merely because I'm on the road for work and have not had any shop time at all. I still try to release a video each week but, sometimes the day job just gets in the way. I don't do this for money, there are no sponsors, I'm not asking for money on patreon, etc.. I do this purely because I enjoy it! I really enjoy taking you guys on my journey! Thanks for your participation in this forum as well as following me on YouTube! For the record, I'm not making any money there either as I don't have enough followers. Maybe one day I will and can count on a few bucks in my retirement but, that's still a little ways off. For now, I just enjoy making the content, having fun with the projects, answering your questions, and growing as a woodworker! I hope that explains the common question and I welcome the questions and reactions that follow. Follow Up Posts: 1) Thanks bud for taking the time to explain this. Although we know you love this hobby, you’re posting the videos, running this site and Admin of WTO have got to be demanding and we appreciate all you do and the patience of your wife as well. 2) I Appreciate it Coop!
-
Thread transferred from previous forum - Original Post by Kev Original Post: Are we going to look back in 20 years and say the same things about live edge stuff as we do about 70s style furniture and design? As furniture designers, should be be steering clients (our ourselves) away from live edge stuff for this very reason? Does this leave room for being "creative" with our designs? Does this also count for the current rage on the river table stuff with the epoxy inlays? Just a variation on the live edge stuff really. Thoughts? Follow Up Posts: 1) Talking clients out of choosing a piece that may be a fad is not good for business I'm not a fan of live edge. It's ok in certain circumstances, but it is so overdone there isn't room to breathe. 2) I am not a huge fan, I think it needs to be in the right setting to work well. It is being over used, just like epoxy River tables in my opinion. Now if I was doing this for a living, whatever the client wants is fine as long as the check clears. 3) I don't do any client stuff but it would be financial suicide to steer a customer away from it. And if it is a fad it could be repeat business when they get tired of it and need something to replace it. Live edge isn't anything I would do for myself but I did have the opportunity to see a liquor cabinet that Mel did for one of his customers that had a live edge top on it. It added to the piece but it didn't demand to be the center of attention. I could almost go unnoticed in general passing. I don't know if it was his idea or her's but it was very well done. 4) I met a gentleman several years ago that specialized n milling and making live edge tables for big oil companies. He ended up milling several logs for me that I had cut down and am still using the slabs to this day. He had several pecan slabs, trees downed due to new home building, and offered several for sale. As our den is pretty rustic, cedar and stucco, we needed a coffee table and I bought one of his slabs, bark included. After much sanding, grinding and rasping, I now have a live edge coffee table that fits well in it’s environment. Been there, done that. But still glad I did. 5) I don’t sell many live edge slabs. But, I can’t cut the big super wide slabs. What few I do sell are black walnut slabs. I think, there will always be people that will buy a few.
-
Thread transferred from previous forum - Original Post by Bushwacked Original Post: Video just came out but I’m curious if his way for panels is the best way? It’s a great looking desk design though and may have to borrow some inspiration from it for my desk build next year. I’m thinking possibly 3/4” frame and then 1/2 walnut ply and dado them in so they are flush on back and no need for pocket holes just some glue and brads and a 1/4 reveal on the front. Follow Up Posts: 1) Simple frame and panel construction. I would disagree that it is a great looking desk, the middle section (to many stiles) and the opposing grain direction makes it look cheap in my opinion. 2) I agree on both points 3) Beauty is all in the eye of the beholder. Have you picked up Marc's Guild project and looked at that desk? If I wanted the look in your example, I would be tempted to do it in one sheet of ply and affix fake styles to achieve the look you want 4) Kev, what’s your opinion on the front panels runnIng horizontal? I agree on the eye of the beholder and I am definately not one to consult on design but to me, it looks like the left and right panels should have several drawer pulls on them. JMO. 5) Wouldn't be my choice but, if the grain lines up it could look ok.. Especially on the back of the desk. More difficult on the sides and fronts. 6) I’m going to call an “Eric” here, not my normal. This thing just screams, “ hey, I’m made of plywood”! Again, you’re right, just a matter of opinion 7) I don't disagree but, what if that's what you wanted? 8 IKEA? 9) Design is subjective, and if this was a commissioned piece and what customer wants then they are right. One of my biggest complaints about things like this are walnut vs walnut ply always looks mismatched. Around me, walnut ply is $100, I could do 1/2" hardwood panels for about the same price and get a better grain and color match. Unless you are really good at finishing it looks like a cheap plywood mass produced product (IKEA). Personally I think if you were going to use ply, cherry and matching the grain direction would have been better. 10) I did go look at this video last night and he's pretty outrageous on his pricing IMO. There's no way I'd pay that for sheet goods and pocket holes 11) So what are y’all thinking the wood choice would be? Walnut play and maple/cherry frame? Or vice versa? I would assume 1/2” hardwood panels would be a lot of movement to have to deal with ... no? On the back bridge looking middle piece I would probably only have 2 “style” pieces and cut out the one in the dead middle. 12) His was all walnut.. His really shows the contrast between ply and solid. Doesn't mean it has to be that way tho. I don't recall if he listed sizes in his video but, you're probably in the ballpark. If you're doing floating solid panels, just be sure to leave room for movement in the dados. 13) I don’t think I would bring maple into this build. Maybe cherry panel with a vertical grain with a shellac base and walnut frame. 14) Hmmm cherry and walnut. Haven’t thought much about that combo. Should look good
-
Thread transferred from previous forum - Original Post by Kev Original Post: New FB page if you'd care to join there.. Just tossing it out there. Kev's Woodworks
-
Thread transferred from previous forum - Original Post by Coop Original Post: I’ve polled a couple of guys on this but would like everyone’s opinion and it might be helpful for others in the future, faced with this delima. I’m going to order some boards from Spanky and they are currently 10’ long. This is his first time to ship and he called UPS and FedEx and the longest he can ship, standard freight is 7’. I will check with other freight carriers tomorrow for charges and restrictions. Question to you guys, given the 7’ limit and with your woodworking experience, would you have Spanky cut these at: 1) In half 2) 6’ x 4’, 3) 7’ & 3’, 4) other, 5) pay the extra fry. and ship the 10’? Follow Up Posts: 1) Coop and I have talked privately on this issue and I encouraged the public post so everyone could benefit from the conversation. I'd really like to see Mel chime in because I know he's done a bit of shipping. 2) I've never shipped wood before... I've bought a bunch from the local places (local meaning in state), and they have their own trucks. My guess would be that the quicker you need it, the more expensive it will be... If you don't care about it getting there in a week or so, try U-Ship... There is probably a guy headed your way that would pick it up for cheap. 3) UShip is probably the best option. The other thing is maybe call a company like Bell Forrest and see if they have restrictions on length and who they use to ship. If it absoulutely had to be broken down, I would probably go with the 6' and 4'. 4) I too am leaning towards the 6’ & 4’. Thanks both of you for the UShip idea. I’ve never heard of it. 5) The other option Coop is if you call one of the national moving companies they may be able to complete a truck that would be going your way. 6) I’ve never ordered wood before and am still trying to conceive what the mass and weight will be. Picking it up and throwing a board over your shoulder and taking it to check out has been my norm. This indeed will be a lesson. I’ll update when it arrives. 7) I'm just being curious about how you solved your wood shipping? 8 I haven’t acted on it yet. To ship 8 ea. 10’ x 8” x 1” boards, approx. 120 lbs. will cost about $350. I really don’t need them and can probably get them here as cheap total, but I’ve seen them in person and they sure are sweet. I like working with qtr. sawn syscamore and one of my suppliers doesn’t carry it and the other calls it exotic for some reason and the few crappy pieces they have go for $12.50 bf. 9) Thanks Ken. I was just curious. I ship wood all over the country but nothing over 48" long. UPS tacks on an additional fee for packages over 48".
-
Thread transferred from previous forum - Original Post by Chet Original Post: I have a question for the group. On another forum a member is working on a couple of mission style end tables and in the conversation he mentioned cutting his mortises with the router and squaring up the ends for the tenons. The member that is making the tables is somewhat new to the hobby and I thought I would share another way of doing the same thing that he might find faster. Instead of squaring up the mortise you can round over the tenons. Here comes my question. Another member stated - “Honestly rounding isn't worth the time, chop the tenon narrow enough to fit and leave the rounded mortise sections empty they don't contribute noteworthy strength to the glue up”. This is the second time I have seen him say this, the first time I heard him say this he said that he came up with this theory because the domino has a setting for cutting wider slots. I thought the wide setting on the domino was to allow for movement in something like breadboard ends. It seems to me that leaving a void like that is going to make the joint weaker and in the case of when he is telling this to a newb, I would like to rebut, but I myself have no scientific or mathematical information to back my thinking up. I personally cut mortise and tenons three ways, I rout the mortise and square the ends with a chisel to fit the tenon, I rout the mortise and round the tenon to fit the mortise because this is a little faster and I use a domino at times because it is real fast. It all depends on the type of project and how I feel at the time. I use these methods because they were taught to me by people I considered more versed then me at the time of my education. What say you. Follow Up Posts: 1) I have used your 3 methods, what you mentioned was posted doesn't seem to make sense. The only thing I could come up with is if the mortise is bigger than the tenon, the piece isn't connected and the glue will not have anything to bond to. This is a completely dumbed down example, but if you had a table with PVC pipe as the legs and a smaller pipe attached to the table top that slides into the legs, where is the connection? Maybe I'm not thinking clearly on this. Edit: after reading the thread I think you are talking about, I can see the point he is trying to make, but you will always end up with a tiny gap, will you see it, maybe not, but getting tight fitting joinery is a good feeling. 2) The pvc is a good analogy but there is very little contact between the two as they are round. Chet, I’ve often wondered the the same, is is it worth it to round over/square the joints. Great question. Personal opinion without merit, I think if you have sufficient long grain to long grain contact, the minimal gap on the ends shouldn’t make a lot of difference. 3) From a strength standpoint, cutting the tenon short is probably fine. Those big flat surfaces for the glue is where the strength comes from. This is provided that you didn't cut the tenon too short where the joint could wiggle loose over time. Now, with all that said, I still prefer tight fitting joinery rather than doing a sloppy job especially on a client project!
-
Thread transferred from previous forum - Original Post by Kev Original Post: I think this sums it up perfectly!