Every purchase made through our Amazon Affiliate Page helps support this site


Woodenskye (Bryan)
-
Posts
2,096 -
Joined
-
Last visited
-
Days Won
62
Content Type
Profiles
Forums
Downloads
Gallery
Events
Store
Articles
Blogs
Everything posted by Woodenskye (Bryan)
-
Thread transferred from previous forum - Original Post by Bushwacked Original Post: Does anyone use something like this? Many times it would have been nice to have something flat. I have plenty of square I can hook on an edge. www.leevalley.com/us/wood/page.aspx?cat=1 Follow Up Posts: 1) You might try here.. I've bought many squares here.. www.harryepstein.com/index.php/ 2) Yep, every square I have in the shop came from Epstein's. 3) I have that exact veritas square in 6". I use it more than any other square I have. I have 8" woodpecker, 2 different 6" combination squares, 2 4" squares and the veritas is by far the one I reach for the most. 4) This is the square that I most reach for in my shop.. Great price on these as well! www.harryepstein.com/index.php/6-double-square-4r-usa-40675.html 5) Took your word for it. Mines on it’s way. Thanks 6) I think I have about 4 of them...lol 7) I have one of the 6 inch like your's and 3 of the 4 inch, one of which stays in my apron pocket. Its nice to have multiples when laying out mortise, tenons, or other layout work. It's nice to have each set up with a different measurement instead of having to change one back and forth. 8 I’ve had a stainless 24” ruler for years and it has suddenly disappeared. I don’t recall where I got it or the name brand. Since it was close in color to my ts top, it has disappeared before by blending in with the top. Do any of you have one similar that you just can’t do without and where did you get it? 9) I have several and I really like them all! You guys know me, they all have a home in my shop and that's where you'll find them. Unless I'm mid project and need them at a particular setting, then they sit with the project. 10) I received mine yesterday and it’s a neat deal. I can see where having a couple of these will come in handy! 11) They're really great squares and hold up well!
-
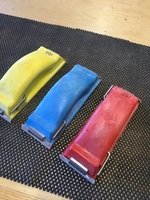
Transferred from previous forum - Original Post by Chet Original Post: I have had these sanding blocks for about six months and I have had time to use them on a number of different projects. With ROS sanders and such now a days you don't need sanding blocks as much as in the past but when the occasion arises I am happy I have these. They hold a 1/4 sheet of sanding paper and a nice feature of this particular block is that it will hold multiple pieces, so you can cut the sheet up into fourths stake them up and clamp them all in the block at the same time. When the sand paper is worn you just tear it off and continue on with your work. They come in four colors which makes it possible to use a different color for each grit. The pad is firm so you can work close to the edge of things with out rounding the corners. I find the grip to have a nice feel to it and I think any size hand would find it comfortable. I got these at Tools for Working Wood for $21.95 each. I know you can get them at amazon and other places but I don't know if they give you the opportunity to select different colors or if you are stuck with the luck of the draw. www.toolsforworkingwood.com/store/item/MS-PREPWEA.XX/Preppin%27_Weapon_Sanding_Block Follow Up Posts: 1) Chet, I’ve had one of these for years and fought with others that have the little “nails” type guys for finer grit. I finally snapped and chunked the nail guy and use these exclusively.

-
Thread transferred from previous forum - Original Post by Tmize Original Post: So I finally after a serious inner battle with myself. I pulled the trigger and bought a red square. Being in construction my whole life I choose there carpenter square to start with I ready have 3 or 4 that I use quite often right up to when I need it to be super accurate. At that point I have several different combos that I’ve checked to be true. I my just be but seems I’ve always gotten better registration with carpenter square when pulling a knife line across it. Follow Up Posts: 1) You'll be happy with that square! All the red stuff is over priced but, it is nice stuff. I use that square quite often especially on large glue ups! 2) That’s what I’ve always been told. I was also thinking I could use it on my shooting board for quick miters 3) I find it interesting that you see a lot of red stuff hanging on shop walls of some of the more well known content producers but you never see it being used. The one that comes to mind is the T-square, I don't think have ever seen on of those being used. I have one red item, well maybe its three. I have three different sizes of the centering rule 6, 12 and 24 inch. I use at least one of them on almost every project, mostly I use it to find the center of my stock for tenon layout. I would like to get the 6 inch Paolini pocket rule but the shipping was almost or as much as the rue itself. 4) Hmm.. Jotting notes.... I use them a lot but, don't recall if they're on film or not.... To include the T 5) Ya Kev ... Mainly I see you squaring things up with the red but I think that's about it from what I remember. I guess one of the main things is marking and all that isn't sexy for most viewers so I guess the bigger guys leave it out? Also never heard of the Paolini pocket rule and looked it up... Looks like a pretty cool little ruler. Especially the height adjustment part on the end Also Chet are you sure you entered the right info? My shipping would be $4.37 on it. 6) Not to hijack the thread but, it's hard to decide what video footage goes on the cutting room floor and what lives in the video.. To put it in perspective, 8 to 10 minutes of produced content usually represents 10 to 12 actual hours in the shop not including editing time. It's not so much what the "bigger guys" leave out. For me, it's more about putting in relevant content. Marking and sanding, I think, are just time fillers as it's stuff we all do regardless of skill level and don't really struggle with. Back on topic, I absolutely love the big square as well as the T square and use them quite often. I really make a concerted effort to not purchase tools for frivolous reasons like "they match my collection" or, "I must own them all". There's been a couple times (like the rest of us) that I've bought a tool because "it's all the rage". When I found myself not using those tools, they were given away to another woodworker. The Gripper is the one that jumps to mind. Of the red tools that I own, the Paganini squares are on my short list for giving away. I thought I would incorporate them quickly into my work flow and that just hasn't happened. I also bought the panel gauges but, haven't had much use for those either. I'll give them a bit more time before giving them away. 7) I googled Paganini squares and found nothing but a French musician lol ... 8 I looked at the palino rule ( however it’s spelled) I went the stop rule from LV. And it’s great for tool layout and setup. And third the price. It’s heavy tho I’ve got smaller one and I bet it’s 2 pounds or so 9) It doesn't hurt to show every once in a while, you never know when you do something (technique) that somebody hasn't seen before. I was watching something on Philip Morley's site the other day and saw him do something I had never seen. What he did might not be news to millions of wood workers but it was a new one for me. Okay, I just went back to the Woodpecker site and the shipping is a lot cheaper but the rule is a lot more then it was. When I first looked at it, the rule had just been made a regular item instead of a one time tool and the price was around $23-24 and shipping was somewhere around $13.00. I was so baffled I showed my wife the shopping cart to see if i was missing something. Good news is I have gotten over even wanting the rule. 10) Funny, I can't find them either.. I'm sure I probably spelled it wrong which doesn't help.. I'll be home in a couple days and will snap a pic. 11) When I thInk of a t square, I think of the 24” x 54” that I have from HD that I use to cut Sheetrock. Aside from checking the squareness of an end of a piece of ply, where else would one come in handy for a woodworker, especially if you have a track saw? 12) First off, I've never seen one of those drywall t-squares that's actually square I use mine a lot for marking across panels for things like dados. 13) Ok, that makes sense. And yeah because drywall is usually all I use it for, it doesn’t have to be that accurate cause my cuts sure as heck aren’t ! 14) It’s kinda on subject but a video on layout would be great. I know with me I use the pieces themselves when I’m building an anytime I try a measure anything it’s always off by a hair. Or try an translate it to the router table or table saw fence I mess up some how which is a large reason to doing my joinery by hand instead. For my it easier to bring the tool to the work than to transfer marks to line up on the tool. If that makes since 15) Paolini. They might be a reoccurring 1 time tool. I have the 1280 square and it good, I almost stole it. I went to the counter at a Woodcraft and asked how much and the guy was like how's $40. I quickly said sold. 16) That’s where I got mine thru but online I just use promo code comeback to get free shipping all the time 17) Pulling what you need directly from the piece (relative dimensioning) is always the best method regardless of how the piece is being cut. 18) I just tried that code "comeback" and didnt work for me 19) I’ve used it the last 3 times I’ve ordered from them. I put a few thing in my cart and just closed out of the site. Well they sent me a couple email reminding me of stuff in my cart. Then after about a week they sent me that promo and has worked every time since
-
Thread transferred from previous forum - Original Post by Kev Original Post: My youngest son is just starting out with woodworking. He's a starving college student so, really has no money. To his credit, he does work and go to school so, maybe has a little money. After long discussions with him, I've talked him into starting out with hand tools. They're going to be more budget friendly and much easier to store in his current rented environment. The downside is, as most of you know, I'm not really much of a hand tool guy.. Yes, I own them and use them when needed on projects but, I don't start projects with the intentions of doing it all with hand tools. That would just be plain silly! Here's what I recommended to him for a starter set up that will last him a while. Veritas - LAJ and Smoother LN Rabbet Block Plane Veritas - Three saw set - DT, Rip, and Carcass Narex Chisel set And, of course, I'll help him with the bench. I'm sure some of this will show up on his Christmas list. Thoughts from the group? Follow Up Posts: 1) With the bench you are building, what are his work holding options included? I would also say a shoulder plane and card scrapers as well. I know you mentioned LAJ, but A jointer plane would be a good choice, but really this depends on where he can buy lumber (rough or S3S) and projects. Ripping lumber is tough when first getting going. A membership to something like Shannon's hand to school or similar may be useful as well. 2) He'll have a front vise and a tail vise, round dog holes, and a split top so, work holding abilities should be good. Going with the LN rabbeting block over the veritas was the reason the shoulder plane wasn't on the "starter" list. As for the lumber, I'm not really sure what he'll have available to him but, worst case is that he can work pine to get the hang of things. Good call on the card scrapers and the hand tool school. I know that he follow's Shannon's free stuff so, that might be a cool Christmas gift for him! 3) Two things that might make this a good start. Lee Valley has norton tons that are cheaper then the Shaptons. They are duel grit, one is 200/1000. The 200 isn't real necessary unless you really mung something up, but it is attached to the 1000. And the other is 4000/8000. Of course if he could get his dad to polish up the back side of everything he could get by with just the 4000/8000. The other thing would be the veritas Mark II sharpening guide. He might need something to whack the chisels with on occasion 4) We did have a lot of discussions around sharpening.. I gave him a Fastcap system that I had and never used. Figured that would at least get him going until he could get into better sharpening options based on his limited budget. 5) I should also add that he has a circular saw and a jig saw.. Neither of them the greatest but, he does have them 6) With him having the circ saw some sort of a long straight edge could be nice. Might make initial rip cuts on some stock easier then the hand saw. 7) I know this is mostly about hand tool setup, but I think a bandsaw should be included. The footprint of a 14" saw isn't really big, but it could put a straightedge on a board better than a circular saw, (7" - board width), also could resaw, cut joinery. Also what are his sanding plans? If everything is hand sanding, then I would get him a decent dusk mask. A shop vac would also be a good addition. Kev, just think how a new Laguna 1412 or 14BX look in the new shop to replace the small BS currently in your shop. 8 All legit stuff but, if I hand him everything then he doesn't have the same appreciation for it. It's my dime for his bench and I donated the jig saw as well as the sharpening system. Perhaps when he outgrows these beginning stages and really wants to stick with it, I can offer a little more help in the way of tools. I think he'll then have a better understanding of how he wants to go about his woodworking journey as well. 9) Good point. I would still suggest the BS as an initial tool, maybe over the rip and crosscut saws. With him working and going to school, having a tool that could help him with dimensioning and even some joinery may lead to being a life long hobby. 10) With Kev as his dad, I’m betting this chap won’t starve for decent tools?! 11) I'd say a #5 jack might be a good addition to dimension lumber with two blades. One heavy on radius and the other a regular. Nothing special just an old Stanley. He can of course call back to his dads shop to sharpen the blades but a double sided diamond plate (rough/smooth) and a MK2 honing guide might be a decent addition oh and a bottle of auto window cleaner (a tip I learnt from Paul Sellers) to lube. 12) Only thing I would add considering my low budget start an still going is an plow or combination plane. When I finally got my Stanley 45 it opened up a lot of doors into types of projects then. It amazing how much of what we make has a simple groove in it. Now it’s possible with a saw an chisel I’ve done it just so much easier.
-
Transferred from previous forum - Original Post by Tmize Original Post: So over the past month or so I have kinda been bite by the LN bug. I already had their dovetail saw and it true a straight out of the box. It start simple and innocent by needing a la block plane so I bought the bronze 102. It is a amazing plane by the way. Then I got to thinking I needed a couple in between size chisels so I bought 3/8 and 5/8. I got them an that was another eye opening experience over my Narex and vintage collection. So I had to have my two more in my more common sizes 1/4,1/2. Now it’s been a week since my last purchase from them so I ordered the 71 router plane. So I’m guessing this is my first taste of high quality tools. So am about to have a full shop of bronze or will this pass? Follow Up Posts: 1) Will it pass, nope! Good luck to you and the wallet. 2) I have quite a bit of LN stuff and love it! As for the router plane, I will admit that I like LVs version a bit better but, you can't go wrong either way.. 3) I’ve been back an forth on which one to buy for the last couple months. I’m normally a pre war Stanley user refurbisher but the price of a decent one pushed me to buying new. To be honest the deciding factor on the router plane was the LN came with the fence at no extra cost. I was watching a video the other day. The guy was using it to make stopped grooves with it an a light bulb went off that would be so much easier than the way I do it now with a plough plane. 4) Well the LN bug bite me again. I found a 12” 10ppi tip tenon saw pop up on eBay for cheap considering it has been discontinued for 4-5 years. So I had no choice but to buy it right. It showed up today. I havent opened the package yet been chasing kids since I got the bandsaw put together 5) Wow! 2 great cutters on the same day! Nice score! 6) Well I jumped the gun. It happened to be my woodslicer blade. It threw me off being in a flat rate box. Neither was supposed to deliver til Friday or Saturday by tracking. 7) lol.. 3 great cutters in the same day! 8 Tmize, put the iPad down, take the dog for a walk, the kids to a movie, the wife to a nice meal. Anything to break the cycle. Easy for me to say! Congrats bud! 9) So hard tho. I just ordered a fishtail chisel now for all these half blind dovetails I’m doing now and in my near future 10) I have a couple of them and they do come in handy! 11) What size do you find most useful? I got the 1/2” but only because the 3/8 was sold out 12) I don't want to lie to you but, I can't run out to the shop for a couple weeks.. I think I have 1/2" and 1/4". I'll check when I get home in a couple weeks and update.. 13) No big deal thanks tho
-
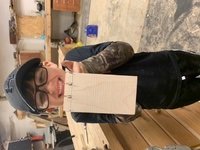
Thread transferred from previous forum - Original Post by Tmize Original Post: I was down in the shop earlier rehabbing a saw. My son was over at the bench just cutting away on a wood(I just finished up his new saw). He said daddy come here I’m having a problem. I walked over and noticed he was cutting triangles out in the top of the board. I asked him so what’s the problem bud he said these don’t look like the once you cut. So the warming of the heart stopped me on what I was doing to teach him how daddy does it. We didn’t use any chisels(he isn’t old enough yet for that sharp of a tool yet) just his saw and a old coping saw I have. Figured I would share this to remind everyone to get a kid in the shop no matter how young they pick up on stuff even when your not looking. He just turned 7 by the way Follow Up Posts: 1) If I was able to go back and look through the ashes, those might be better than my first attempt. 2) Mine to 3) Looks like he is off to a great start and the fact that he started on his own. before asking for help shows he has the aptitude. 4) Boy amazes me at the way he comes up with ways to figure how to do things an fix them 5) That's awesome! Goes to show that kids pay attention to what their parents are doing! Get him an account here and ask him to teach us how he cut such fine DTs! 6) That is super cool! 7) That is awesome! Far better than I could do!
-
Thread transferred from previous forum - Original Post by Tmize Original Post: So a lil background I’ve always sharpened on diamond stones. Even growing up sharpening pocket knives on diamonds. So my planes and chisels I sharpen paul sellers way 1200 grit the strop. Well I just bought a another type 11 Stanley #4 today an i comes with a basically free 4000/8000 grit Norton stone. So any tips or what to expect differently over my diamonds. I know topics like this usually people out of the wood works so bring them on Follow Up Posts: 1) I have the same stones, I keep in a Rubbermaid with water. Also you will need to flatten, not a hard practice, I use a DMT Diamond plate. 2) Same here I have the Norton 4000 and 8000, I also have the Norton 200/1000 combo stone. I think the only thing I wish were different is that they were a little longer, more like the Shaptons. 3) I read somewhere that the high grits it is better not to soak before using just spray with water while using then dry a store til next time. Any one see a problem with it or see a problem a issue with keeping them soaking. I have a piece of float glass at my sharpening station that I was just planning on sticking some 220 w/d paper to for flattening 4) I just re-read Bryan's post. I don't keep any of my stones in water all the time. And it is for no particular reason, I just don't store them that way because of were they are stored. 5) Maybe I am wrong with the way I do it, but I have stored mine this way for close to 6 years and I haven't had any issues. I don't sharpen in my shop since it isn't temperature controlled, keep stones in house so they won't freeze, by keeping them wet full time allows me to sharpen in different locations. 6) I’m in my basement I sharpen a lot an often. It never gets below freezing down there 3-sides completely underground an I cut a couple vents into the duct work so it stays fairly comfortable. An it’s also Alabama so it don’t drop below freezing 4-5 weeks of the year an it’s random couple days here an there. I probably will not keep them in water all the time anyway. I guess it came at a good time I notice last night that my extra fine dmt stone has dished out. I didn’t that they was suppose to do that? I have been having issue getting my slight camber on my smoother iron right witch throws off my whole process so. I remedy it with a lil sandpaper but I hate doing that. So I’m going to see if that is my problem all of sudden or it just operator ?
-
Thread transferred from previous forum - Original Post by Tmize Original Post: Are all engineer square the same type tolerances? I was looking at a set by igauging they seem like a decent set. Just don’t know if this is one of these things get for what the pay for an trust. I could go red aluminum if I have to but if not I could buy more of other stuff. Now I’m not one of those that believes woodworking requires everything to be to the 1/10th of a thou I just need it to be square enough for wood that is always moving more than that. Follow Up Posts: 1) If these are the ones I'm thinking of, I have a set and they're pretty dead on square. With that said, I also have the small red one and that's also dead on square. The small red one is really not that expensive when looking at the red stuff. I'll also add that I just don't reach for the machinist squares much. I have a set of 3 and really only (occasionally) use the smallest one for most set ups which is why I bought the red one. To be completely honest, my set of 3 machinist squares will probably be on my give away block at some point because I just don't find them that handy. If I didn't have any of the above, I have enough trust in my Epstein 4" squares to do the same job. 2) I have the red carpenter square I love it and have 6,12,18” combo square I use fairly often. What I have in mind it’s so much machine setup that most use them for. I’ve noticed I use my red one a lot with marking knife an I’ve noticed it will Nick the aluminum every now an then so I was thinking of going to steel to keep that from happening. The part I like is I can just lay it across the board an put down a knife line and don’t have to mess with adjusting the blade out. Kinda like the old try squares was used. I use my combos for a set decent from a edge like mortises or hinge 3) The Machinist squares would work well for that but, they have no graduations on them so, you'd have to get those marks from another tool. Would make sense to me to use a tool that accomplishes both for you. The bulk of my work is done with Epstein tools for this. Way less cost and really accurate. If I'm using the red stuff, it's usually with a pencil.. 4) Relief to others. I won’t be doing a double entry for the give away as I have a good Lowe’s framing square as my go to. 5) Hey tmize , For what you want the square for I would go to Harry Epsteins website that Kev mentioned. They have top notch engineer squares, PEC are the ones they usually have, and they are pretty cheap because they are blems. Nothing physically wrong with them just a little scratch or things like that that keeps them from being sold as "new". 6) I have a set of iGauge squares. They seem to have good tolerances. I don't think they are quite up to old Starrett, but they seem as good or better than new Starrett from what I could find. The biggest difference I found between them and Starrett is the fit and finish is cleaner on Starrett. The iGauge stuff doesn't move as smoothly, but for the cost I am fine with that. 7) My go to square when i just have to know if something is square is this little steel precision thing that I brought from a machinist shop. Designed for use when welding and doing other metal type work. NOT WOODWORK. It has no graduations on it at all. Cost me a pretty penny but I use it to check my other squares. Its not red either, its a more steel like color, so whatever color steel is then that is what it is. BLUE STEEL! Also all my other squares are steel as well. Aluminum squares are for pussies. . . Either steel or that hard manganese stuff, the ruler part is steel while the body is the other stuff [don't have many of those] My main square though that gets used the most is this big flat steel thing which I have a Varitas do dad attached and screwed up tight so I can run it up against an edge.
-
Thread transferred from previous forum - Original Post by Tmize Original Post: Ok I’m going to do my best to describe this. It’s basically a dado but the first inch or so is dovetailed into the sides. I see it a lot in dividers in casework between drawers. I got a small project I’m starting an want to try out this joint. Also an tips or or how to would be great I think I have it figured out but could always need advise Follow Up Posts: 1) Are you sure it isn't a sliding dovetail the whole length of the divider? Thats a pretty common technique. 2) No I’ve seen D&W cut it in his videos. It’s kind of a cheating sliding dovetail. The pieces I’ll be using are just to narrow to do a full sliding dovetail 1/4-5/16” thick so I was wanting to try this instead of just plowing a dado. 3) If you are referring to the shaker chest of drawers, I don't know what the joint is called, but it could be something he made up. To me it seems he is trying to save time doing a full sliding dovetail for the front and back of the web frames, then did a M&T for the sides. The sides sit in a shallow dado for additional support. 4) doucetteandwolfefurniture.com/Home_Page.html try this link to their website they have videos on the site. Just about all his casework with drawers show the joint for the drawer dividers web frame assembly 5) What comes to mind for me is a half blind type of joint. I have a bunch of joint books at home that i look at occasionally and marvel at how cool they look but have never tried. Knowing that I'll fail abysmally every time since I tried once to make my dovetail joint jig to work and failed. I did end up destroying a lot of wood and a bit of gear in the process so fixed the whole thing with a big hammer and threw what was left in the corner. Then went and played a computer game for a couple of days to get over it. If no one else answers your question I will have a look in my books and see if I can find something.
-
Thread transferred from previous forum - Original Post by Tmize Original Post: So as most of you have probably figured out by now that I love my hand planes. I come across a problem not real long ago with my most trusted Stanley #4. It is hard to explain an wish now I would have taken so photos to better explain now. I would freshly sharpen it put it in the plane set the lateral adjustment to cut square. It cut just perfect down the edge of the board but when planing the face it wasn’t cutting right heavy on the edges none from the center on super light cut. So I’d stop do some troubleshooting check the board for bad ripples or serious plan tracks left from my jointer (#7). The board was fine so I would start checking the plane normal culprits chip breaker clogged, shaving stuck to the bottom of the plane, check the lateral adjustment again no issues. I’d pull the blade out an check the camber it was there. I don’t camber much on my smoother. So I would sharpen it again no change. So I did what any 21 century woodworker does google it ?. Internet almost let me down but deep down in my search like the 4th page down there with the so far off topic crap it’s not worth reading I found a solution. The way I sharpen/prepare my iron is on the virgin sharpening I start on my coarse stone 400grit an create the camber bout 5-6 seconds on each corner then the rest of the bevel. Work my way thru the grit to my finest stone and strop. I never go back to anything but my finest Stone an strop for touch ups unless I badly nick it somehow. When doing touch ups I will still hit the cambers couple seconds. So now to the point of this topic. When doing this after so many sharpening without having gone back a re establish the camber I had created a concave bevel. Now I don’t know how I couldn’t see this when holding a straight edge up to it toward the light. But what happens is the center of the bevel wears down faster because it is what is in constant contact with the wood and just the touch up on each corner after probably 100 sharpening wasn’t enough to keep them further back than the middle an eventual the corners pasted the middle of the blade by like a hair not noticeable by eye. Something this simple will make you mad enough to turn what was once a prized possession to new anchor for my canoe. Figured I would share this with you are and hopes it reaches the next guy both he goes postal on his tools when they won’t do what he wants them to do all of a sudden. Follow Up Posts: 1) As most of you know, I'm not a heavy hand tool user. I have never added a camber to any of my blades but, you have gotten my interest. Can you go into more detail on the how and why you do this? Glad you found the issue! Looking forward to learning more! 2) First time I put a camber on my smoother it was near perfect, I was happy beyond belief. Then I got a small nick in the blade and had to work that out. After it was gone I went back to my regular sharping routine a long with adding the camper the same way I had the first time but it didn't come out nearly as nice so I have to keep working at it. I guess the first time was a big case of beginners luck. 3) The camber is there for a couple reason depending on the planes use. First heavy stock removal greater the camber. A simple rule is the camber back to the corners you want a little more than half of the thickness of the shaving you want to take. So if you want to take heavy 1/16” in a pass with a square across the blade to corners should be back a lil more than a 1/32”. Now a smoother to me it is there for couple reasons. One to help make plane track almost impossible to detect by raking light or touch. It also helps in squaring the iron to the sole of the plane in that it doesn’t have to be near perfect. So when doing overlapping passes the camber blends the passes together. Best analogy I’ve heard is like cutting grass across a hill you overlap your cuts but if you run over a lower spot on the next pass you will leave a line in the grass that is nearly impossible to get rid of without cutting the grass lower. Also helps when leveling a joint to feather the two piece together same as when sanding you well concentrate on the higher spot then gradually work it back to the other surface. Leveling the edge of the board by shifting the plane to the high side instead of holding the plane out of plumb to square it. That’s just a few things I can think of right now. Any more questions just ask or if I didn’t answer it with this spill 4) One of the big things for me is to remind myself when I hit a issue all of a sudden such a tool stops work correctly or a particular skill you know how to do doesn’t come out the way it normally does GO BACK TO THE BASICS normally always fixes the problem. Chet if I remember correctly your planes are bevel up correct? Do to some kind of geometry I don’t understand when chambering those irons require much more camber than bevel down to the same task. Derek Cohen did a great write up on it on his website. I know the little I’ve done with bevel up they are harder to camber free hand an require a jig. Mainly for the reason the bevel angle can not change in the camber or it simple will not cut on the edges. While a bevel down the bevel angle doesn’t matter along as you don’t raise it up higher than the bed angle 45• typically.
-
Thread transfer from previous forum - Original Post by Coop Original Post: i read on another forum where a member used ARS as a first coat on a table top and followed with General Finishes HighPerformance for the top coat(s). Why would the GF HP, water base give a better protection against table top abuse? Follow up Posts: 1) Sorry I missed this post here Coop! I don't know that you get "better" protection from the WB over the ARS. Because I prefer to spray, the WB can be applied much faster with much faster dry times between coats. On darker woods, I like the look of ARS as the grain tends to "pop" more. Following with the WB means that I don't get any additional coloring but, get the protection that I desire on the piece. Also, fewer coats of the WB maintains the "close to the wood" look or you could continue to add until the finish has the look you like. Hope this helps! 2) Thanks Kev. I need to use my sprayer more ( than two times). The first time, with Chet’s help on the barrister bookcase, it came out fantastic. The second time on a small cherry cabinet was a disaster of runs. I will admit that the second one was rushed and I should have taken my time and practiced on the adjustments with some cardboard. I was sprayed no shellac and ended up sanding back down to bare wood. To spend so much time on the build and rush the finish was really dumb on my part. 3) So, this is one of the reasons that I like the wipe on ARS on the first coat. No equipment clean up, no runs, and similar results. Any differences would be a matter of opinion really. From there, it's just a matter of spraying the WB finish. If you practice with water on the card board, you'll be good to go. You're fine leaving a heavier coat on the horizontal surfaces, just leave them more time to cure before blocking out.
-
Thread transferred from Previous Forum - Original Post started by Kev Original Post: There seems to be this push for more natural finishes lately. I attribute this mostly to some of the woodworking bigs leaning this way for "health" reasons. My question is, considering how good current PPE options are, do these "non-natural" finishes really pose a health risk and does that out weigh good protection for the furniture that we're creating? Follow Up Posts: 1) To be honest, when I find something on a menu that I like, I don’t venture too far from that. A couple of years ago, a bunch of you guys convinced me that ARS was finishers heaven and I locked in. Then Chet opened my eyes to shellac and It broadened my horizons. Then Chet and others tell me how cool it is to top coat with GF HP, especially when blowing it on. Having said that, I have the three above options as experience and like sheep, I just follow the crowd. Are the “ woodworking bigs” living too close to the west coast or is this really a concern? I guess I just reverted back to your original question and did’t realize it. 2) I agree with Coop, I will use what I know. I guess if your goal is making money via commissions or content, then you need to appeal to the masses. By that so many people are concerned about VOC's and other things that may or may not be a risk. 3) I think the whole industry of finishes are heading in a direction of less VOC's. House paint, car paint, woodworking finishes, I just think it is a way things are headed and it's not just a California thing. If the content producers do a proper job of evaluating the healthier options it is a good thing and I take note. But if they just slap it on and saying look at me I am being healthy, even though down the road the finish looks like poo and they don't report back on the failure, well that is of no service to me. Having said that I think you need to come up with a finish kit that serves you well, but for me I still want to keep it as simple as possible because in reality that is my least favorite part of the hobby. If I had someone to do the finish for me I would be happier then pigs in mud. Here is my basic kit - Shellac on some items like small boxes and things of that nature that aren't in high use i'll us some shellac. ARS on things like nicer furniture pieces that I want to build a nice warm film finish on. Species like walnut that are going to lighten over time I will put a coat of garnet shellac or even ARS to bring the grain out and keep the rich color and then spray with GF High Performance or Endro Var for the protection. I usually formulate a finish plan while I am working on the project... and then I probably change my mind. 4) I'll trade you my sanding for your finishing.. 5) Hey, I’ll take you up on that. I’ve got me a new green accented sander that connects to a green accented vac that I love using. You pay the freight?
-
Thread transfer from Previous Forum - Original Post by Coop Original Post: I’m sure this is elementary to most of you but I’m just curious. My finishes are limited to ARS, shellac and GF, HP Top Coat. I don’t venture too far from the dock without a life vest. As discussed here and others, it has been said to apply multiple coats of ARS (as that’s my choice) glossy and then a coat of satin. Can the satin coat of ARS be eliminated if my top coat is satin? I.e., will the satin top coat prevent the finish from being glossy? Follow Up Posts: 1) Do you mean "can the GLOSSY coat of ARS be eliminated is my top coat is satin"? If so then, I would answer "yes". I typically only run satin on my projects. 2) I have never tried it but it should. It is the amount of flatteners that makes any finishes gloss factor semi-gloss, satin, matte or flat, depending on how much flattener is added. Gloss doesn't have any. So I would think that it wouldn't matter what your final coat is product wise, if it is satin It should give you a satin finish. Of course it would be a good idea to back up my theory with a test scrap of your own. I used to do the same as you Ken, but I haven't in about seven years and I think I am better at the finishing process then back then and certainly more picky about how my finishes look and I can't tell the difference between using gloss base coats and not. 3) Yeah, that was the question. It’s been said that the first few coats be glossy to allow for more grain exposure, then satin to allow for the desired sheen. Thanks. 4) So you’re using satin, start to finish, like Kev just said? 5) Yep. Never more then three coats though. On things like a Media cabinet, table top, sideboard, any flat surface that will have things put on it, when I use ARS, I do do a fourth coat that is about 65 percent ARS and 35 percent what ever is the thiner for ARS, I think it is mineral spirits, can't recall at this moment, and apply it in light strokes the full length of the top. The thinner causes the finish to dry real fast and so less chance of dust nips getting in the finish. When I spray High Perfornmance or EnduroVar it drys fast enough so this step isn't needed. 6) I've often started with glossy and finished with satin. I'm not a fan of glossy finishes though they do have their place. My final coat is usually 50% satin and 50% mineral spirits. It dries faster and with fewer dust nibs. I think I learned this process from Marc the Spag.
-
Transferred from Previous Forum - Orginal Post created by Bushwacked Original Post: So I'm curious ... He mentions he uses this on his equipment and all sorts of stuff in his shop ... I'm curious how mineral does on cast iron? It seems really easy and cheap to make if it is quality stuff https://youtu.be/VivrbSKNyjY Follow Up Posts: 1) I would be curious to how it actually protects metal surfaces. He really put a lot on the plane. Does this mixture leave residue on the wood? I also think it would be better making in really small batches. 2) In the video he says a lit bit goes a long way, also if the mineral oil goes rancid, why even risk wasting. 3) So did some looking around ... Could not find anything to say mineral oil would go rancid ... Basically everyone seemed to be saying the same thing which was ... Mineral Oil is a non-drying oil, which means that it will not polymerize (form a plastic-like substance) over time. This is good for oiling cutting boards because it will stay a bit liquid in the wood and flow into cracks and scratches. It is also food-safe and won't go rancid or support microorganisms. So yes if a little goes a long way no need to make a ton like he does but if it never goes rancid, I guess it wouldn't be a bad thing. I'm still curious if it would leave any residue on woods that are used on the cast iron soon after application