Every purchase made through our Amazon Affiliate Page helps support this site


Woodenskye (Bryan)
-
Posts
2,097 -
Joined
-
Last visited
-
Days Won
62
Content Type
Profiles
Forums
Downloads
Gallery
Events
Store
Articles
Blogs
Everything posted by Woodenskye (Bryan)
-
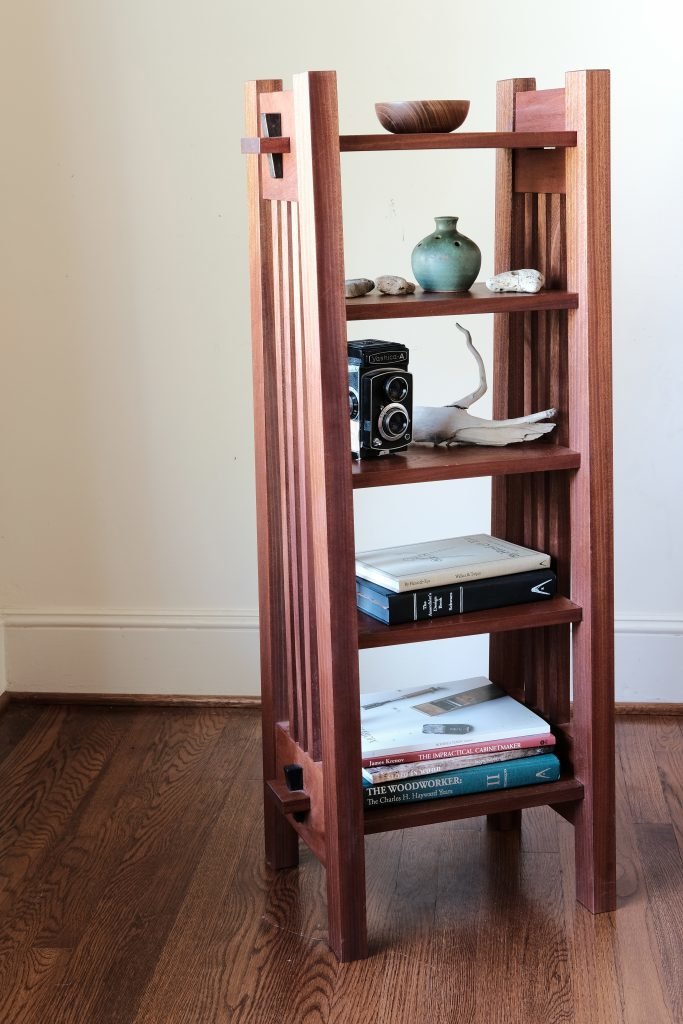
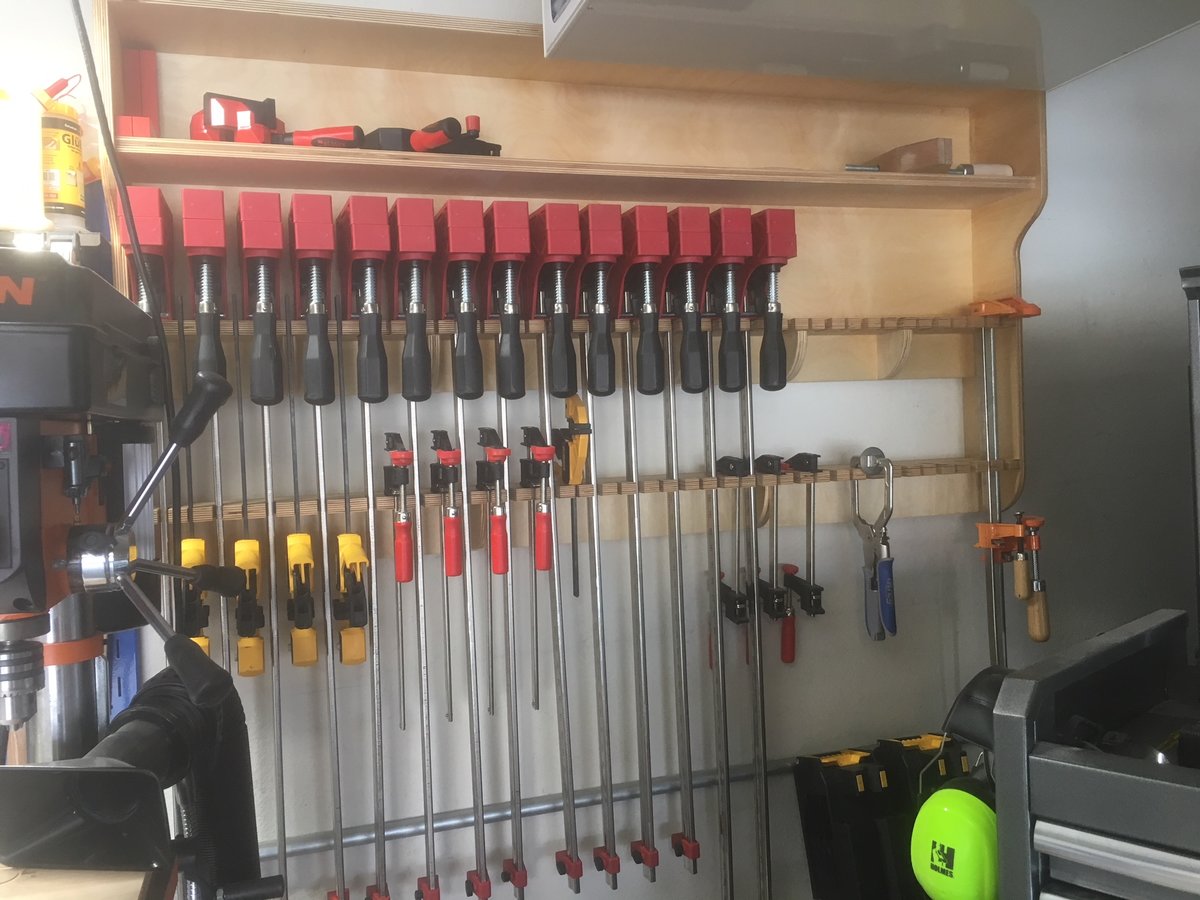
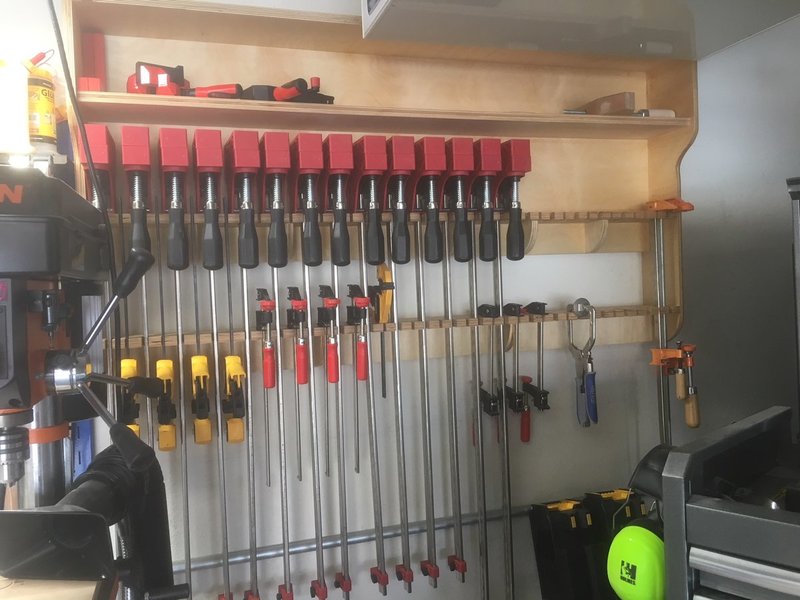
Thread transferred from previous forum - Original Post by Chet Original Post: This is the first year where starting the year, I have a list of projects that I want to do. The first couple will be for the shop. I want to remake my clamp rack with a little bit of a cant to it. I need to make it so the back of the clamp head sits a little lower then the front so they don't tend to slide off and fall the present rack I made at a perfect 90 degrees and mounted it to a wall that, turns out, is a half bubble off plumb. And there are some other adjustments I would like to make to the rack. Then I want to redo the under saw storage. I have worked with the set up I have for a few years and have decided to change some things around. After this I want to make this Gustav Stickley shelf unit pictured below, maybe even make two. He actually designed this in 1905 as a do it yourself project for people. Popular woodworking has published it a few times and I have to laugh because they say it is an advanced project. I think I could do this in a hand full of days and I by no means am an advanced woodworker. (1st Photo) After that We are going to redo the kitchen - dining area of our house. I built the cabinets quite a while a go and they are ir real good shape but we want to reconfigure some with pull out shelves and also I will be making all new doors (18) and drawers (5) for the cabinets. So now you know what is on my bench. Follow Up Posts: 1) Awesome! Looking forward to seeing these projects this year! For the most part, I think I'm done with shop furniture. I am considering a disc sander so, that might need a cart we'll see. The pull out trays are super handy! I did that in our last house and I know it's just a matter of time before my wife asks for them here as well. I don't envy your door and drawer builds! Just because there's so many. 2) I’ve got a full plate for me anyway. 2-side table,1- hall table, laundry room cabinets and shelves, bench with storage under it for the garage,table saw storage,Roubo bench,and shop stuff. An that’s just what I can think of right now. So there isn’t order to that list at all the laundry room is next for sure. The rest is up for graps 3) Yea I am not overly excited but It shouldn't be to bad, I do have the existing doors for templates so that should help. Plus each set up will before multiple doors except two. At this point we are looking at a simple shaker design. The drawers are all the same size and there are at this point only five... but things can change. 4) Shaker design certainly helps! Not a lot of fancy joinery in those! 5) That shelf unit is pretty cool looking. In a hand full of days? After seeing Kev’s project time card, I’m going to start doing the same thing, just for the heck of it. My brother, also a woodworker, often asks me how long a project took and I have absolutely no idea and actually, maybe it will scare me to know? 6) I think if you track it accurately, you'll be surprised how little time you actually spend on a project. Just heading to the shop shouldn't start the clock. Start the clock when you actually start doing a task. 7) Just make sure you stop the clock when you curse yourself for a dumb mistake and scratching your butt! 8 Scratching my butt time off, should cut the time down considerably! 9) For clamp racks, I made a copy of Timothy Wilmot's, and I have been loving it. I have my Jet Parallel Clamps on them as well as some DeWalt quick clamps and Bessey F-clamps. The storage above lets me put my clamp accessories. Just an idea I wanted to share as I have enjoyed mine and really like the space savings of the upside down clamps pairing with the parallel clamps. I do have a few more clamps and accessories now, but it is still doing awesome (2nd Photo)

-
Thread transferred from previous forum - Original Post by Puka Original Post: As you may know or may not know most of the Eastern seaboard of Australia is on fire. They are having their worst ever bush fires in recent history. As I understand things, bush fires are quite common in Australia and it is actually a healthy part of their ecosystem. A fire would flash through their bush burning off all the crap leaving a clean slate behind for a few years when they'd get another. These fires on the other hand are probably not something that has happened since the white man has been around. Since the fires they are usually have are brought under control in pretty good time, though the odd one or two aren't. Not so with this one where they have been burning since before X-Mass. Anyway. . . when ever ozzy has a big bush fire we [New Zealand] get awesome sunsets. Though lately with all the smoke in the atmosphere we are getting a lot more than awesome sunsets. Last week when the sun came up we had pink light for an hour or two and then last night the sky was Orange. The New Zealand police were getting brassed off with all the dumb arses ringing the emergency number about the orange sky, seriously like WTF can they do about it?!?! Just goes to show just how dumb people can be. Don't people know that the Zombie apocalypse is here now in your neighborhood. The image below is a screen grab not embedded video. Follow Up Posts: 1) This is like in the '80's there was a pretty sizable earthquake here in California in the southern part of the state. one of the things that happened was the power grid got knocked out for a sizable area. So at night there was no light pollution and people could actually see the stars. So the police departments, yes the police department, started getting buried in phone calls asking were all the stars came from and were they caused by the earthquake. 2) Damn it your right, its not Australian bush fires or earth quakes. NO. Its and Alien Invasion. Excuse me I have to go ring the police and let them know that we're about to all be abducted by aliens and given anal probes. Everyone else will be turned into Zombies.

-
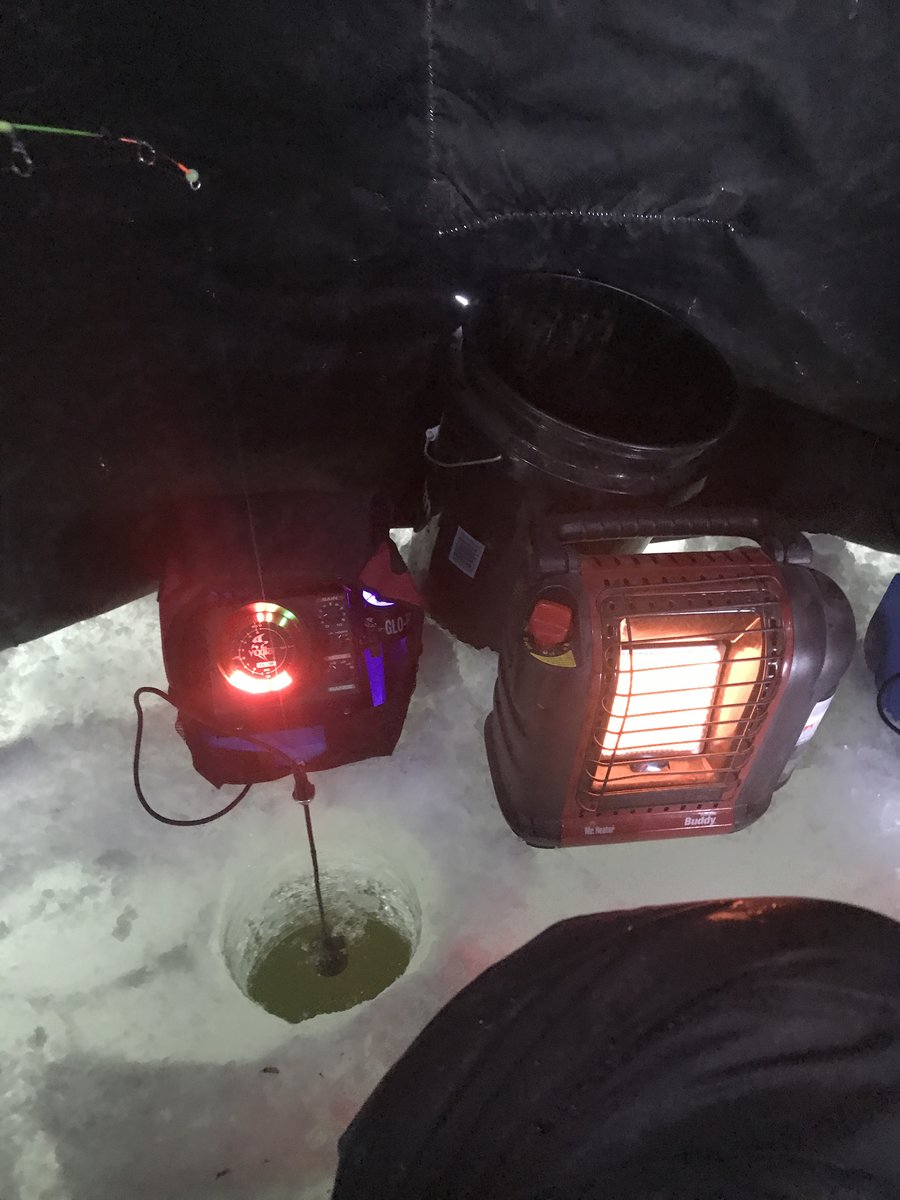
Thread transferred from previous forum - Original Post by Jamie Original Post: Sorry guys haven’t been around much with the holidays. My shop is currently turned into ice fishing central. Went on a little trip last weekend with some friends and neighbors. Headed up into Minnesota about 5 hours from home to find good ice to be on. We have been above normal temps here and have 0 safe ice to be on. Here’s a few pics from the adventure. Follow Up Posts: 1) Nice fishing trip to cold for me tho? 2) I thought Ice fishing was a myth like Eskimos? So what that electrical thing hooked onto your fishing line? We don't get weather cold enough down under here for that sort of carry on. Maybe occasionally on the odd Lake in the South Island but you could till never do it like that. Not enough fish in the waters. And if you did you'd have the local ranger on your ass for poaching. 3) No myth. It really does happen! One of my favorite past times. It can get cold but that’s what the tent and heater are for. There were tons of people out on the lake while we were there. Am surprised that there is as many fish as there are. the electronic item you asked about is a velilar. It is a sonar that is real time and super sensitive. Can pick up micro organisms in the water. Use it to see where in the water column you jig depth and to let you know if there are fish in the area. We were fishing about 20ft deep and the device at that depth shows about a 5ft coverage of the bottom. Would have a really hard time fishing without it. 4) So let me get this straight. While you sit in a tent on a frozen lake fishing. You have a super sensitive device you hook onto you fishing line so u can listen to fish having orgasms? So is that just fish orgasms or other things having orgasms? 5) I think you misread that.. Pretty sure he said organisms 6) Semantics. Orgasms organisms they all sound the same to me. MEH!


-
Transferred from previous forum - Original Post by Puka Original Post: Other than the a fore mentioned setups from commercial shops can / could some one(s) maybe give me some ideas or perhaps some links to DIY setups for building your own. Primarily I'd like to level small wood pieces using a router. I made a setup once before when I leveled the top of my work bench. But i would now like to make a setup I can put together and pull down reasonably quickly so I can flatten small boards made up of a number of laminated wood chunks, that are too big to go through my drum sander or thicknesser, or are just too out of wack between the various bits that Even using a sled is not an option (I hate using a sled). I'd rather fix the piece down and flatten one side with the router then when I finally have a flat side start running it through the thicknesser, or if its two big then flatten the other side the same way as the first. Some help would be greatly appreciated. Follow Up Posts: 1) Sorry bud.. On the road for work again.. I do know that Woodpeckers makes one but, it's pretty outrageously expensive. The trick is to get the 2 rails parallel. From there, just a little sled to slide on it and you're in business. 2) I was more interested [to be honest] in the leveling setup underneath. Trying to get the work piece level. or building a rig that could be used to get the work piece level. Pretty sure i can do the top part easily enough. Have done that bit before but the first time it was to level the work bench top so everything was fixed to the work bench. 3) Because the wood can be so warped and twisted in so many different ways, I don't know of any way other than shimming in appropriate places to steady it where you want it and then get one side flat. From there, the other side is easy. 4) I’ve only done it once and that is how I did it with shims and use winding stick to check it with
-
Thread transferred from previous forum - Original Post by Puka Original Post: I was walking through a supermarket car park the other day and found this. Follow Up Posts: From the OP, to offer more detail. KBA Stood for "KIWI BATTLE ALLIANCE" Some 20 odd years ago Microsoft put out a cool little 3rd person space ship shooter called Freelancer, the ship in space was controlled via the mouse. Was a good easy to control system. But anywho. . .the game was easily modded and could be played in real time on the net in Multiplayer. It had a huge following on many private servers. I played on countless different servers till I landed on a server run by a dude called Strail or something the server was called [VOID]. I initially I joined a clan called [BBB] but was kicked out by the dick head leader of it who thought I was another guy in the clan impersonating me because we both called ourselves KIWI's and my name in that game was KIWI. New Zealanders call themselves KIWI's at home and when abroad. A Kiwi is a native New Zealand Bird only found here. But anyway I couldn't get it through the F@#K Wits head that we were two different people so he kicked me and I joined another clan in the game called [KBA]. The clan was run by this guy called TIODS or to be more precise [KBA]_TIODS. I played this game for a couple of years till I got tired of it and found a much better game called EVE. TIODS moved up through the ranks and eventually became an admin and partly or fully funded the [VOID] server for a while before I corrupted him and he gave that up and came joined me on EVE where he played for a couple of years before Getting bored and left. Some time later he joined and played yet another game I suggested called World of Tanks. Also played that for a couple of years before giving it up and he has since moved on and I think never played another online game again. So SAD! I think you should come play ATLAS with me and the boyz TIODS, what could be better than building sailing ships and hitting the high seas as a pirate. The official server has 72 maps, each map is run a separate server instance.
-
 Thread transferred from previous forum - Original Post by Puka Original Post: I brought myself a The question that now remains. Will I be able to to install it myself and or how long will it take, how much skin will be removed in the process, how much saw dust will be needed to mop up the blood that will likely hit the floor. Do I hide my hammers for when the need arises that I need to fix it properly?!?! Follow Up Posts: Mostly offered congratulations and weren't transferred
 -
Thread transferred from previous forum - Original Post by Chet Original Post: I have been working on a shop project which is involves plywood. Yesterday I was setting up the dado stack to cut some groves. While putting on the stack I dropped the arbor nut down the vacuum chute under the blade. To get to it I have to open the door on the side of the saw and disconnect the hose and reach down the hose and fetch the nut. But to open the door I have to move my outfield table which is easy because it is on wheels and move my bench which is not on wheels and is heavy, not Roubo heavy but heavy enough. After retrieving the nut and before putting the table and bench back I sweep the floor under those two things. Got the nut on and did a test cut and decided to had a thick shim to the stack to get the fit I wanted. This time I didn't wait until I was putting the nut back on to drop it, I dropped it taking it of and down the chute it went again. But this time the whole process was faster because I didn't have to sweep the floor. You are now free to laugh at me. Follow Up Posts: 1) Pretty sure we've all been there! I did it the other day but, I only have to move the sled rack and it's on wheels as well. 2) I drop the table saw nut every time I change blades! Lucky for me on the ol 66 the dust collection is crap and all I have to do is dig through a foot of saw dust to find the nut back. 3) Chet, I understand that as you get older, mistakes repeat themselves so I have spare arbor nuts, should that ever happen to me! 4) Yea but leaving in the dust shut it would be just my luck to have that thing get sucked into the impeller and create havoc. 5) Yep.. Don't need that nut shooting through the impeller on the DC! 6) Just kidding! Besides, I’m too cheap to buy multiple.
-
Thread transferred from previous forum - Original post by Kev Original Post: Just curious who you guys follow? I can't imagine that I have an "all inclusive" list in my own YT feed and would like to expand it. I also removed some that I used to follow because they haven't produced any content in several months. Just curious what your threshold is for unfollowing a YT channel? Thanks in advance for the insight! Follow Up Posts: Below is a list of creators that were presented by members in the follow up posts. Please add others Doucette & Wolfe, Ishtani, Jay Bates, Frank Howarth, Matt Cremona, Wood Whisperer, Kyle Toth, R. Humphrey, Tim Yoder, Andy Rawls, Mike Farrington, Rob Cosman, King's Fine Woodworking, Shaun Boyd, Matt Estlea, Dave Stanton, Jimmy Diresta, Boris Beaulant, John Peters, Chris Salomone, Brian Benham, Samurai Carpenter, pask makes, Make Something, Are Baloni, The Periodic Studio, Izzy Swan, Guys Woodshop, Andrew Pitts ~ Furnituremaker, John Malecki, Nick Ferry, Shop Nation, JAy Bates, Stumpy Nubs, MTMWood, Third Coast Craftsman,
-
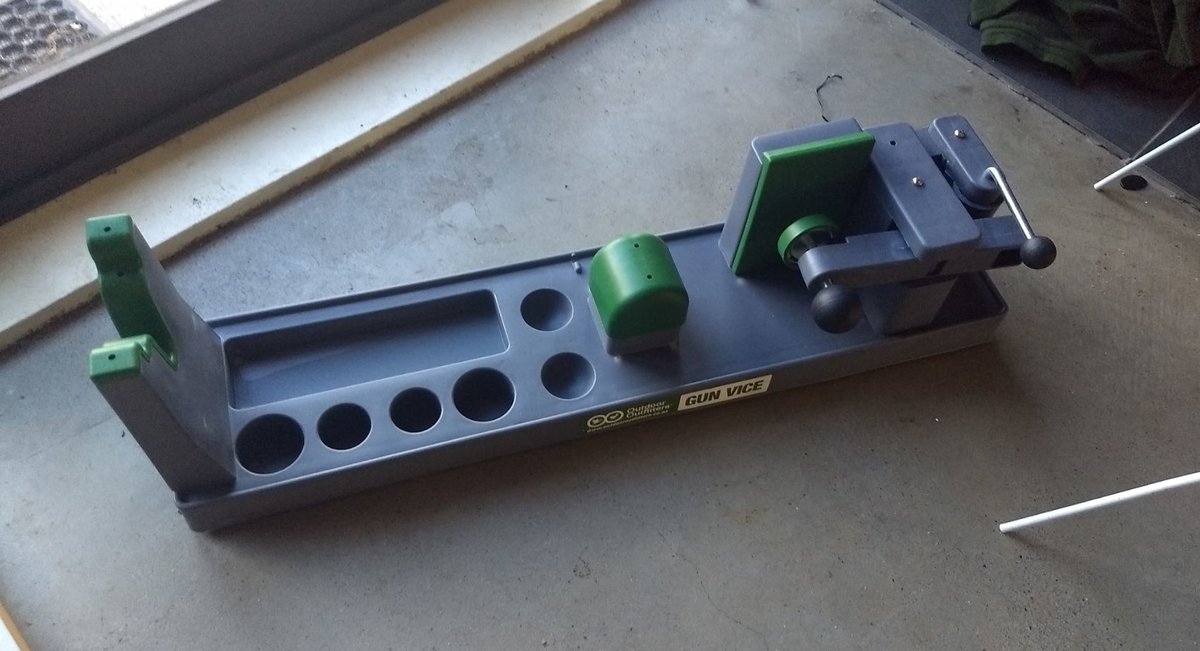
Thread transferred from previous forum - Original Post by Puka Original Post: So anyway I recently brought a really Cheap Gun vice to work on my rifles. $150 bucks worth of plastic. (Photo Below) I looked at it when I put it together and decided that I could build a better one out of wood. So this is a project I hope to get into over the break. The above bit of crap is warped and quite frankly its crap. More crappier than I would have thought even for 150 mulah. It holds the .22 rim fire all right, but the 6.5mm not so much. I need something that is solid, that will cradle my girls with respect. No some loose and sloppy joe saying she'll be right mate. Follow Up Posts: 1) That should be a good project Especially if you build it out of nice lumber y’all have down there. 2) I started this project finally....took the item in the above photo out to the work shop to get started but was defeated by the heat. 3) Definitely need to get started on this as I two new scopes to mount, new mounts for the 6.5 in red anodized aluminium, some nice bling for my baby. Seriously why does everything have to be black? Black or stainless. . .WHATEVER! So I hunted down some pica-tinny scope mounts that weren't black. Yayeee for me. I suppose I could put them on the ruger, depends on which one I decide will be used most. Haven't really decided on wood yet but since I'm leaning towards something that is solid then it'll probably be Eucalyptus based and since I have a couple of ton of Botryoides in my back yard. Don't need to be Einstein to work out what I'll probably be using. 4) Did you keep the purchased one? What will you be using for the green, softer material? 5) The green soft material

-
Thread transferred from previous forum - Original Post by Puka Original Post: This is a For You Information type of thing. I find it annoying when people say certain things without really knowing what they are actually saying. So this is going to be a quick and dirty because i have things to do, its stinking hot here as the air con has switched off for the day and I need to get my plan S&^T sorted for my building project next week. So without further ado. . . Like everyone I used to say "I did some research and came up with this" After I did a bachelors degree at University [way back in the dim dark past] I now no longer say that because its an untrue statement, what I in fact did and what you do was information gather. You didn't research jack shite, you used other peoples information to answer your question. THAT is not research! Also If you use this other work and don't correctly acknowledge it then you are plagiarizing which is stealing so to speak. Research is where you form a hypothesis about something then set out to prove or disprove it. There are a number of steps you have to go through to do this, one of these steps is in fact information gathering, which is where you have to see if anyone else has asked this question or a question(s) like it. If they have then you have to read through their work which will state their hypothesis, their methods, their research. . .the whole sha bang, pretty much the same thing you are doing to answer your own hypothesis. The next step is develop a methodology to prove or disprove you hypothesis. Then there is the RESEARCH. This is where you through your methodology create something from nothing. Because that's what researching is, your working a question that no one else has asked, or if they have then your either helping to prove their work or your disproving their work. But either way your coming up with your own results from either their methodologies or your own. You now have results so you have to present them in a way that others can understand and check if they so wish. This is where you have to lay it all out, tell everyone how you did it. Reference any other peoples work, did you use any of their work? Prove it. . .disprove it? Did you build on it or go off on a completely different path? Is it all your own etc... and so on and so forth. So now when you have a burning question about some tool, some wood building process or what have you are you going to say. "I just spent a couple hours on the net researching whether or not this is a dumb question but can you guys tell me what the best hammer is for hitting nails into balsa wood, so i can build a work bench out of it?"
-
Thread transferred from previous forum - Original Post by Tmize Original Post: Anybody planning on buying anything good their tax refund this year? I’m going to do stuff stuff around the house an finally get dust collection setup in the shop with mine. Follow Up Posts: 1) If my cpa is gentle and I’m lucky, I won’t owe too much. 2) Ditto! 3) Well dang guess I’m the only one that gets money back then. But I do still qualify for most all the tax credits so that makes since. I’ve tried to move my tax with holding around trying reduce the amount they get to keep from me all year I can never get it to balance out. 4) If you get in a bind and can’t quiet figure out how to to spread the wealth, just let me know. Otherwise, enjoy the windfall! 5) Afraid I'm in the "have to pay" boat this year as well.. It's not much but, still have to pay. 6) Jointer and maybe a bandsaw for me. 7) Good choices I got a bandsaw for Christmas an I don’t know how I got by so long with out it. The jointer I still haven’t convinced myself I need it yet to drop the money on it 8 I will tell you that it's another purchase that you just won't regret! 9) The real trick is figuring out how to use your tax return to buy a bunch of tools, then write them off next years taxes. 10) You went with the laguna if I remember correctly? 11) Yes I went with Laguna 14/12. I was dead set on the Rikon 14” just off of reviews an reading online. WhenI got to the store they had them both side by side. I was comparing the Laguna just edged out the Rikon just seemed to be built a little more solid. Now don’t take that the Rikon was made cheaply. I actually like the way the fence system on it better an table tilt. The Laguna has a much higher table that I really like. 12) That is funny you mention that. I did the exact same thing and came out completely opposite. I was set on the laguna and left thinking the rikon was the way to go. Table height is a big deal for me. Not that I’m overly tall but all machines seem to be built for the 5’8” guy. Being 6’3” I raise all my machines up to a more comfortable height. The rikon that I looked at was a good 2” taller at the table than the laguna was. Both didn’t have a mobile base on them. I really liked the fence adjustment on the rikon over the laguna as it was really smooth. I will probably hunt on the used market for a while to see what shows up 13) Agree I like the fence on the Rikon better to
-
Thread transferred from previous forum - Original Post by Keggers Original Post: Just a personal note to say I never realized just how much my wife did for me until she was no longer able to. I've recently had to take on a lot of the things that I've sadly taken for granted. Another personal note - My wife DOES have cancer. We'll be finding out how bad it is next Thursday. Again, if you are so inclined, please pray for her. She's a good girl. If you are so inclined - I'd really appreciate prayers for my wife. She has a long tough road ahead of her and right now I can't see a light at the end. Thank you. Follow Up Posts: Many offered best wishes in support, but the following are updates by the OP 1) Another personal note - My wife DOES have cancer. We'll be finding out how bad it is next Thursday. Again, if you are so inclined, please pray for her. She's a good girl. 2) Thank you for all your kind words and prayers. They are certainly appreciated and needed. After Ann spending a week in the hospital I was able to bring her home yesterday. She's doing much better. Chemo is scheduled to start this coming Monday at 8:30. It will be an all day event. Hopefully she'll have no problems. 3) It's been a while since I've posted any update on my wife. I'm happy to say that this Thursday we'll find out if she's cancer free or if she needs some additional chemo treatments. We both feel confident that her cancer is gone. This is a great group of folks. Thank you for your prayers!
-
Thread transferred from previous forum - Original Post by Puka Original Post: QUESTION Whats a good simple method for joining a square 100mm post [upper] to a square 125mm square post [Lower]. At the Crib in Taranaki I have concreted in some short 125mm H5 Treated piles. These are a standard dimension for a wood pile. I now wish to extend the height of this pile by a few meFotres to brace the end of an extended roof. I had a brief net search but the only thing I could find that sort of sounded right was using a lapped joint. I could cut a slot but it would need to be off to once side as there would only be 25mm [or for you guys an inch] of wood to play with. I'm thinking a lapped joint sounds pretty good as I could then run a couple of bolts through them both. Perhaps I could also add a metal plate on either side with 4 holes two above through the joint and two below the joint for added strength? What do you guys recon. Its been doing my head in thinking about a fix for a couple of weeks now. Follow Up Posts: 1) 11 VIEWS ZERO REPLIES Which means jackity boo because I will be buying what I need in 14 hours and i won't be checking this forum again till Monday. So cheers . I'll just go then with what I have figured out from some of the engineering sites I looked at. TA 2) Well, you're talking construction, not really what we do.. Most of us have done some construction work but, probably not a lot. In the end, you're looking to extend poles. Regardless of the joint, this will be the weak spot. I'm guessing that the metal plates will be your best option. 3) ALL I'M SEEING HERE ARE EXCUSES...OLD BUDDY. Since I posted the question I have since found 4 or 5 different fixes all using basic wood joining techniques that I reckon are all viable. A couple don't even use metal hardware. Basic traditional wood frame joints. I was after ideas. So don't be shy put them out there. 4) Buy a longer 125 mm post. 5) You could do a mortise an tenon. How much lateral pressure would the post have on it? Or just downward force. That would be the most important question on the type of joint an fastener you could use. 6) Absolutely correct which is why I couldn't come up with a quick answer. Vertical forces wouldn't be an issue, it's how to stop lateral forces from things as simple as the building settling. I suppose if you were to tie in lateral supports at the joint, that would be plenty strong. 7) I would use a bridle joint and put the male on the lower post . 8 Have been busy so haven't really been doing much surfing on here. The posts main job will be to anchor the roof and stop the wind from blowing it up the valley. So with this in mind there will be sweet little nothing of down ward force with mostly upwards when it blows. Since its at the bottom of the valley the wind tends to funnel threw and blow a bit of a gale. I did some surfing here and there and looked at various building specifications and have come up with a new bracket setup. Will drop a pic or two in here when i have it bent to shape drilled and welded together. Unfortunately after I bolted the bearers to the posts I discovered that the excess post length that I needed just wasn't there anymore so the chamfering I was going to do along with the bolted lap joint is now not an option. Instead of bolts I will be using coach screws. due to the lack of room. This is what happens when u change the building design after you have concreted the 125 sq posts into the ground. Yayeee for me...
-
Thread transferred from previous forum - Original Post by Jamie Original Post: What if any magazines do you guys subscribe to or purchase? I used to get popular woodworking when I was younger and did renew my subscription around the 1st of the year. Haven’t seen a copy show up yet but keep getting renew bills in the mail from them. Follow Up Posts: 1) I used to subscribe to FWW, Wood, Woodsmith Shop, but have let all of them lapse. 2) I used to subscribe to Popular woodworking but I guess I kind of out grew them or the dumbed down their magazine. Now I just have Fine Woodworking, 3) Mortise an tenon magazine is the only one I have now. It’s more a historical and hand tool type quarterly book. I had pm and fww I cancelled them both nothing interested my much 4) ermmm A neighbor gave me a cd with about 30 years worth of Fine Wood Working mags on it that dates back to when Adam was an apprentice. I dumped that on my PC so now when ever I'm looking at starting a project I go look through them to see what is close to if how to do it. Usually i see its too complicated and loose interest. But I do like looking through them occasionally. On the other hand I have a whole heap of technical books on cabinetry, workbenches, country furniture, green and green, joints and so on and so fourth. Plus another whole lot in the ebook department 5) Have to drop an update.....a couple weeks back was my birthday. Courtney and the girls got me one of the best birthday presents I have ever received, the wood smith shop digital collection. It has been very enjoyable to me. Lots of projects to flip through plus the search option is awesome. It was a perfect gift for me as drawing up plans would be one of my biggest weaknesses in the shop. I haven’t built any of the projects from it yet, looking at a few of them. I always seem to stray a little from there plans and come up with different ways to do things. Been kinda fun to look back at the projects. In our high school woods class we built projects from their plans. Found one of a mirror frame that I did as one of my projects. Seen others that my buddies did and can remember looking at quite a few of the old yellow pages. I was lucky enough to take the class 2 times. Not that I failed it but I enjoyed it that much. When I was a senior in high school I happened to have study hall during junior high shop class. The shop teacher actually pulled me out of study hall to come in and help with the junior high kids. Which did make me want to be a shop teacher, a dream that I never did fall into. I did actually sign up for classes a couple years out of high school but end up getting a job at the cabinet shop about a month before classes were to start. 6) I still sub to Wood mag but, that's more because that's what the family gets me for special occasions.. I hate to admit it but, I think the print media is on its way out. 7) I agree print is on its way out. I will say that I do enjoy holding a magazine in my hands more than a tablet 8 Agreed! The down side is storing all the old magazines.. I always hate it when it's time to thin the pile! 9) Could look through the old pile and find a cabinet plan to build to store the over run 10) Thats the nice thing about Fine Woodworking. I get their magazine but throw it away when I am done because you can access all their magazines on their website too. And the have a pretty decent search mechanism.
-
Thread transferred from previous forum - Original Post by Puka Original Post: I didn't feel a thing! Until my toes started to stick together. (Picture Below) Follow Up Posts: 1) I know there are lots of woodworkers that wear open toed shoes in the shop. Maybe it's because I'm a safety professional, I don't know but, this practice is just about as brainless is it gets. It's a pure sign that not enough people have been bitten to spread the word to wise up. Thanks for the post! 2) If you had been barefooted, you would have had time to pull your foot out of the way without the added drag those shoes provided. 3) I think not wearing proper shoes or boots in the shop is just plane bad thinking. In my career before I became a professional retired person I saw enough bloody injuries to last me. I see no reason to want to add me to the list. 4) Steel toes all day. Only time I’m not is if I am finishing a piece. 5) I kicked something somewhere when i did that. AND I haven't learnt from this. I still wear jandels or nothing at all. But then I am a brainless moron that doesn't think so I'll just keep doing it. On the other hand I was in my bedroom the other day and kicked one of my bed posts and smashed another toe nail off. No way you will catch me wearing steel caps to bed. Strangely enough some years ago I was doing some tramping down south. I'd brought some cheaper summer boots and they got wet and shrank a bit. My big toe nails went black on both feet and after a few days they started to ach something cronic. I was walking around in one of the huts and you guessed it I kicked the kick board under the sink and ripped one of the toe nails partially off. Couldn't get the boot on after that and ended up hobbling around a couple of days before I took the bull by the horns, closed my eyes and ripped it the rest of the way off with a pair of foldy plyiers. Instant relief and lots of blood. BUT boy did it feel 100% better after that. Went down to the lakes edge and dangled by tootsies in the cold alpine water (snow melt) for a few till they were all clean (and numb), dried them off wrapped it up and away i went. Not one of my bestest two weeks away in the bush but XXXX happens. I kick toe nails off on a regular basis. Usually about once a year. 6) Sound like maybe you should avoid doing things that involve your feet.

-
Thread transferred from previous forum - Original Post by Coop Original Post: My dad started the company that I worked for, owned, sold and still work at in 1945. When he passed, I found an old uniform shirt that has the company name and his last name embroidered on the back. I would like to make a frame for it, similiar to the ones you see with a sports jersey mounted in it. Anyone have any idea how to mount the shirt onto the back board? I guess it will be more of a shadowbox than a frame? This is what I’m referring to. (Example 1st Picture Below) Follow Up Posts: 1) That is a dang good question.....is the back board a matting material that you could pin through it somehow? 2) I would think that the backboard could be 1/4” ply or so. Not sure about spray adhesive, Velcro, or what? This is a full fledged old cotton type shirt, way before the type of now days. 3) I’m trying to think of a way that does the least amount of damage to the shirt without seeing it. Might have to check out the university of YouTube 4) Not sure how to fold it and secure it in the frame. Just an old shirt. (Second Picture Below) 5) Sadly disappointed Coop I did this very build some time back.. The shirt is now mounted.. How it was done... 1/4" ply backer in the frame for stability. Glued in 1/4" poster backer board (painted black) and the shirt was simply pinned to that. Now, the owner actually mounted the shirt and I was uninvolved. If I were going to do it, I'd of done 1/2" ply backer in the frame and placed rare earth magnets to mount the shirt. To me, not poking holes in the shirt and being easily removable is a better way to go..2 6) Ken, This article may help you. www.cardboardconnection.com/how-frame-jersey 7) Kev, I would have sworn it was yours that I saw and I did one of my not so proficient searches and couldn’t find it. Thanks bud. 8 Perfect! Thanks Chet! 9) Probably.. I would have preferred glass but, because it was for a client, I also had to consider cost. Because it was shipped, I just skipped that detail with the client and did the Plexi. Now, in hindsight, Plexiglas has gotten really expensive so, glass might actually be a cheaper options now? 10) I’m sure broken picture frame glasses are a rarity but I probably need to make adjustments to be able to replace the glass, just in case. 11) The easiest way is just with some simple stops inside the glass. 12) Making some sort of a lip on the front and not having a groove for the glass to slide into and having the glass wedged between the lip and the stops? 13) Yep.. That's how the flag boxes are done as well so that the glass is replaceable. 14) That being the case, I could actually make the front a door I guess. 15) You could and there's nothing wrong with that. I just wanted the continuous case sides on mine. You could do it without a door, you'd just need to rabbet all but the front lip on the inside and then line it with what ever the thickness of your rabbet is.. 16) Kev, in your video you mentioned that you pre-finished your frame. You painted only the ply backer board, right, and not the inside of the frame? 17) Correct.. The backer board was painted and the inside of the actual box was finished per normal process.


-
Thread transferred from previous forum - Origianl Post by Puka Original Post: New Zealand goes into lock down 12pm Wednesday. So I'm officially on Holiday for the 4 weeks of said lock down starting Wednesday 1pm NZ time. I will be running silent for the next month or longer [Since I only use this forum while in the city at work]. For the next 4 weeks I will be working around home and doing much needed maintenance about the orchard. Lucky for me I live in the country on a large parcel of land. For all the other city dwellers they will be stuck inside. Only able to drive to the super market. The Sheeple have been panic buying since early last week. Even though our glorious leader has stated on national TV that there isn't and won't be a shortage of food and that everyone will be allowed to go and buy food if they follow the rules. Looks like I will be getting a lot of shed time and Zwifting in. Hope you guys are all good. Stay safe, take this shite seriously and we will service. First time I have ever walked into a shop with my face covered in a bandana and not had some one tell me to me to take it off. The rubber bands on my face mask broke. My other choice was a full face respirator mask. If this shite gets any worse then I might be wearing it, along with gloves and a full body spraying oneze suit. PS...I looked through the list of symptons for the Corona virus. According to this I have had the Corona virus for the last 3 years or more. The only sympton I haven't had is the fever. But everything else i have regularly, most of them once or twice a day. Follow Up Posts: 1) Best of luck to you, stay safe! 2) They have mentioned a shut down here in Houston but as far as I can see, there is no definition. Don’t know if we can’t go to the gas pumps, grocery stores or the the potty, if we’re fortunate enough to have tp. Good luck everyone. 3) Stock up on TP.. For some reason, that's what flew off the shelves here...lol 4) I always find the run of toilet paper at times comical. In this case it isn't even a symptom, so I guess it is just the situation scares the crap out of people. 5) I think people assumed that they would be locked in their homes and not allowed to shop for essentials. Now, on the comical side, our local stores all put out notices that the items were non-returnable. So, those people that bought truckloads of the stuff can just enjoy it for a while as the rest of us get back to more normal.. 6) So its a global this this need for a shed full of TP. Like I have enough now to last me to the middle of the year. And if for some odd reason I run out there always a hose out at the pump shed. I've never seen used TP returned. 7) Birmingham,Al just joined the locked down cities today at 5pm. Apparently I’m essential because construction is exempt from the order all together. So I’m still working now til this crap gets bought on to the site then we are all screwed. I’ve noticed this trend in about 50% of the states/cities that have these orders in place include construction. I don’t understand it the median age for construction worker is 55 so I’m guessing they are trying to kill us off. End of rant sorry 8 Man I have mixed feelings on all of this. I understand why they shut places down, but it is hard to some of the reasoning. I feel some of it is political. My kids have been out of school for about 10 days of the 30 that they are shut down for. Talk is around here that the kids might be done with school for the year. Sure hope not. Really racks up the daycare bill. All the bars and restaurants, hair salons, tattoo parlors are shut. Yet you drive by a wal-mart or grocery store and they are packed. This whole fuel price drop is just weird and not good for anyone. Just a messed up deal all around. I go back and forth on being scared to death for people with health conditions and saying the heck with it and let’s move on. This is going to have some long term effects on the global economy and I don’t believe we have see the worst of it yet. I like to look at numbers and statistics, if my theory is somewhat correct we should be through the worst of the infected counts in the next 7-10 days, just going off the numbers of other countries. Idk if all our social distancing will slow that down or not. I do understand why they want to slow it down for the health care system but also want it sped up to be done with it. Sorry for the rant and bringing politics here. If I am out of line please let me know. 9) I’m about on the same page as your line of thinking also. I’ve got a lot of the same feelings. The state shut my wife’s work down so she has been home with the kids the whole time so no extra money there. She is driving my crazy with all her worrying. An some of my fear I guess is my crew I lost a guy last week to a car wreck I had worked with 10+ years. An I have two other guys with me that are 60+ yrs old. I guess I’m more in the camp of shut absolutely everything down but police an hospitals for two weeks an see who all is sick an treat them. I know a lot can’t play for 2 weeks with of food at home an afford that long off without a check so..... 10) This whole thing is tough! It also really depends on where you are. If you're in an area like I am, you tend to take it less seriously because everyone is spaced out so far. Now, if I were actually working in a refinery right now, I really do think I'd view things very differently. Like you, my wife isn't working right now either as she's in the school system. Most likely, she'll be out the rest of the year. If I don't work, we'll be tight. We'll make it but, we will definitely be tight! 11) I agree with a lot of this. I think the media is responsible for the panic a lot of people are feeling. The government (Federal, State and Local) were way to slow to react. When China refused access to the CDC and WHO when this first started, we should have locked our borders, immediate quarantine of returning citizens. Not saying this would have stopped it but this went from Asia to Europe to the States. Until all people can be tested, we aren't going to have solid figures or if new cases are declining. My wife is a nurse and her unit is basically shut down, except for patients needing procedures that are in the hospital already, but she has floated to other departments. I don't have any higher level of concern with her bringing home. I believe most people have but won't show symptoms. Personally I'm am getting fatigue on hearing about things. As for schools, I don't think kids will be back until mid to late April. These first 2 weeks will be a test, and I don't think the teachers or students are enjoying it. My son hates it, his learning disability doesn't help, kids are basically having to teach themselves and actually do work.
-
Thread transferred from previous forum - Original Post by Jamie Original Post: My step dad sent me this tonight, I got a kick out of it! Follow Up Posts: 1) 2) That was funny! 3) That was beaching funny!
-
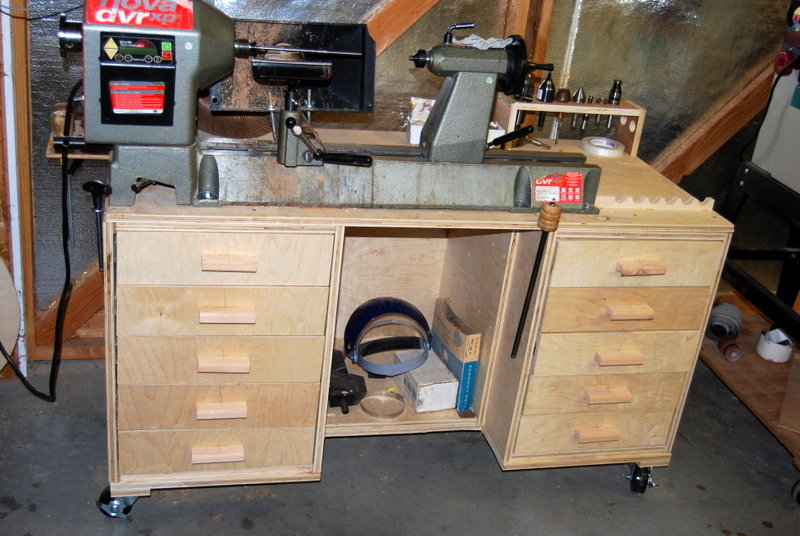
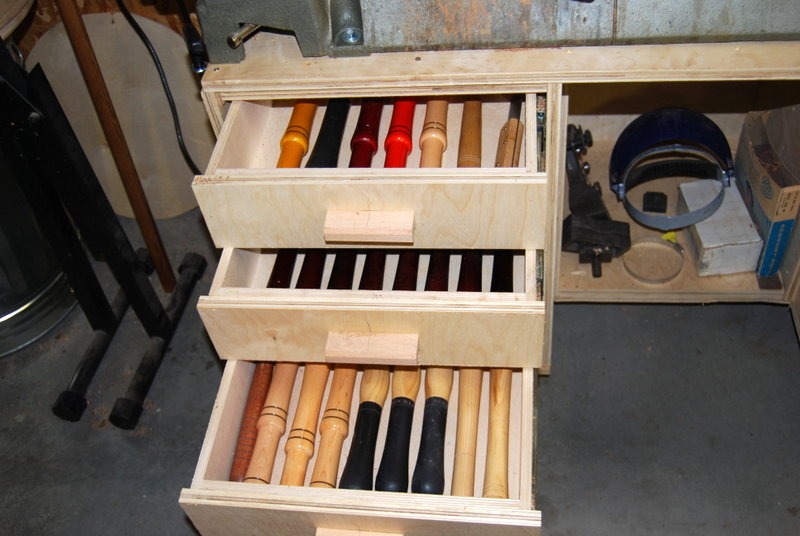
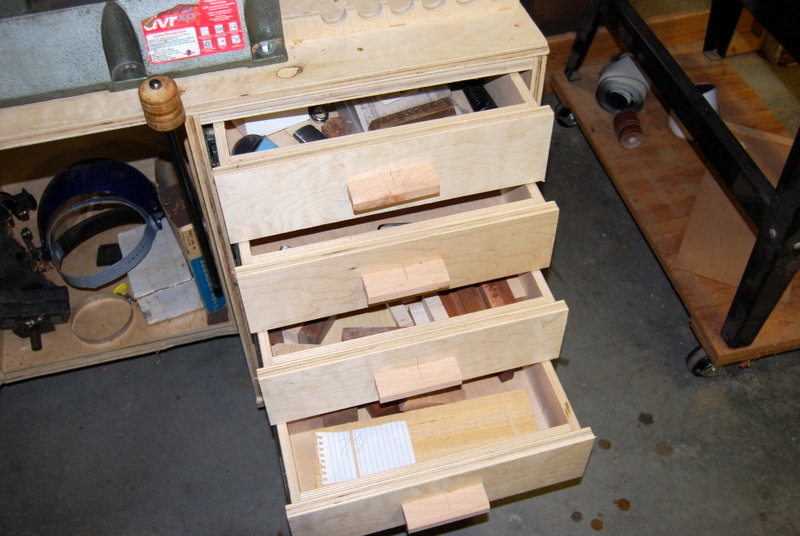
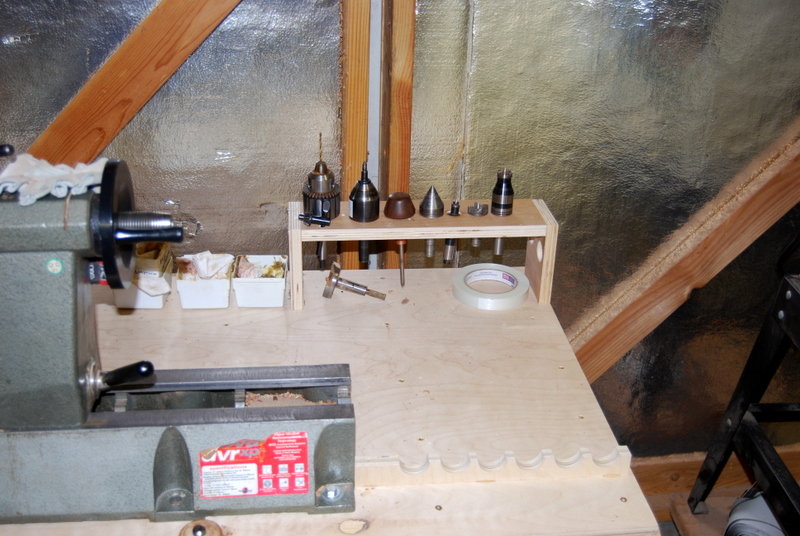
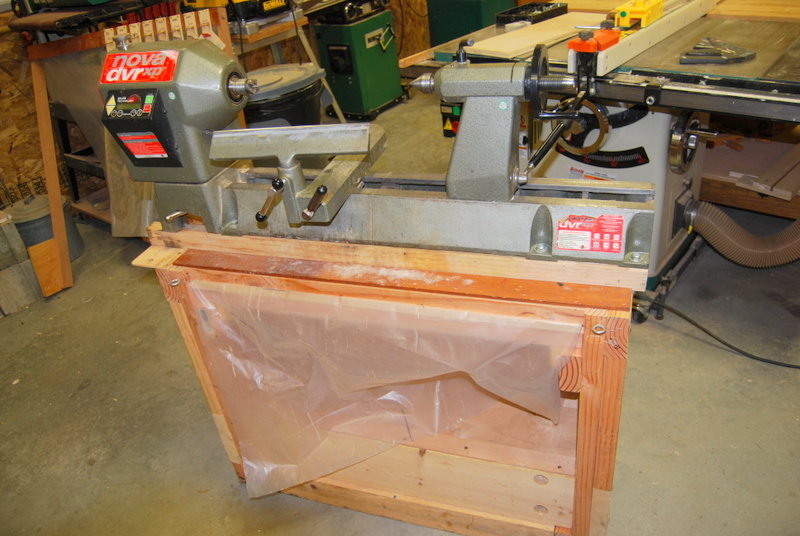
Thread transferred from previous forum - Original Post by Kev Original Post: As you know, I'm in the process of building a new shop. One of the many reasons I'm excited is that there will be room to get my lathe back in my shop. So, I'm starting to research options for storing turning tools to keep them easily accessible, easily cleanable, and of course, it has to look cool So, if any of you have any ideas, I'd love to see them here! Follow Up Posts: 1) I had no idea you have a lathe. Please don’t get me started . A divorce would mean 1/2 a shop. 2) I do.. It's currently living in my garage away from all the other tools. I'm not a good turner by any stretch but, I know enough to make what I need when I need it 3) Kev, On Nuts fishing rod holder on WTO, someone suggested this being an idea for lathe tool holders. I went to a friends house yesterday to have him turn some mallet handles for me. Nothing for him to do but have me practice on a scrap blank, knocking the corners off. Then on to the real thing. He cut and shaped the first handle and then made/let me do most of the second one. It’s a darn good thing for my bank account and marriage that I don’t have room for a lathe. That was a kick in the butt! 4) I do enjoy the lathe from time to time. I'm not a good turner by any means but, I can do well enough to pull off what I need. I'll figure out my tool options once things are settled in the new shop.. Lots of ideas but, standing and working in the final space will drive me to my final solution. 5) know I am late on this, but last month I decided to solve some of my lathe problems. I bought the lathe used and it came with a very user unfriendly stand. It had no storage and was very "tippy", I had my tools in one cabinet, the chuck, centers in another, and more stuff in a drawer. It was driving me nuts, so I decided to build a cabinet to store everything. I don't like the tool storage that hangs on a wall, because the only wall space near the lathe was directly behind the lathe with would make reach over a running lathe to grab a tool. I ended up adding 10 drawers to the cabinet where I can store all of the lathe related stuff. I built the cabinet long enough so there is space on the right to lay up to 6 tools I am using on any particular project in easy reach. The centers, and drill chuck store on top of the cabinet again within easy reach. I am using 2 of the drawers to store smaller wood blanks. I haven't finished laying out how I am going to organize the calipers, chuck jaws, cole chuck etc.. but it is all going to fit. I went to FastCap and bought several sheets of their 1/2 in foam, that were 50% off, and will use that when I finally get the time, (after Christmas) to finish the organization. I still have to add a shelf and door to center of the cabinet, but I will do that at the same time. Pictures of old and new stand below. 6) I really like this! Have you had any issues with getting dust and debris in the drawers? Knowing me, I'd forget to close the drawers tight..lol I agree that I don't like reaching over a running lathe to grab a tool! I was thinking about a pull out cabinet similar to what you did that would sit next to the lathe when I'm using it. Definitely some cool ideas there that I have full intention of shamelessly stealing! 7) Yea I occasionally leave a drawer open, but that is why I have a shop vac. I have to clean the lathe regularly anyway because it makes such a mess. I really haven't found a downside to this yet. My #2 son showed up for a few days and we are turning some pens for Christmas, even standing next to him while he was learning there weren't any problems. 8 Thanks Bob! You're correct in that turning is a messy business! I put 2 drops over the lathe area in hopes of battling that mess! One to collect at the tool when I'm working and another just for clean up. I really appreciate your pictures and explanation! 9) I forgot to add that I was going to make this 12" longer so I could put my tormek to make sharpening easier, but I didn't have the shop space. Shouldn't be a problem for you....yes I am jealous! 10) I haven't yet decided where my Tormek is going to live but, the lathe area certainly springs to mind 11) Speaking of spring, we’re now into summer. Have you had the opportunity to utilize this or your lathe since building it? 12) Well, I've been home for about 4 days and was out of videos when I got here. So, no, I haven't had the chance to use the new station yet. I have finished up a couple videos as well as got the new grinder and sharpening station set up. I have a couple more videos to get through and then I hope to have some time to get to the new lathe station! 13) I often forget that a bunch of your editing and posting are done when you are on the road. 14) No worries.. I did get the Ashley Harwood tools added to the cabinet.. I'll try and grab pictures a little later and get it posted up here.. 15) Speaking of lathes. Mine lives in its very own special spot that I set up in my Car garage. I have a sheet of aluminum behind it to protect the wall. Sheets of ply on the ends to keep the dust and chips to that area and I have one of those thick rubber fatigue mats in front to stand on. Makes your feet feel loved when you stand on that mat. 16) I've had my lathe sitting in this position for about 6 years now. All i need now is someone to show me how it works. 17) Best way is to chuck something up and go at it.. 18) I couldn't help myself and had to throw that in. Because who would go to all that effort to get the perfect setup for their spinny machine and then not use it.
-
Thread transferred from previous forum - Original Post by Bushwacked Original Post: I am curious ... Can you get the same quality 4x8 baltic burch as you can in the 5x5 sheets? Looking to get some prefinished sheets to work on closets as well, but wanted to test some non-prefinished out for some cabinets in the garage. So was curious if the quality was the same between the 2 or do I need to learn how to break down 5x5 sheets systematically since it is different than 4x8's Follow Up Posts: 1) Looking at the edges should give you a good idea of the quality. You shouldn't be seeing any voids in the laminations on good quality stuff. Also I would be a little concerned if there was a lot of football patches on the surface. I just bought three sheets of 5 X 5, 1/2 inch thick for some shop projects and none of them had surface patches pretty nice stuff, I paid $24.22 a sheet. At my lumber yard the 5 X 5 tends to be cheaper if you figure out the cost by square foot. But you need to be cautious because if you end up with more waste because of the 5 X 5 dimension then there may not be a cost savings. My mind set when I am using the 5 X 5, 1/2 inch stuff is the off cuts are nice to throw on the rack for future, temperary or permenent jigs and fixtures. 2) Chet is correct, if the 5x5 sheets create more waste, the savings may not be as much, but most people can find uses for the scrap. The price of pre finished ply is usually more than I like to pay. It isn't hard to pre finish a sheet on your own before making your cuts. I have used poly in the past. 3) I've gotten to the point where even if it costs me a little more because of the scrap, I just pay for it. The headache of dealing with something cheaper that tends to potato chip on me just isn't worth it. Often times, I try to be mindful of the size of the sheet in my designs to best utilize the material I prefer to use. 4) Thanks for the input guys, I really appreciate it! So here is there first set of some basic cabs I am planning for the bathroom along 1 wall (Just the carcasses so not super pretty yet)... Would I be better using 5x5 on this build or 4x8? See Picture he height of these right now is roughly 45" I am thinking and 30" wide on the outers and 23" wide on the inner ... I am still debating on having taller lower cabinets and then shorter uppers. Or just having the same height all around ... 5) What is the depth of the cabinets? If you are going full backs on each cabinet you will need 4@45"x30" and 2@45"x23". You will need 3 sheets of ply for the backs. Using 5x5 sheets you may run into an issue when taking the kerf into account, so a 1/4" rebate on the case sides should rectify this issue. If you did a depth of 18" you should get 3 side panels per 5x5 sheet so you would need 4 sheets. Now tops and bottoms will be another 2-3 sheets. So 10 total using 5x5 BB ply 6) Depth - 23 1/2 to match the others that are already there ... Thanks for the breakdown! 10 sheets seems a bit much ?? Although I have not broke down what it would be for 4x8 sheets yet. 7) If you lay it out, I'm confident you will need at least 10 sheets. Remember if you make a panel 45" X 23 1/2" you will only get 2 sides out of a 5x5 sheet. You will be left with a 15" w X 60" L strip and a 12" w X 45" L strip. Can't do any other parts with the leftover. 4x8 may save you a sheet, but you will also have less waste in most cases. Looking at your drawing it gives the appearance of 6 boxes. Rough parts layout per box sides 45 X 23 1/2 (qty 2) top 23 1/2 X 30 bottom 23 1/2 X 30 back 45 X 30 Based on my assumptions above, this is 2 sheets of 5 X 5. Your making 4 boxes this size so that's 8 sheets, the middle you might squeeze out of 2 sheets since dimensions are smaller. You may be able to tinker with the layout of parts per sheet, but I doubt it will reduce by much. 8 One day I needed some bb ply and I didn’t have my trailer at home so I strapped the 5x5 to the top of my Suburban. I looked like a Woodworking carpetbagger. Luckily I only had to travel a mile or so.
-
Thread transferred from previous forum - Original post by Puka Original Post: I think I need to set the record straight here. Its WOOD. . .no idea what this lumber is that you northerners speak of. To me Lumber is that region in the lower back. I wish you people would type proper engrish. Now that's out of the way. . .WOOD yours and mine. I've been talking to Kevin for years about this. You guys in the northern Hemisphere and us way down here in the deep deep south. I'm sure some of you will be interested in different wood. Kevin has always talked about what he builds with and has taken the piss with me what he sometimes throws away because he's run out of room. What you guys get and can buy and or what you treat as local wood to me is what i would call exotic wood. We can get some of it but not a lot and when we do its damn expensive. On the other hand what I can buy and or acquire here is the same for you exotic but for me not so much. So local wood for me that I have used or have in stock waiting to be used : Kauri - Native to NZ Rimu - Native to NZ Pohutakawa - Native to NZ Totara - Native to NZ Saligna Eucalyptus - Native to Australia Botryoides Eucalyptus - Native to Australia Jarra Eucalyptus - Native to Australia Pine Macrocarpa or Cupressus macrocarpa - Native to California USA (Grows like a weed here in NZ). There are more but these ones are the most common. . . ok maybe some not so common but I have used them. Not so local European Spruce - Dunnage Kwila - Used mostly for Decks Purple Heart - Dunnage Cedar - Sourced from a Trip to Dallas back in 2006 I'll post some pics for all you interested wood nuts of my wood in the future. But I figure a thread about wood needs to kick off. Follow Up Posts: 1) It's all lumber! I'm sure the others will find your descriptions above interesting! 2) Lumber and wood are interchangeable in my mind. The lower back is lumbar, if your lower back is lumber you might be a bit stiff. 3) There is an Aussie on another forum and he refers to everything as timber. 4) Timber, lumber, wood.... As long as we know what they're referring to.... 5) When I called the freight company to pick up the lumber from Spanky, I told the lady over the phone both timbers and wood and she didn’t have a clue and finally I told her boards and she asked why I didn’t say so in the first place and she was serious. 6) Australians (Ozzies) are weird buggers, even weirder than you Americans. I thought everyone knew that Timbre is what you yell loudly when a tree is about to fall over!
-
Thread transferred from previous forum - Original Post by Kev Original Post: So it would seem that my "scrap" walnut pile just grew substantially! Pennies on the dollar for this pile! It's certainly not the prettiest or biggest but, I couldn't refuse at that price! Follow Up Posts: 1) Lucky you! 2) yaaaay more walnut projects Is this another one of your dealer deals you got in on? 3) Yes.. I'm guessing it's somewhere around 300 BF but, that's a guess.. 4) Walnut in my shop is usually project specific unless I run across a must have board or two, regardless of price. I do that sometimes . Neat haul bud!
-
Thread transferred from previous forum - Original Post by Woodenskye Original Post: So if you needed to create a couple walnut or cherry panels that would measure 11" X 11", need to finish at 3/4" thick, would you buy 6/4 material and resaw hoping to get the thickness or just buy 4/4 and plane down and suck up the minimal waste? The lumber supplier I was at Saturday their prices between 6/4 and 4/4 was minimal, think 4/4 = $10/BF, 6/4 = $11.00/BF. Follow Up Posts: 1) Ouch.. That's spendy for Cherry! Because you're looking for a net 3/4, that doesn't leave you any waste. You'll have the blade thickness plus what ever milling is required to get it flat when you're done. I actually ran into this yesterday on the utility cabinet that goes with the quilting desk. All I had was 6/4 material and the HW dealer was closed. Long story short, I ended up just planing away 3/4" worth of material.. Might have been a little quicker to resaw a big chunk first but, I didn't. On that note.. My wife came in the shop and asked me what I was doing because saw dust was flying all over the outside end of the shop.. Yep.. dust bit was full and everything was flying outside....lol. Bad enough that I had to get the leaf blower out and clean up the end of the building...lol 2) I was looking at Walnut, white oak and cherry specifically so the price was for white oak. 4/4 eliminates the resawing step and in the end may be best. I hate hogging off a lot in the planer. 3) Agreed.. It is wasteful but, if you need 3/4", I don't see how you get around it? If you could get away with 2ea 5/8" panels then I'd go the resaw route.. 4) Also rough cutting as close to final size before you re-saw, joint and plane usually yields better because you have cut down the amount of possible twist or warp. 5) For 3/4 I have always gotten there from 4/4 stock. I haven't ran across a piece of wood jacked enough to where I couldn't ... Maybe I'm in the minority? And I do know I have not milled near the qty of most though. 6) Bryan, if I did the math correctly, using a 12” x12” panel, you would be paying $10 per panel using 4/4 and $8.25 per panel using 6/4. And considering the kerf, you wouldn’t get your 3/4” and then considering planing or drum sanding, you would get considerably less, assuming your re-sawing to be spot on. Me, I’d go with the 4/4. 7) Resawing adds an extra step that I'm not sure I want to do. Plus 10+ is pushing the limits of my saw. I think I'm just going to stick with 4/4 stock. I'm really want to try this new to me HW dealer, they are a little further away, but have some great slabs and selection. The place closer to me may be cheaper, but their stock is kinda boring. My old dealer burnt down and they decided not to reopen.
-
Thread transferred from previous forum - Original Post by Coop Original Post: Anyone have a suggestion for a good to better one? Follow Up Posts: 1) All mine are old Stanley. The only important part is that it locks and holds the angle you set even if it gets bumped rattling around on the bench. 2) And you’re right! Even two pieces 3/4” wide strips of ply held together with spring clamps work. I just want to treat myself to a purty one, as well as functional. 3) I have a couple Woodpeckers ones that look and work awesome! They don't work any differently or better than the cheap Stanley that I have but sure cost a lot more.. I agree with Tmize that holding the angle is the important part.. 4) This is the one I have and it's held up over the years real well. This link is amazon but I actually got mine from Peach Tree about a decade ago. www.amazon.com/Crown-116-9-Inch-Bevel-Rosewood/dp/B001C04FZS/ref=asc_df_B001C04FZS/?tag=hyprod-20&linkCode=df0&hvadid=309832851244&hvpos=1o2&hvnetw=g&hvrand=17462320587623781305&hvpone=&hvptwo=&hvqmt=&hvdev=c&hvdvcmdl=&hvlocint=&hvlocphy=9032171&hvtargid=pla-569320082802&psc=1&tag=&ref=&adgrpid=64417494871&hvpone=&hvptwo=&hvadid=309832851244&hvpos=1o2&hvnetw=g&hvrand=17462320587623781305&hvqmt=&hvdev=c&hvdvcmdl=&hvlocint=&hvlocphy=9032171&hvtargid=pla-569320082802 5) Thanks Chet. Every time you answer one of my questions, it costs me money ! 6) That's just part of being on a forum Ken, helping other members in anyway you can. 7) Appreciate ya bud! Just click on the link, click on pay now and it will be here on Monday. Gotta love/hate Amazon! That is a nice looking gauge. Looking forward to using it. 8 So you got a project in mind to try out that new bevel gauge? 9) It’s not fine woodworking but a new purple Martin house. They will be here soon. 10) Ok.. I know there's a story behind that comment? 11) Not really. I have to replace a roof on a purple Marin house and need to replicate the angles where they meet at the top. My HD gauge works but just would like to have a nicer one. It’s more of a like than a need. 12) Forgive my ignorance.. What's a purple Marin house? 13) Bird house for Purple Martins, I believe. 14) I think it's a house for purple aliens from Mars. 15) Ah, family.. That's probably it 16) I would prefer to think of it as a creative name for Coop's liquor cabinet. 17) Yeah, I forgot the “t”. Purple Martin house. A couple arrived last week and had sent their deposit in and get here to find their room not ready or the light on for them! 18) Me and my son (6 yrs old) built a bird house this weekend. I cut out all the pieces and predrilled some holes. Then I handed him a box of nails and hammer an unleashed him on it. It turned out almost square and no busted fingers from holding it while he stated them. 19) That's awesome! 20) Still no clue as to what the Purple Martin house is. 21) They are apartment type wooden structures that purple Martin birds use to lay their eggs and raise their babies in when they migrate north for the spring and part of summer. Here in Texas they usually arrive in mid Feb. to early March and leave in mid July to head back to S. America. They are really cool birds to have around. And I received my bevel gauge yesterday so apparently it wasn’t on Amazon’s plane that went down Sat. just east of Houston. And I don’t say that in a demeaning way as it was certainly a tragic accident.
-
Transferred from previous forum - Original Post by Bushwacked Original Post: Just curious what you all use? I have been looking at everything from rockler to woodpecker. Considered making my own but that just brings a chance of slop into play and would really like my shelving to be level haha. Follow Up Posts: 1) I have a few of them. I have the Woodpecker one as well as the Festool rail with the holes in it. Regardless, I find myself always going back to the home made option that I created with when doing the closet built in. If you don't want to make your own, I'll cut you a sweet deal on my Woodpecker version which I did demo in that video. As for slop, if you build it correctly, you'll be fine. I made mine 1.5" on each side of the holes, used my fence on the drill press to create the holes, and used the same spacing off of each end as well. 2) Interesting ... Is it because your homemade one is quicker and easier to use? Or what? Yes, I'll PM for details on what you want I'll take it off your hands please 3) Yep.. With the home made version, I just simply clamp it in place and start drilling. With the other ones, they require a router with a bushing and a lot of extra set up. The tricky part with the home made version is the depth stop on the drill bit, I usually accomplish this with blue tape on the bit which isn't the most accurate method especially in terms of repeatability. One of these days, I'll remember to order a stop collar for the drill bit which will solve that issue. 4) I have the kreg jig, the Festool LR32 and one I made out of a piece of pegboard. The kreg is easy to use. The pegboard works well, but sometimes you can jack up a hole. 5) Kev, as it’s easier to ask than to go back, is your home made version made from wood, as I suspect? And what keeps the bit from wallowing out the holes after successive drilling? 6) Yes, it's made from some scrap 3/4" birch that I had in the shop. To me, the trick (if you want to call it that) is to put the bit in the hole before pulling the trigger and then drill straight Something else to thing about.. If your hole has gotten a little sloppy, are you really going to notice it being a 32nd off from the other side of the cabinet?