Every purchase made through our Amazon Affiliate Page helps support this site


Woodenskye (Bryan)
-
Posts
2,097 -
Joined
-
Last visited
-
Days Won
62
Content Type
Profiles
Forums
Downloads
Gallery
Events
Store
Articles
Blogs
Everything posted by Woodenskye (Bryan)
-
 Thread transferred from previous forum - Original Post by Bushwacked Original Post: As goofy as he used to be in his videos when he first came out, he is still extremely talented in woodworking and I have really enjoyed his videos over the past year or so since he has toned it down a little bit. Spending the past 5 years in Asia on work, I have gained a huge fondness for the asian inspired look and will be implementing it into my builds once I get my garage setup completed. Just thought I would share ... Follow Up Posts: 1) Very talented woodworker for sure.. Can't handle him when he opens his mouth...lol. He should also mature on finishing rather than rattle can lacquer tho. 2) I can't stand him either, he should get someone to do a voiceover in all his videos. My problem with this piece is he is kinda killing the piece by mixing styles. I actually think the center stile isn't needed and confuses the piece. Now I will admit, I prefer more simple design. 3) I liked his tools more than anything. The router bit used in the router table to make the grooves for the panels and the router plate used on his hand held router. Wonder where you can get one of those base plates? Thanks BW for sharing. 4) It doesn't matter who the woodworker maybe but when they do the video in high speed they loose me as a viewer. I don't mind a touch of it here and there like when something requires a large number of clamps but when the majority of it is that way, I am done. And it is a shame because I enjoy watching different techniques for the same task even when its incorrect. 5) Rocker, Woodcraft, etc.. All sell those clear base plates.. 6) Completely understand! The issue becomes how to get the entire build in in YouTube time.. It's a dual edge sword.. You're supposed to keep the video length down but, if you don't show enough detail you get pounded in the comments. I do agree that the fast frame stuff should be limited and it's certainly not my favorite thing to do. I also understand it from the other side of the camera and YouTube comments. Of course I say this as I'm gearing up to put out about 20 days or so of time lapsed video of an entire shop going up 7) Good to know. I have a universal round clear one but didn’t know they had the square ones. I can see where it would come in handy. 8 I agree with kev it's a double edged sword. I'm sure he could of made this video into 4-5 easily smaller ones. But 10 mins tonget the full build in isn't too bad. Although I wish he would spend more time on certain techniques but it is his style. It is kinda like Marc. To get good videos anymore you gotta buy his stuff. Which I understand but I haven't watched much of his stuff in a long long time because of it. Each person does what they feel will make them most viewers and $$$ 9) I agree as I was constantly starting and stopping and in doing so, was not able to keep up with where he was at in his progress. 10) I do understand the time issues and the comment thing but I watch to learn and at the high speed that just doesn't work with my older style of brain. I am not saying it wrong it's just me. I imagine that watching regularly eventually makes it easier to consume. I know if you are a content producer you can't totally ignore the negative comments but to me they don't seem like actual woodworkers, just people that get their jolly crapping on others work. I will admit that even though his videos are not real instructional, when I just want to relax and watch something with out having to think about what is going on, I do enjoy watching Ishitani 11) Speeding up of some tasks is ok in my book. For example if you watch someone a lot, let's say Kev. If he has shown the milling process and then speeds up through that part I'm good. I am not a big fan of trying to condense a long intricate build into 1 10-15 minute video. As for comments, I don't make them and I'm sure the majority are just trolling the maker. I have a feeling that is why a lot of people are going to IG, which doesn't seem to be as critical, I guess maybe cause you can't hide behind a screen name. 12) I think there's a lot of truth in that! I'm actually fortunate to have received mostly positive feedback but, I know the day is coming
 -
Thread transferred from previous forum - Original Post by Kev Original Post: Just tossed together a video around this subject that I won't release until after Thanksgiving but, I thought I show you guys the picture early..

-
Thread transferred from previous forum - Original Post by Kev Original Post: Let me start this topic by saying that I am not the respiratory police and what you do in your own shop is your own business! I'm often guilty (on camera and off) of not wearing a respirator when I should be. The question often comes up about respirator use with a beard in the hobby shop. It's hard to argue against the practice with such woodworking giants in the industry doing it all the time and putting it all out there on video for the world to see. However, the fact is that they are not getting a proper seal on the mask and therefor, not getting the intended protection. When occasionally called on it, they simply state that at least they're helping themselves which is really false. It's like only having a "little bit of cancer". It's also hard to argue against respiratory manufacturers whose target market is the hobbyist wood worker and make false or misleading claims about their product protecting the wearer from airborne dust particles. Suggest just reading the fine print to find their catch. I'm pretty sure their lawyers aren't going to allow them to really make claims they know are patently false. Could be they "highly suggest" being clean shaven or their particle size is so large that the mask is pretty ineffective in the first place. As some of you know, I work in the oil and gas industry and respiratory protection is part of my job. Before you jump to conclusions and assume that there's a big difference between oil/gas and woodworking, let me also add that I also deal with refractory contractors, lead abatement contractors, welders and fitters as well as all the other volatile organic compounds that come with the oil and gas industry so, I'm well aware of the respiratory protection requirements in a wood working shop. In industry, to be able to wear a respirator on the job, a pulmonary function test and medical clearance from a doctor are required before they even allow you to have a fit test for the specific mask that you intend to use. If you were to show up for the fit test with a beard, you would be immediately denied the test until you were clean shaven. This is purely because you absolutely cannot get a proper seal on a mask with a beard and, therefore, could not pass the fit test. So, as I said in the opening, what you do in your shop is your business. I'm not the hobbyist respiratory police but, I will say, those posting instructional videos wearing respiratory protection with a beard are doing their followers a great disservice! I'm not a fan of the YouTube Safety Police and refuse to toss my name in that ring. However, I thought I'd toss the information out here for you guys to use as you see fit. I'm always available if you have questions! Follow Up Posts: 1) So for a full face respirator, I have researched that some have a power pack (trend air shield) others have cartridge filters (3M) as long as the seal is tight over the beard and let's say under the chin, are the cartridge units as effective? 2) Not beard related but I’ll ask anyway. I had heard it mentioned that more the pink cartridges are exposed to the air, the less effective they are. That pertains to fumes and not dust, right? 3) The ones with the "power pack" are actually known as Powered Air Purifying Respirators (PAPR) and actually feed filtered air into the mask. They do offer a better level of protection than just filters. If the beard is a must then, the PAPR is the better alternative. As with any respirator relying on a seal to the face, any interruption in that seal reduces or eliminates the effectiveness of that mask. 4) Great question! Most manufacturers recommend that cartridges be replaced each shift (8 hours). What does that mean in our shops? Well, you can prolong their life if you seal them up in a plastic bag between uses but, they're not meant to last as long as most of us ask them to. As for fumes or dust - Not all cartridges are created equal. For fumes, you need an Organic Vapor cartridge and for dust (mostly what we deal with) you need a Hepa filter. The Organic Vapor (OV) cartridge will actually clog up and be no good faster than the Hepa cartridge. Most manufacturers recommend a max of 8 hours use on any of their cartridges. In then end, when you notice it becoming a little harder to breathe, change the cartridges out! 5) Well, razor blades are a heck of a lot cheaper than a PAPR, and five years ago that respirator I bought was a waste of money. I guess I really need to see if the cartridge types fit my face. 6) I have the 3M 6291 and really like the fit. Prior to it, I had an elipsemask with the paper filters. No comparison. 7) 3M makes good stuff, just change the filters once in a while...lol. Next time you change the filters, before you install the new ones and after taking the old ones off, put the respirator on and plug the filter holes with the palms of your hands. If the mask sucks tight to your face and you can't physically get air in, then you probably have a pretty good seal. This really is the "poor mans" way to do a fit test. 8 I use isopropyl alcohol pads to clean the mask itself after each use. Is there a better way? 9) Respirators come in different sizes. Usually small, medium, and large. This is where the "fit test" comes into play to ensure that the mask fits your face properly. There are rare occasions when the user can not get a seal from a particular manufacturer and is forced to switch to a different manufacturer. Most adult males usually take a large but, there's quite a few (like myself) that take a medium. 10) Nope, that's awesome! From there, just store it in a sealed bag and you're doing as you should. 11) Seems to be lots going around right now around respiratory protection so, I tossed this together to help answer some of the basic questions that come up.. Always so many questions about respirators in the shop! Which manufacturer, which cartridge, what if I have a beard, what about these new companies who claim to have all the answers? I'll start with the easy part. If you're not willing to shave the beard then, you're more concerned with your personal appearance than your lungs. That is just a fact but, it's also a personal choice and your decision to make. So, what about these new companies who claim to be able to fit guys with beards? Nope! They might toss some fancy data at you to support their position but, if you read the fine print, you're not truly protected! The RZ mask is the latest which seems to be all the rage. Take a look at their advertisements and you'll notice a bunch of clean shaven men using them. Even for them, this is still not even close to the best option! This is really nothing more than a paper mask with a bigger price tag. Which manufacturer? Lots of good ones out there and this one comes down to which one fits your face best. Not all masks are created equal! If you're not going to invest in a proper fit test, then do the next best thing and put the mask on, plug the cartridge holes, and try to inhale. If you can't get air in, chances are that you have a pretty good seal. Which cartridge? Hepa is for dust and Organic Vapor is for fumes. They're not interchangeable. The size of the particulate matter is very different. Most manufacturers do make a "stacked" cartridge which is good for both. They're a little harder to breathe through, assuming you have a good seal, and probably won't last as long because of the different sizes of the particulate matter. How long do they last? This is the tricky part for what we do as woodworkers. Most manufacturers are going to claim about 8 hours use before recommending changing the cartridges out. Obviously, they design in a little fudge room in that number so, you have a little wiggle room. How much? For me, my ability to adequately get air is usually the tell-tale that my filters need to be changed. How to store your respirator? In a sealed bag! Don't toss it on a shelf, hang it from a hook, etc. Store them in a sealed bag to get the most out of them. Maintenance. You should use an alcohol wipe to clean them after each day's use and before storing them for the night. Change the cartridges when needed! And, do a deep clean about once a month to prolong the life of the respirator. Once a month is based on an average hobbyist woodworker. If you find yourself spending a lot of time in your respirator, then this frequency should be increased accordingly! I hope this answers some of the common questions.
-
Thread transferred from previous forum - Original Post by Woodenskye Original Post: My eye and taste is generally simple. Awhile back someone posted a video by the samurai carpenter (felt mismatched joinery) and I follow certain people on IG. One of them is Cremona, and he has been working on the sideboard project. I like the design, but feel the heavy figure ruins the piece. All the crotch figure is distracting and in my opinion ruins the piece. D&W uses a lot of figure and in most cases I think it enhances a lot of the pieces they do, it seems to be more strategically thought out. So what do you think, does figure help or hurt a design? Follow Up Posts: 1) Very fair assessment IMO. There's a few things about Cremona's piece that I'm not a fan of. Too much figure and, the sap wood in the panels is upside down. I think figure is important but, you can also take it too far. It has to be the right piece to take a lot of figure. 2) I guess 1 of the places that to much figure is a no go in my opinion are drawer fronts and doors. They usually are the focal point of the piece and not the right place for overly figured wood. Sometimes I wonder if people use to much figure as a way to hide something or make a shock and awe type statement. Tommy Mac once did a piece that had so much figure it looked horrible, but his skill makes me think of the shock and awe statement. 3) I don't doubt his skill as a woodworker. Ultimately, it's a personal choice unless you're trying to stay true to what it's supposed to be. I guess you could say the same for the way he mounted the knobs. Where I understand where you're going with all the figure, I guess I didn't like the sap wood in the top more than all the figure. Great conversation topic for sure! 4) Guys, can you provide a link to Cremona’s project? 5) It's a Guild project Coop but, he's posted lots of pics on FB as well in the Guild group 6) Coop, if you watch the first 2 minutes you can get an idea. 7) I think this pic was public.. (see photo below) 8 I thought all along that he was using to much figured wood and he, at one point, had a live edge on the bottom apron but ended up removing it. Over all I think the whole project has to much wide and wild grain. The side and door panels may have survived had he used some nice tight grain for the legs, aprons and the stiles and rails. But even at that it still wouldn't have been my cup of tea. I think that because he mills all of his own lumber he wants to make his projects from the same log which is a good plan but to some degree you have to plan that when you mill the log to begin with you can't just slab it up because you won't have the grain for some parts that will add to the project in the proper way. I had wondered if this would have worked better if the figured panels had been the secondary wood to something like cherry but over all I think it was just wrong for a shaker piece which are normally known for simple design and appearance. 9) Chet, I tend to agree this is probably a major contributing factor, and maybe he needs to work with a pro sawyer to better understand how to saw for furniture projects. I have watched almost all his sawmill videos, because I find it really cool, but he only seems to saw for crotch figure or large slabs, not taking into account sawing for furniture parts. If he was using the crotch figure I'm not sure a different species would be better. I dont want it to seem I'm bashing Matt specifically, I have seen others. With that said, I do like the overall design, but I really think figure should be used as an enhancement to the piece, like a specific hardware or in some cases exposed joinery. 10) Wow. Not an expert on design, shoot, not even a novice but there’s definately something to be desired. Myself, I like figure in a panel. I’m not even sure you can over do it. But the sap wood in his did it for me. It reminds me of a snapshot with a glare, x’s 6. I understand you can’t always use perfect heart lumber and he was understandably proud of his. Not to blow smoke but Kev’s hall table with a subtle bit of sap on the bottom of the apron gave it a soft rich look, like it belonged there. 11) Although I agree that there was too much figure in his piece (which is a matter of personal choice), I took more issue with the sap wood being on the top of the panels. The panel look to have the grain going the wrong direction. 12) I have 2 ea. 12” x 1” x 12’ long curly maple headed my way from Spanky. Although it’s some beautiful wood and I don’t have plans for it and I’m going to have to be darn selective where I use it. I’ll take pics when it gets here on Tuesday. I’m also getting 2 ea. 10” x 2.5” x 10 long qtr. sawn sycamore. I really like working with the sycamore but can’t get it here. 13) I have some stuff like that in my shop as well Coop.. Waiting for just that "right" project. 14) I may by the outcast on this but I prefer nice straightgrain wood an good clean design in a piece. My thinking is that it makes you focus on the craftsmanship an quality of the furniture instead of the allure amazing wild grain to draw you away. ( full disclosure) I haven’t gotten to the point yet to that I feel my craftsmanship is high enough to take center stage but it’s just what I strive for. 15) I don’t disagree completely. But I do think some nice figure has it’s place. Take a pretty lady (no pun intended). She will always be pretty, even in a mud fight. My mind is beginning to get off course. But if that lady puts on a nice dress, necklace or ear rings, it just adds to the beauty. JMO
-
Thread transferred from previous forum - Original Post by Coop Original Post: I made this bookcase a year or so ago for my son and his wife. Now she is wanting this hall tree to match it. The bookcase, made of walnut and cherry, was sprayed with dewaxed garnet shellac with several top coats of GF HP. Would the hall tree look ok made of walnut and the door panels of cherry? Or would it look better all of either wood? The two pieces will be in different parts of the house. Sorry for the quality of the pics. I have a larger one of the bookcase but it is too large to post. Follow Up Posts: 1) Coop, I think the cherry and walnut in the bookcase is good. In the hall tree, I'm not sure it would look good. In my opinion if I was going to do I would make the entire thing out of walnut, but make the drawer panel out of cherry. 2) Thanks Bryan. The bookcase was a Guild Build and as I recall, that’s what Marc used. However, I was hesitant about the cherry panels as I have never seen a two tone door like that. Thus the reason for the thread. Thanks. I’m just glad she does’t want It painted. Love her to death but I would have had to hold my nose and not sign and date it! 3) I will contradict Bryan here a little bit. I think that if you used the cherry for the panels only on the hall tree, no where else, not the arm rests or anything else, just the panels, I think it will look good. Then to help it along make sure any hardware you use is black this will draw things back to the walnut and keep the cherry as an accent wood. I think too, that I would keep the cherry clean and a simple tight grain no figure or cathedral grain to it. 4) Now that I look at the hall tree again, I don't think that it would look good in just walnut. If I was t pick just one species i would use something like mahogany, sepele or cherry. But I know you have a walnut stache so it is what it is. 5) Here is my thought on the walnut only, if you are going to have coats hanging there, the cherry wouldn't be seen often, so having it be the drawer panel would provide the accent. The other suggestions for species Chet gave are good options if you wanted to go a bit lighter. 6) Just another thought... Why not age the Cherry a little before finish? Put the Cherry out in the sun for a few days and let it age naturally and then build with the cherry panels. IMO, it would look amazing! Use cherry for all the panels including the drawer. 7) Although I do have a walnut stache, most is 8/4 or better. I did buy 25 or so bf of walnut and cherry today. My figuring is, it’s going to DIL and I can write it off and put the balance in stock . So I do have plenty of both to be creative with. Unfortunately I can’t scroll back to see previous posts while I type but I think to your point Chet, I bought figured cherry, thinking just the opposite of what you said, thinking figured would be better on panels if that was the direction I went. I’m glad I threw this up for discussion as I have no sense of direction when it comes to something like this. Thanks for all and any input. 8 That’s exactly what I did with the bookcase to darken the cherry so there wouldn’t be such a stark contrast. Then the shellac subtracted from it as well. Thanks to Chet for your help with that. 9) Regardless of the wood used, do you think laminating a piece to the edges of the “door”, to give it the thickness of a real dood would be a good idea? The rest will be 3/4”. 10) Not quite sure I follow? Why not just thin out the panels to 1/2" rather than thicken the rails and stiles? Would certainly be structurally sound. 11) I was just thinking that as it was suppose to be or look like a door, that it would look better if it was as thick as a door, only on the outside edges? It would be built out of 4/4 and the panels as you suggest will be 1/2”. 12) Make a trip to your local furniture and antique stores and look at their options for your build ideas. I think you'll find most hall trees are built from 4/4. The wife and I make trips like this occasionally and I'll snap photos if I see something that really catches my eye.
-
Thread transferred from previous forum - Original Post by Kev Original Post: Obviously, the new shop is getting closer! It's time to start considering media options. I'm not going to run dish or cable out there but, I will have an internet hook up. I would prefer not to create an extra monthly bill for any service but, am interested in the ideas and options available. I want to run TV as well as radio. I do pay for a sirus service for my truck, just not sure if this can be transferred to the shop? Anyway, I'm interested in the responses as we get closer! Follow Up Posts: 1) In the early days of Sirus, which is saying I don't know if this still exists, my brother had service through them and at that time he had some kind of a do-hicky that plugged in at each location depending whether he was in his house, car or office and it had to be plugged into the device that he was using at the time. It cost more then a single subscription but less then a subscription for each location. I just use pandora in the shop on a Bose dock, I have a Dewalt radio for listening to Baseball games. I would like to have a TV out in the shop for college football on Saturdays but haven't done that for two reasons, its only 14 weeks a year and I haven't decided if having a TV on in the back ground would be an (unsafe) visual distraction. So it will probably never happen. 2) I will have a TV in the shop but, I don't typically have shows on that I have to "watch" to know what's going on. It's really no different than listening to an audio book or something of that nature. I will put a sporting event on where I may peek at the score now and then. If I find myself watching something, I'll usually stop the woodworking and watch. As for the radio, I really only get one station here. It's pretty good so, I don't normally mind it but, it would be nice to get the baseball games on there or, occasionally get a different station. Especially on Sunday's when the local station plays the Beatles all morning. I can handle them in small doses but, not hours on end! 3) I think Sirius has something where you can link between car, home and devices. I don't know if you need other equipment. Internet and computer should allow you to stream most of what you want. I really only like listening to music when in the shop. 4) you could always do chromecase or fire stick or apple tv ... whatever your tied to. Then you could just stream from your phone whatever you want. Youtube has a new live tv feature, but have not researched that to see if it is worth it. If you have ESPN on your TV provider already you can stream games and stuff from their app as well. 5) I'm actually looking into some of those options as (of all places) Walmart has amazing prices on TVs right now! Internet will be put in the new shop on Tuesday.
-
Thread transferred from previous forum - Original Post by Kev Original Post: I created an account over there for anyone interested in following.. I don't know poop about it but, I guess I'll learn.. www.instagram.com/kevs.woodworks/ Follow Up Posts: 1) Following. Mine is woodenskye, but I don't post much. 2) Mine is - chet.made.that 3) Thanks! Following both of you
-
Thread transferred from previous forum - Original Post by Kev Original Post: I ordered the hinges for the upper cabinets from them. Apparently, they went on back order right after I made the order and I never got a notification. I could have canceled my order and been done by now. Instead, I wait! Needless to say, I don't see me ordering much from Rockler in the future! Follow Up Posts: 1) I have never been real impressed with Rockler's order system. It always seems to take a week after placing the order for them to even ship. There is a new Lee Valley in Reno Nevada. I am getting stuff I order from them in two days now, almost faster then Amazon. 2) I’ve never ordered from Rockler as there is one not too far from my office and I find the service there to be very good, but I can see where this experience could leave a bad taste. 3) I tried to follow up on my order today and couldn't even get ahold of anyone in customer service. They told me I could leave a message and they'd get back to me. Pretty unhappy and will be looking elsewhere to spend my money in the future! 4) Just spoke with their Customer service.. Hinges came to them today and they're not going to ship until Monday. Rockler is just not interested in my future business! 5) As a follow up on this thread... I needed a couple 4' sections of T-Track for the new miter station and really did NOT want to order from Rockler! The problem is that not all T-Track is the same so, I was concerned as all my other T-Track is from Rockler. I took a chance and ordered from Amazon and they arrived today. I was pleasantly surprised that they're identical to the Rockler T-Track and take the regular toilet bolts. www.amazon.com/gp/product/B07DB45LLY/ref=od_aui_detailpages00?ie=UTF8&psc=1 I will be looking for more options outside of Rockler in the future! 6) A good source for T Track is Orange Aluminum. Good prices and they do fit Festool clamps. I totally get the stuff you have fitting the Rockler track. 7) Yea, that's my issue! If I were starting from scratch, I'd pick something and stick with it but, now with my current dislike of Rockler, I was really taking a chance! I'll have to take a look at "Orange Aluminum" and maybe order a little to test drive it compared to what I already have. I'm certainly not stuck on a color! 8 I just went to order a chunk from "Orange Aluminum" and their price is great! The problem is their shipping! A little less than 9 dollars for a 4' chunk was great! 18 dollars for shipping wasn't tolerable. Perhaps on a large order the shipping wouldn't be so bad. 9) Agree that for a small order the shipping cost stinks. It really needs a bulk order to justify, but how much track does a guy need at 1 time. 10) One more follow up.. I ordered more on Amazon and they just arrived before Rockler's.. Also, they were about 1/2 the price of Rockler so, word to the wise, shop around a little. 11) Rockler sent me an email yesterday asking for a review..lol. Not too sure they'll be pleased with the review that I left! 12) They will not be swayed by your scathing review, they will however notice your online presence, then they will send you a whole bunch of free stuff to update review and will try to make you 1 of the gang. This is how they get all the non savvy shoppers go pay double. 13) As much as I really want to cut all ties with them, I think it's a smarter move to just let it be for now. Would be just my luck that I'll cancel everything from them and end up needing some particular object and looking like a heel.
-
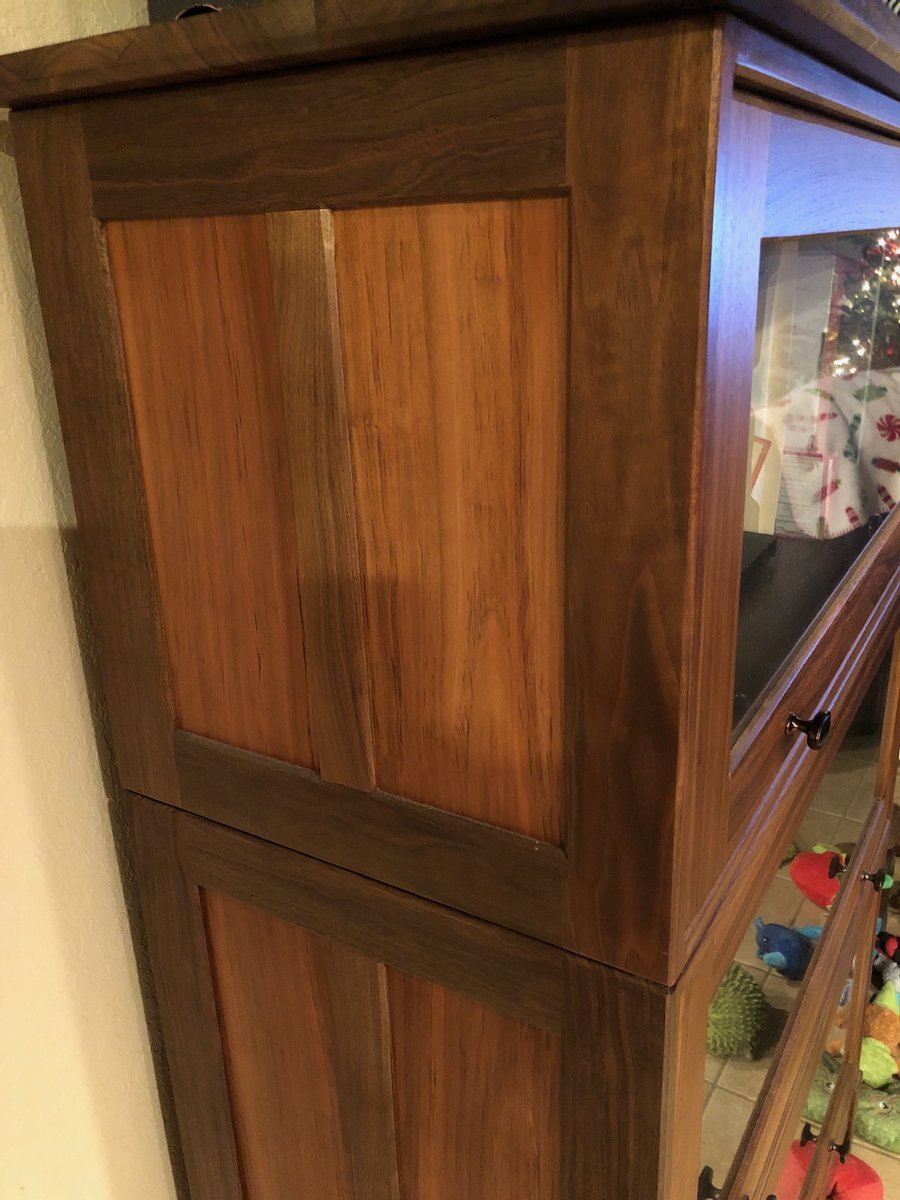
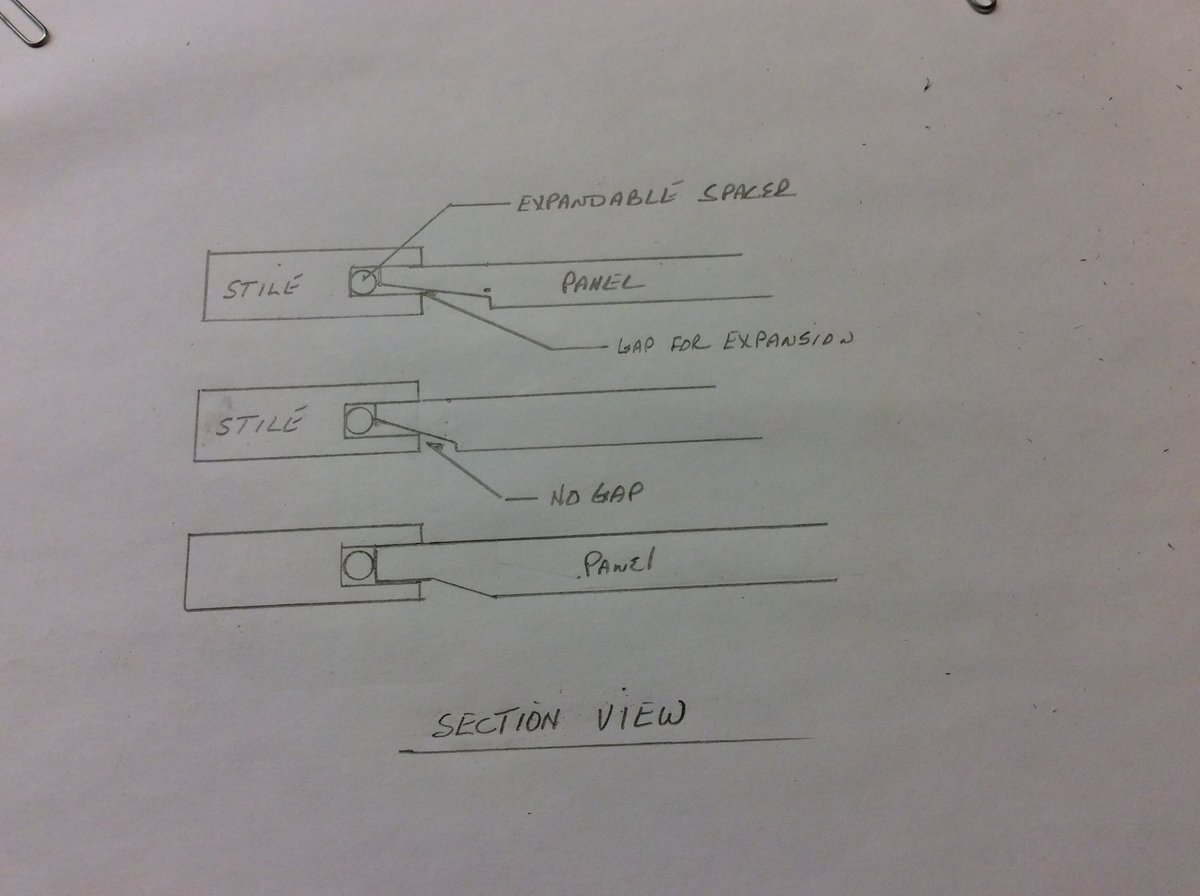
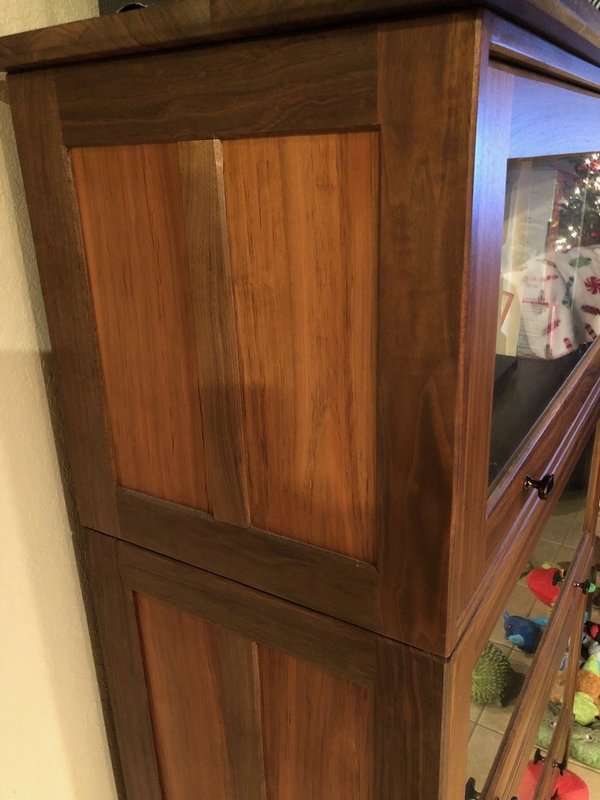
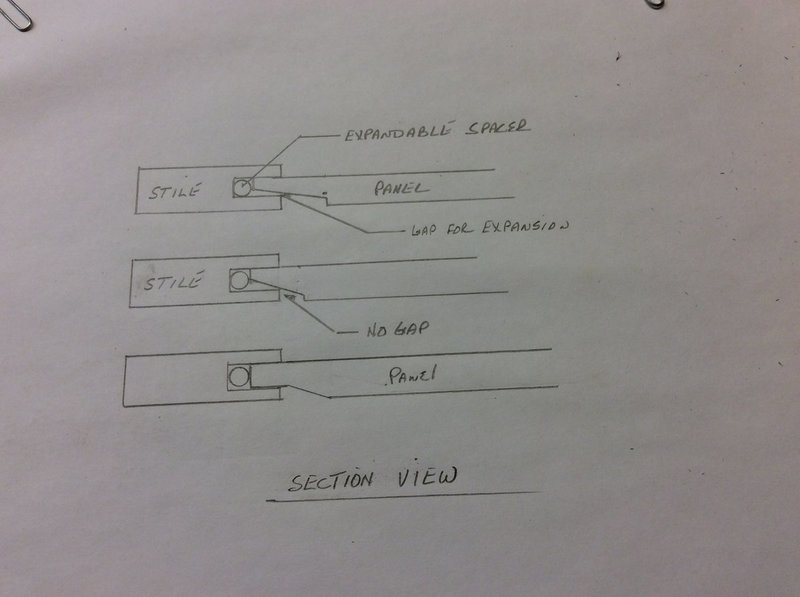
Thread transferred from previous forum - Original Post by Coop Original Post: Guys, I’ve never made a typical raised panel door. I researched making them on the table saw and they all look like my center drawing with no space between the panel and the stiles/rails where they touch on the bevel side. To allow for expansion, it looks like there should be some clearance, top drawing. None are cut like the bottom drawing (and excuse the crudeness of the drawing), where the connection has no space but does allow for expansion. It appears to me that if cut like the top illustration, if the panel expanded, the stiles would split? I realize the amount of wood movement increases, the wider the board, so everything is relevant. I hope all of this makes sense? And hopefully the drawing is clear enough. Sure doesn’t look good from here. Sorry. (See photo Below) Follow Up Posts: 1) I only made 1 raised panel door in my life and it wasn't a complete fail. I believe you need to back cut what will essentially be the back of the door. Go take a look at the Infinity tools or Sommerfeld tools website, they should have raised panel router bit sets, and will hopefully give images to clarify. 2) ThanksBryan. That type of bit is what gave me question. The videos on ts cutting doesn’t allow for the back culling. Thus the question on the space allowed on the bevel or no space? 3) If you use a raised panel bit in your router table, it will make a flat so that things come out more like your third image. I've done a few and have a few different Freud raised panel sets that work well. If you go this route, just be sure to turn your router speed way down! Remember, the bigger the bit, the slower the speed. If you don't have a raised panel set, I could probably send you one to test drive.. 4) Thanks Kev for the offer. After looking at the panel bit, I think I can just lay the board flat on my router table and use a straight cutting bit to make the last cut. 5) Yep.. You can certainly create the flat you're looking for that way.. To be honest, I've often had this same question when watching Cremona do drawer bottoms. He only bevels one side which leaves that odd angle into the groove. I'm guessing there's just not enough wood movement to create any issues over time? 6) Although movement does exist. We had new cabinets installed about 6-7 years ago and I wanted solid 3/4” wood flat panel doors so the raised portion was on the back side, all made of solid beechwood with the exception of the shelves and back panel. This year my wife got a wild hair and wanted them painted. The painter came in and sanded everything and caulked the lines between the panels and rails and stiles. Now that winter is here, a couple of the door panels have shrunk/withdrawn from the stiles and broken the paint lines. Hey, again thanks for the offer to loan me the panel bit set. 7) Did he use the stretchy caulk or whatever it is called so when that does happen it will stretch instead of break .. or was it not the caulk lines that broke? 8 No, the caulk lines didn’t break but when the panel withdrew, the paint lines broke, if that makes sense?
-
Thread transferred from previous forum - Original Post by Chet Original Post: If anyone is interested. Marc's joinery book is out sometime in March. If you pre-order it on the guild site for $30 you get the book and a guild project from the past. There is a drop down menu of the available projects. You get the book when it comes out but you get the project as soon as you place the order. If you have all the projects you can pre-order the book for $25. This is a good way to join the guild if that is something you have been wanting to do. Follow Up Posts: (some posts removed due to not matching theme of thread) 1) I noticed that this morning, I wish the projects I would want we're part of this pre order bundle. 2) Which projects aren't part of the preorder bundle? 3) On the guild site, at the top of that page, click on "extras" then click on the Essential Joinery book pre-order and it will take you to the next page, on that page there is a drop down menu that list all of the available projects for the pre-order deal. If there is nothing there that you want, you just pay $5.00 less for the book. Kev, I am guessing you are like me, there is nothing there you don't have already. I doesn't include any up coming projects. 4) Ok, so it does include all of the older projects? I did preorder the book but, chose the cheaper version without the project for obvious reasons. 5) There is a couple that he took out. One was the Roubo the other was the sculpted rocker. 6) Unfortunately I haven’t been to the guild site in a heck of a long time. It doesn’t look the same and That ain’t good for an old timer that hates changes. I don’t see anywhere on there about the book. Navigate me please. 7) I thought when I first looked at this the rocker and roubo were there ... did something change? Those were the 2 I really wanted. I might check out the desk? I am not sure now ... 8 It contradicts a bit what he said in the Friday Live.. He said that he wouldn't include projects done by other instructors or pre-order projects but, didn't mention those 2 projects to the best of my recollection. I'll also be honest and admit that I haven't gone and looked. 9) Those were the 2 that would have really got me to buy the book... Now I'm just kinda annoyed ... 10) This was my thinking as well. However if nothing appeals to you or you have every project you might be able to get an upcoming project. 11) It was said. If you have every project, select the I have all guild projects and give me my $5 back. Marc said he would verify and his mom or Nicole would call after the 16th to see if they could do something. If something else was said after about 5 minutes I missed cause I stopped watching, like usual. 12) too bad I dont have them all :/ I really only see myself buying 1 or 2 ... at this rate, I see myself picking up more plans from Kev/Mel than TWW 13) As much as I appreciate that, you do realize that you're actually better served long term to build your own plans right? Finding a program that works for you (Sketchup, Fusion 360, etc) allows you to work through details of your project before committing them to the wood. I will also give you some insight into my plans. I purposely asked Mel to omit the joinery in them. I did this on purpose because there are so many ways to accomplish a joint and the dimensions change with those different options. This is why my prices are so low as well. They are nowhere near as in depth as Marc's plans but, I also don't have someone who does that as their full time job either. So, you can pick up my plans and follow the videos or, alter the plans to fit your joinery options. So that everyone can see what I'm talking about, I'll give each member of this forum a free set of plans of their choosing. Go to my website, pick out what you want, and drop me a note (MyBenchTime@gmail.com) and I'll send you the plans. No strings attached.. 14) completely agree Kev, making my own is the best way. I draw all mine up in CAD first ... sketchup, I have just not had time to try and learn with small kids and crazy work hours. So I stick with CAD and a pencil drawing for my builds ... I just like plans to more or less validate I covered everything if I am trying to build something close. like all the little pieces etc. sometimes get left out on my drawings. So I use them for a sanity check and to support the makers as well. Once I get better on making sure everything is there and I thought it all through, I am sure it will just be CAD and pencil drawings unless it is something big and maybe need some guidance You serious about the plans? That is too nice of you Kev!! 15) Absolutely, pick a set of plans that you want and drop me a note. Note: The assembly table plans aren't uploaded yet but, they are available. 16) I am more than capable of adding the joinery in Sketchup and I'm sure that Mel is in 360. The issue I have with it is that if I show a traditional M&T in the plans and then change it up in the video to a domino, the plans don't match the video. I just don't want to be tied to something but, want the plans to be available when the videos are. I really do think that most woodworkers will use joinery methods that are appropriate for them. Of course, I have ways to contact me so, if someone wanted to use specific joinery they can contact me and ask the questions. I might not be the brightest lightbulb but, I think I can answer most standard joinery questions as they relate to my projects.. Ok... I hope I can
-
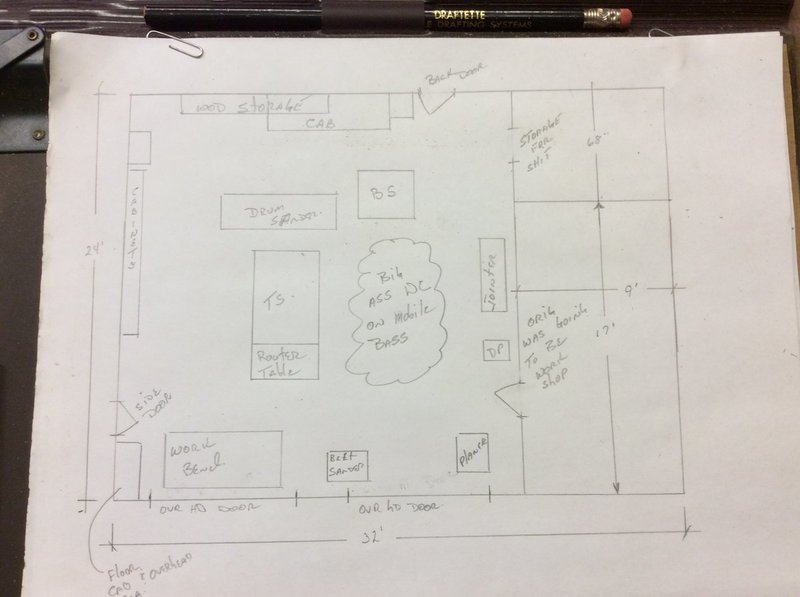
Thread transferred from previous forum - Original Post by Coop Original Post: Ll I’ve spent the last 3 days in the shop working on multiple projects, connecting my mobile dc hose at least 50 times to various power tools. I have a small 6’ x 9’ room in my garage that initially was suppose to be for lawn and garden and has since become a catchall for everything. I’m thinking of taking part of this area for a permanent dc system and coming of age with hard piping from there to my shop. This will also give me much more, unobstructed floor space in my shop. As with computers, I am behind times. My dc is currently a HF system, again on a hand constructed mobile base, two stage with a Wynn filter. As popular as hard piped systems must be, is there a guide somewhere that deals with the size of piping in regards to the amount of drops? Also, should I s*#tcan the existing HF system and purchase a better, more efficient one? This is my current layout. The dc system will serve only the ts, bs. jointer and drum sander. Sorry, don’t know why it shows up twice. See Photos Below Follow Up Posts: 1) There are thousands of people out there with their own opinion of what you should do. Many will come off somehow offended if you don't chose their way of doing it. My suggestion would be to select the dust collector you want to use. I use Clearview, Marc uses Oneida, many use the HF unit that you have, some use Grizzly, and some use other brands that I can't think of off the top of my head... Once you choose the collector that you want, I'd suggest using a design service (I went through Clearview to get Nordfab's service) to design the system for you. Yes, it costs a few bucks but, at that point you know it's right. This doesn't mean you have to use that piping, it just means you get a properly designed system. Of course, from there, you open your wallet and get to work. In the end, your choices on machine and ducting depend on your shop, work flow, and budget are your choices and none are really wrong. If the budget is your main concern then, you'll be looking at it very differently that if great DC is your main concern. One final thought... There's no such thing as perfect dust collection. I have more money wrapped up in my system than probably anything else in my shop and it's far from perfect. I still have to clean up at the end of each day. At least by using a design service you know that you did the best you could based on your budget.. For the record, I think the Nordfab was $250.00 and when I bought their ducting, that came off of the price. 2) Thanks Kev. Gettng it right the first time is more of a concern than budget. I’d hate to ram rod this thing and it not be right, putting good money after bad. 3) If you're interested, I can drop you my contact at Clearview? She's been absolutely great and does all the communication directly with Nordfab so you don't have to.. You just fill out their paperwork with a diagram similar to what you have and they do the rest.. Now, if you don't want to go with Clearview, then I'd suggest checking with your manufacturer of choice.. Or, you can contact Nordfab directly and get the ball rolling on the design service.. And you won't hurt my feelings if you're not interested in the contact...lol 4) That would be great. Send me your contact. Thanks 5) How do you like that Wynn filter? What version did you get? Really $250 for a design by the pros so you know it's right and mathed out correctly seems like a great price! You probably spent more than $250 in man hours fiddling with moving the hose. 6) +1 on using Nordfab. It's pretty expensive but it's a joy to put together. 7) I really like the Wynn filter. I generally tap all around the outside to get some of the dust to fall into the clear bag. About3 times a year, I will take it off and give it a through cleaning with gloved hands and air pressure. The little turnbuckle screws that are suggested to be used to attach it are a joke. I use two ratchet straps over the top to secure it. It sure beats the heck out of the cloth bag type filter.

-
Thread transferred from previous forum - Original Post by Woodenskye Original Post: I'm in the very early stages of a workshop reorganization. Hopefully this doesn't move at a glacier pace. I did a rough layout that I am happy with at least on paper. My shop is 10'x20', and has its challenges. So let's talk workbenches. I believe I could comfortably fit a 4 - 5' bench. So what would you guys consider the minimum width you would want for a bench? Follow Up Posts: 1) Interesting topic considering my recent releases.. That bench "entry level bench" that I did was originally going to be a 5' bench. Frankly, I think you'd be fine with a shorter bench. As for depth, I really think 24" is a great depth but, you could get away with a little less there as well. You can pull the plans free from my web site and alter to fit your needs.. If you don't want to go there, drop me a note and I'll send them to you. 2) My bench's work surface is 20" X 66" and I have found that a very usable size. 3) Kev, I will look at the entry bench plans. Chet, do you feel the 20" is at all unstable? I was thinking more along the lines of 16-18" due to where the bench will live. I'm just not confident that it will be sturdy for planing or chopping. 4) Not at all. This is the bench I built but to the dimensions I mentioned above and I used poplar www.popularwoodworking.com/articleindex/knockdown-english-workbench/ Here is my WTO journal of the build. www.woodtalkonline.com/topic/20978-nicholson-bench/ Also it now has a Bench Crafted leg vise and the Veritas inset vise for a tail vise. It is a 1/4 inch shorter then my table saw so that occasional long stock on the table saw won't hit it. When I first finished it it set out in the open and was very stout and sturdy, no tendency to tip. To make more room for other tools Kev and I moved it up against the table saw and outfeed table, basically it sets where the wood is stickered in the first picture of the journal 5) Thanks Chet. I remember your build. After a little more thinking, I think the minimum I am going to consider is 18". The base will be a bit wider. 6) You should be fine, just ensure that it's heavy! You can get away with a lot if the bench is heavy! 7) My bench is 62” x 28” but the work surface is no where near that ! Needs tidying up a bit. 8 Today was 1 of those rare winter days in the 60's, so I decided to start the shop reorganization or should I call it renovation. This is really going to be a daunting task, but the good news is I hopefully have enough materials to not have to buy much. Today basically consisted of a lot of clean up. Hopefully I can make some progress, even if it's just a little here and there. I have a 8x10 metal building that I really think I need to replace, I'm really thinking about building a small lean to for the snowblower, lawn mower, trimmer and shovels. I guess I should try to roughly price something up.
-
Thread transferred from previous forum - Original Post by RichardA Original Post: I needed to figure out a way to bring in some extra cash. When Linda died, it also depleted our savings, but it cut our income in half. I posted on our local internet sales site the pictures of the casket I made for her, and explained why. I also added that, if anyone knew they were going to need a casket, for a family member, or themselves to get in touch. Last week, a gentleman called and wanted to meet about building "two" caskets. After meeting with him, it turns out that he wants to supply the wood, and he wants super simple. Tennessee, has more cedar trees than people. And he wanted caskets for him and his wife made from cedar that he would supply. For me it was simply a labor project, so I gave him a price and he agreed. He's having the wood cut to his spect's, and has a kiln available to dry it. So it looks like I'll have a small job coming up here in about a month. He hated the caskets he saw in the funeral home, and wanted the proverbial "pine box". Only using cedar. He called the other day and told me he'd spoken with a few of his friends about the project, and told me that after they see his two, they might be interested in having theirs done. Who'da thunk that because Linda died, that I'd wind up in a deadly business? An afterthought: If "pine boxes" become a thing, I'll have to stand them up against a post next to a bar with the Jack Daniel's sign nearby. Follow Up Posts: 1) Maybe that's Linda telling you how much she loved hers? 2) Well to me it is apparent that she is still looking out for you. Maybe the fact that you can personalize these projects for people will play into your hand. 3) Sure seems like there is something going on with this. I am very glad you have some work. No fun having to worry about the bills. 4) Rick, no amount of work will make up for losing Linda, but the casket you built was incredible and it only seems right for others to pay you to make a similar tribute for one of their loved ones. 5) There are some restaurants around here that don’t have a liquor license but allow you to bring your own bottle and charge you a “ corkage fee” to bring your own. Maybe if they bring their own lumber becomes too common, you could charge something similiar. After all, you are missing out on the markup of the lumber although if you bought the rough cut, youwould still have to mill it, thus more labor involved.
-
Thread transferred from previous forum - Original Post by Mel Original Post: Just wanted everyone to know that I am somehow still alive. Have had too much going on for far too long. I have let a few people down along the way, and for that I am greatly sorry. Thanks to those that have checked in on me. Really means a lot! Hope to spend more time in here, and the other usual places just to see how people are doing. -Mel Follow Up Posts: 1) Hey you old fart! Wanted to say something else but knew that Kev would slap my hands! Good to hear from you! I still have that reindeer on my mantle. Thinking of ya dude! 2) Good to see you Mel! You have friends here! 3) Welcome back Mel! 4) No need to apologise at all. Life happens. Glad to see you back though. 5) Thanks for the responses. I'll try to pop in more.
-
Thread transferred from previous forum - Original Post by Coop Original Post: Hi, I’m Coop and I have a problem. I’ve made a couple of pieces of furniture for my son and grandkids but none for my daughter. I asked her if she would like something and she suggested a chair for her desk. Like an idiot, I showed her a pic of the Maloof Low Back Chair and she said “go no further, that’s it.” I have some 8/4 walnut with no plans for so I agreed. Instead of jumping right in on the walnut, I decided on a prototype of cherry. After several, several hours of work and $200 worth of lumber, I have barely broken the ice. Every time I turn around, I find that I will need another tool that I will never use again. Luckily I have the Domino and Kev sent me a soft pad for the ETS 150. Amazon daily drops off daily new items. I almost feel like converting the remaining cherry to cutting boards and buying her a chair. Follow Up Posts: 1) You'll be glad you did the chair Ken. And It has been my experience that once I have the tool, it allows my thought process to extend past were it had been in the past as far as design and technique. 2) You'd be deeper if you were building the rocker! Those spindles require tenon cutters.. The matched router bit set should be the only odd ball I would think. I could certainly see where a spokeshave would be nice for shaping the back rail on that one! And of course, rasps!
-
Thread transferred from previous forum - Original Post by Keggers Original Post: Forty-one years ago today this woman became my wife. My life's been good ever since. I thought I'd share my happiness! We were so young! Follow Up Posts: All post were congratulating Keggers on his anniversary

-
Thread transferred from previous forum - Original Post by Kev Original Post: Just felt the need to rant for a minute.. I keep up with a couple different forums as well as a few different woodworking groups on FB and am just getting irritated by the constant barrage of posts from people wanting a shop full of tools and an endless supply of exotic woods but, don't want to pay for them. No, we can't all afford the green tools, red layout equipment, PM - SS - or Felder power tools. We also can't afford to work with nothing but ebony but, it gets frustrating seeing all these posts from people wanting to play in this world without putting up a dime to support it. Now, before this goes South, I also understand what it's like to want to do these things on a budget. Yes, I've been there. But, I never once posted on line about not having any money and wanting the best. If you're on a budget, buy what you can afford instead of reaching out to the various communities looking for someone to hook you up with some magic potion to get it for free. There's nothing wrong with getting a good deal but, it just seems to be getting out of hand lately. Follow Up Posts: (Some removed from transfer) 1) For the record, those of you that know me know that I really enjoy helping new woodworkers or those who make genuine efforts to help themselves.. Just a bit overwhelmed with the needy posts on social media lately. 2) And then they tend to argue with you when you give them experienced advice on why the buck twenty five table saw from HD might not be the best idea. I try and stay away from those conventions unless I get really bored and need some action. 3) I think a contributing factor is that they see shop pictures on the forums and social media sights of people like Kev or maybe even me or gee-dub, Marc, or, or, or. What they don't realize is what most of us started off with. Just as an example my journey was some thing like this. I started out with a really nice for the day radial arm saw and a hand full of pipe clamps and built most of my kids bedroom furniture with pretty much those tools. Then I decided to build new kitchen cabinets and priced into the price of the project a Delta contractor saw, a little delta bench top planer, a small Grizzly 6 inch jointer and a Porter Cable router. I thought with those additions to my shop I was truly living the dream. It wasn't until about 7 years ago way after I was done buying a house, raising to kids and putting them through school that I was able to up grade to the gear that I now have. Now just to put that into perspective for those that want it all now, I bought the radial arm saw in 1984, the contractor saw, bench top planer and jointer in 1992 and just bought my present Powermatic jointer, the last of the upgrades in 2017. A 37 year journey and I still don't have a big rack of lumber. Most people would look at my shop and think it is pretty decent but they don't seem to want to ask how long did it take to get there. In a way, the internet does a dis-service to the newb because they see these shops and grow impatient and envious. In 1992 when I thought my shop was the bee's knees I had no Internet forum's to help me realize that it wasn't all that. 4) I think you hit a very important point Chet! The younger generation just doesn't realize how many years we have into accumulating our collection of tools and toys. It truly is a generation of instant satisfaction without realizing the hard work needed to get there! 5) I'm going to tone down what I really think. The issue isn't just with woodworking or other hobbies, it's society as a whole. People want everything but want to give minimal effort to get it and always have to blame someone else for what they have or don't have. To much envy or jealousy in people today. People don't respect others, case in point I was running errands yesterday and held the door for 4 people, how many said thank you, 1, really. I drop my son off at school in the morning and kids are like zombies, walking and staring at their phones crossing the street. I look at the youth of today and just shake my head, and it just isn't teens and younger. Technology for all it offers, also should take a great majority of the blame for where we are as a society. I'm 42 years old and life hasn't always been great, I have had disposable income where I could buy what I want and I have been rubbing 2 pennies together hoping to make a nickel, but never do I care what others have and only I can change this. My parents raised me a certain way and I'm extremely greatful. As for social media and participating in forums, I do both with great restraint, part of this because I know my personality and also I'm not that interested in getting into a back and forth with people flexing their internet muscles. If people would respect themselves, respect others, keep stuff private, and have accountability for their own actions, maybe society would be better, but I doubt it, cause the point where we changed is no longer visible in the rear view mirror. I will get off my soapbox. Finally I'm expecting all of you to contribute 99.9999% of the funds needed for my new shop filled with every top of the line tool by the end of the summer. 6) Bryan, what don’t you agree with and not meaning to be confrontational, just wondering. We all have opinions. Sorry, I spoke without reading your well written comment and I totally agree. I’m a door holder as well and when just one out of ten tell you thank you, it makes it all well worth it. Chet, I’m envious of your monthly meal. The family on a tv show, Bluebloods, has Sunday meals together and I envy that tv family. 7) Here is the other thing that sometimes gets over looked in discussions of the nature. I can build some really nice stuff if only I had it all. Not true. I just ran across a shop tour of a gentleman named James Huggett on youtube. This guy build's custom furniture for paying clients, mostly reproductions of historical pieces like Queen Anne highboys and other stuff from that era. His shop can fool you at first appearance because the building is real nice but his tooling is less then even mine. He has a SS table saw, the Dewalt 735 planer, and what looked to be a Jessum router table. But his jointer was just a 6 inch and probably one of the first from Powermatics when they went from green to yellow and his bandsaw was a small dated Delta. His miter saw was a Ridgid and just set up on one of those portable stations. No drum sander that I could see and the DC was just a small Jet with a really long flex hose that he hauled around to each tool when needed no over head ducting at all. I think the other thing that happens with certain people is they get to thinking that the quality and type of tool will also provide you the skill and technique needed for fine woodworking. One of the best examples I know that proves this wrong is Ross over at WTO. He puts out some amazing stuff with next to nothing in tooling. 8 One of my main points really, "If I had those tools, I could build that too". While I'll certainly never apologize for the tools that I'm blessed to have, they're not "the best" and woodworkers before me built much nicer stuff than I'll ever dream of building with much lesser equipment than I own. Skill is skill. Tools do not equal skill! 9) I agree. Years ago, when I had an almost complete shop consisting of a radial arm saw and a circ saw, I would watch Norm and tell my wife, hell, if I had his tools, I could do that. Thank goodness she doesn’t remember those conversations. 10) I will add on to this discussion. I’m probably the youngest one here at (30 yrs old) I started woodworking about 3 years ago. I have some history working with my granddad building kitchen cabinets his hobby growing up. I’ve got two young kids a wife and a nice house. I do this all with a HS diploma and a job as commercial electrician. I don’t have all of the big three tools. I have a rigid ts I have access to my granddads 15” planer that about 15 miles away but no jointer. So what I did was learned and taught myself how to s4s lumber by hand. No it’s not that enjoyable but it’s what I have to do to get to the part I enjoy. Granted when I’m starting a big project I do take it over an run it thru the planer. It seems I’m always that one board or piece the right thickness short ?but oh well that’s life. The way I look at it is if you have something to do you just need to get it done and just keep on going because crying about it just drags on longer. The point to this is the same as the rest are saying I’m just at the beginning of the trip if you want to do something in life the only thing that holds you back is yourself 11) Ahmen! The big difference is that you're not constantly on social media looking for something free. You seem to understand that it takes work to get what you want which is probably a direct result of your education and occupation. For the record, our education levels are exactly the same and I too work with my hands and brain for a living. Good on you for having such wisdom at such a young age!
-
Thread transferred from previous forum - Original Post by Kev Original Post: Toss him some thoughts and prayers! Chet took a fall today and broke his ankle. Bad enough he'll have to have surgery. He's currently at the hospital awaiting the surgeon. Follow Up Posts: Most of the follow up posts were get well wishes. Chet's post below details what happened 1) I want to thank everyone for their thoughts and prayers. The prayers must have worked because here I am. I am a person of faith but I was a little nervous as I have never been put under for surgery before. Never been in the hospital before. All went well according to the doctors. I didn't quite understand all the science behind it but they wanted to do the surgery as soon as possible or they would have had to what two week to let the swelling go completely down, so they did it late Friday night and then I came home Saturday afternoon. They put a plate and several screws in to fix the damage I did. The biggest problem now is that I can't put any weight on it for 6 weeks or so and I am supposed t keep it elevated most of the time, so doing the regular thing we do through out the day is the challenge. I haven't had any real pain through the whole process and have only used some Tylenol for pain since I got home and the last time I had to do that was Sunday evening.
-
Thread transferred from previous forum - Original Post by Chet Original Post: Marc was talking about this new, from England I think, respirator that are supposed to work with beards. I don't have a beard but I know there are a lot of guys out there that are looking for the holy grail so they can keep their beard. This is supposed to filter down to .001 microns of particulates. It is not meant for gases so you still need something adequate for finishing, which puts your bearded friend back in harms way. It is not OSHA approved and if I remember right with OSHA regs. you can't have a beard anyway. It has a rechargeable battery pack that is supposed to give you eight hours of work time per charge. Just looked interesting and thought I would post it here. pekesafety.com/product/powercap-powered-particulate-respirator/ Follow Up Posts: 1) Marc and I chatted about this a little. It's called a Powered Air Purifying Respirator (PAPR) and they work really well. They're technically still not ok with beards but, they're far better than any other alternative. They work by filtering air and blowing that into the hood. So, everything you're breathing in should be filtered air. Their biggest draw back is the price point. They're not cheap! They can also be uncomfortable to wear for long periods of time. However, a lot of people like them in the summer time as they get a nice cool push of air on their face when it's hot. I haven't got to see the video yet so, I don't know much about the unit he showed. They use these a lot in my line of work especially for welders that need a little more than a respirator but, don't quite need fresh air for their work. Don't hesitate if you guys have questions, I should be able to answer them for you. 2) I have a beard and would love to have one of these. I'm just not sure I could justify the price when it would be so much cheaper to just get rid of the beard. 3) Yep.. Certainly one of the issues is the price point. I guess it just comes down to which you value more. Personal choice either way and nothing wrong with either choice. There may be less expensive models out there, I haven't really looked. 4) I used to have facial hair until about a few years ago when i started to remove it. The soup strainer i used to have really interfered with the nose mask i had for my CPAP. So i removed it. Works so much better without it. These are pretty good, but the price tag not so good. (See photos below) I brought one of these recently for spraying a rather hazardous chemical to kill off blackberry on some land I have. Worked good for that, but once I finished the spraying I removed the organic spray filters and replaced them with dust filters. Wooo haaaa!!! No more dust of any kind gets into my lungs and eyes. I can even use my shitty belt sander (power tool) that has a broken exhaust chute that just sprays the dust everywhere and not worry about the fact the shed is filling up and its getting dark because the lights are being buried under several centimeters of fine dust. 5) The full faced masks have a much greater protection factor for sure! Regardless, none of them work with facial hair!


-
Well Done Richard!
-
Thread transferred from previous forum - Original Post by Coop Original Post: I/we have an employee that is an amateur photographer that likes to travel and shoot old buildings and structures. Lucky for us that we pay more than he can make taking photos, although some day, that will change. He has asked me to make him a picture frame for a 36” x 24” pic from the darkest wood possible. He knows photography and not wood. He doesn’t want the frame to take away from the pic. He’s been with us for several years and I’ve made a couple of frames for him before at no charge. My first thought was walnut as it’s the darkest, cheapest I can afford, but I want it to be “different” but not overwhelming. I’m thinking about a frame made from end grain walnut. Anyone think of a solid “no way” reason that this can’t be done? Follow Up Posts: 1) Wouldn't be my choice Coop but, it's your frame... A little more expensive (but, not a lot) options would be Wenge or, take a look at Peruvian Walnut. The Peruvian walnut would actually be my choice. There's not a lot of "grain" pattern to it, it's darker than regular walnut, and it works just like normal walnut. I've used quite a bit of it and you won't be disappointed. I really think this will be right up your alley! 2) Thanks Kev. This would definately be something that I would have to order as my two supply guys only stock “walnut”. 3) Coop, I have just 3 words for you. Ebony, wallet, crying 4) Yea, it's not a common stock for a lot of HW dealers. My current local doesn't have it but, my last one did.. Bell Forest has a nice stock and you can get it right to your door. The cool part about it is that you don't really have to worry much about grain match as there really isn't any...lol This is what I used in my kitchen in the old house (wife's choice) and I was pretty impressed by it. Now, a cheap do it now option might be some poplar with some black dye. Might be worth at lease a few test pieces.. 5) You’re no help ! Just thinking what end grain would look like? Hell, I may just butcher some walnut to to see! 6) End grain walnut looks cool IMO but, the amount of work you'd have to do to get it for a picture frame would get my wallet pried open in a hurry! 7) Coop, you should go to a hardwood flooring store, they may have something different, or get an idea how to get to a really dark wood. You also could do Sho Sugi Ban. 8 Parota is also a nice option. It may not be dark enough for you but, nice stuff to work with and the pricing isn't too bad.. This is what I did that counter top for a client out of. www.bellforestproducts.com/guanacaste-parota/ 9) Just to show you what the finished Parota looks like, I dug up this pic from my archives.. (See Photo Below) 10) I don't know what the process is but a inexpensive option might be ebonized oak. Dark (black) but still showing grain. 11) The guy really doesn’t care what type of wood, just wants it dark. I think walnut will do fine and I will look to see if the Parota is available here. I just got the wild hair idea about the end grain, thinking it would be dark but have a neat look to it. Thanks Kev for digging up the pic. 12) You might also consider a few drops of transtint dye in your finish.. 13) How about some poplar and black paint??? Another more serious suggestion would be an over sized walnut frame with a black mat to border the photograph. 14) Good idea! He’s going to take care of the matting and I think that’s the direction he’s headed Kent. 15) I think I remember using the TransTint with ARS and it didn’t mix with it, just suspended? 16) I've never tried it in ARS only the WB.. Quick test should answer your question.. 17) Yea TranTint is a water borne product so it needs to mix with water borne finishes. 18) I’m kinda back on starting the frame. I bought a gotta have, 4/4 x 7.25” x 10’ walnut board for future use but I might as well use it for the picture frame. Keep in mind that this print is 36” x 24” and will have a 2 1/2” mat around the pic itself. I’ve searched online for the width of the board itself, compared to the print size and I don’t find any help. Anyone know of a rule of thumb ? 19) Picture frames are tough bud.. There's no such thing as a rule of thumb and it's all open to personal interpretation. Suggest making a couple samples and let the client decide what they want. In the end, you can't go wrong if it's their decision. 20) Coop, 1 thing I have done is cut some plywood strips at different widths to get an idea of what would look best against the mat and picture. To me a wider mat usually means I will do a narrower frame. If the mat and wood are both wide, it takes away from the picture. 21) Thanks to both of you. After typing this, I thought about going to HD and buying some of the cheap dark plastic baseboards and cutting them to different widths, miter them and let my employee decide. And I think the profile will just be a simple 90* with softened edges. The thickness of 3/4” will allow for the use of the Domino.

-
Thread transferred from previous forum - Original Post by Bushwacked Original Post: www.youtube.com/playlist?list=PLDPvEofXXRCOq-YKTHYB5LhVzLXfGPEFQ He's got a good like 9-10 part build going over quite a few things in depth to explain everything he's doing. A fun little watch. I relate Matt pretty close to you Kev as you both still take time to explain the details, which is great
-
Thread transferred from previous forum - Original Post by Bushwacked Original Post: Is the woodcraft sale on these the good buy @ $49 or is that a sale to get them at a normal price? I forget if these drop to like $20-30 or if the $50 is the good price on these ... Follow Up Posts: 1) Man, I have no idea. I guess value is in the eyes of the purchaser. 2) Interesting.. I posted a reply to this last night but, it's not here.. The main thought of my post was that I found some better deals on Amazon. It's not a bad price but, you only get 2 brackets. To me, that's just not enough support for 8' or 10' boards. 3) Thanks guys! Ya I was assuming I be buying 2 sets so I can cover the longer boards when needed. That's why I was curious on the price and if that was the sale price or if they go lower. I see them on sale lots but I never really paid attention to the price haha. 4) Also Kev... Didn't he mounting hardware come with it? If so was it good enough or did you buy your own? 5) I didn't buy that one.. I don't think...lol. I purchased while I was gone for work last year and just installed when the shop was done. So, I don't recall exactly what I ordered. From memory, I think it came with some hardware but, not enough that make me comfortable so, I added additional hardware. They mount directly to studs so, you can add holes as needed if they don't already have them.
-
Thread transferred from previous forum - Original Post by Woodenskye Original Post: I was working on something and 5 seconds in I realized I was using the wrong tool for the job. I knew I should have used the bandsaw, but didn't. All I can say, is way to much time was spent fixing my stupidity. Makes me question why I still enjoy this hobby. Just venting a bit. Follow Up Posts: 1) Hope you didn't get hurt? Everything ok? 2) No injuries unless injuring my pride counts! I'm just frustrated. 3) Keep your chin up bud.. We've all done it.. 4) If you can still count to 10 and didn't catch a kickback then it's still a good day. I think I've screwed more up than actually built right I still enjoy the challenge.
-
Thread transferred from previous forum - Original Post by Bushwacked Original Post: I am thinking my next project or something in the next few months will be my house #'s that light up at night. The medics have been here a few times at night and drive by the house if I am not outside (Son has had a few seizures in the past) Our road is goofy and I think at one time was not fully connected, because our neighbors # is like 240 and then jumps to 130, so everyone drives by the first time they are here. I was thinking with the lights behind the numbers, it would need to be set off the brick a little bit for them to shine. Then with the offset, what kind of mounting options do I have or should I be looking into for something like that? From looking around, it seems like just drilling holes and then adding some type of bolt to connect the number and insert into the holes with liquid nails seems to be a common method. Is that one of the better approaches for doing this to get the stand off look for the lights? I have found some prebuilt lighted numbers on amazon and a few other sites and it seems to be at least $100-150+ for metal numbers. (Picture from Original Post No Longer Available) added a picture of the front ... I am wanting to add this on one of the front pillars on the left or right. I am thinking left so I can have bigger numbers and have more room so they dont look like they are taking over the pillar. I was thinking running them vertical as well. only 3 numbers so shouldnt be too bad. Also, as far as wood, I would like a darker wood/stain to make it stand out in day as well. So not sure on wood yet since I need it to be weatherproof, which I will be using outdoor finish so that should help as well. for lighting, maybe this? www.amazon.com/Flexible-Waterproof-16-4ft-Christmas-Kitchen/dp/B00HSF65EA?ref_=fsclp_pl_dp_1 the warm white, not the daylight white .. I think would still stand out enough. Thoughts? Thanks! Follow Up Posts: 1) I think you have lots of options and can pretty much as creative as you want. Power would be the main issue so, assume you're thinking solar? If you go that route, being able to replace parts should be part of your design. We always have an American flag outside of our home. As this needs to be lit at night, we run a solar powered light that attaches to the flag pole. I thought I'd be replacing it every other year but, it's now about 10 years old and still works great.. I'll see if I can have my wife get the brand off of it and try to find it again. This might be another option for you as you could just up-light or down-light any number options that you come up with. 2) Hmm solar power would be nice ... Does it have an auto on feature when it gets dark enough? 3) Yes.. If there's enough ambient light, the light doesn't turn on. 4) This isn't exactly the one we got but, it's pretty similar with decent reviews. Ours may have came from Lowes, I just don't recall we've had it so long. www.amazon.com/Black-Solar-LED-Flag-Light/dp/B06XCKZ1FX/ref=sr_1_73?keywords=Flag+pole+light&qid=1554677364&s=gateway&sr=8-73 5) At the time, my sil had a custom home building business. All of his homes had a limestone type, recessed block with the numbers engraved. I cut the section of brick out of the front of my house near the entrance and mortared it in. I was able then to pull wires from the porch light to a directional light, mounted recessed into the soffit, to shine one the numbers. Probably easier for me to describe than for you to follow and as yet, I still can’t post pics.