Every purchase made through our Amazon Affiliate Page helps support this site
Kev
-
Posts
6,324 -
Joined
-
Last visited
-
Days Won
583
Content Type
Profiles
Forums
Downloads
Gallery
Events
Store
Articles
Blogs
Everything posted by Kev
-
Nice little smoother and great job! I probably use my smoother more than any of my other planes.. It's the perfect tool for fine tuning parts!
-
That would be my wife's expense report...lol. Can't charge the company for this one.. The really cool part is that the guy I'm working with lives near Coop and agreed to haul him some lumber! Pretty damn good of him to do!
-
Well, in all fairness, I've had the benefit of seeing lots of pictures!. I'm not looking forward to the drive to get it but, I'm sure I'll feel better once it's in the truck! You're joking right? If I had your money, I'd burn mine to stay warm!
-
Just spoke with Coop.. Looks like I'll be hauling some for him as well.. He better get those hens cranking!
-
Hey, don't drool on my lumber...lol
-
I had to drive this trip Coop.. So, I have my truck here.. I'll give him a shout later today when things slow down at work and see what we can do.. That's Coop saying he fell asleep on the couch! ?
-
He hasn't checked in here tonight either so, he's off the Christmas list ?
-
Unfortunately, that much time is something I don't have but, let's see what we can work out..
-
Yea, I don't want junk.. Drop me a PM and let's do some serious chat.. Being this close, I really think I want to haul a good load home.. Quilted maple, Cherry, Walnut, etc.. I'd like to stay under 2k so, let's talk turkey
-
I'm so stinking close that I'm thinking of renting a trailer, meeting you 1/2 way, and hauling a grand or 2 worth of material.. I'd rather not pay for shipping when I'm this close.
-
How long to do the kiln dry? I'm figuring to be here until at least the end of the month..
-
Where are you located Spanky? I'm currently in Tulsa OK and am seriously considering a meet/greet someplace to get a fair share to take home with me when this job is over..
-
I just might be willing to cover the cost of your trip to make a delivery to MT.. Or, since I'm currently in OK, I might just have to buy a truck load and meet you someplace...lol
-
Give that HNT a good look as well for your tail vise. It's holding power is better than the Veritas but, the insert can be finicky as well..
-
To hell with Coop.. Head for Montana! ?
-
I should be home around the first of the month.. I've already had the virus and the beer is cold so, c'mon up..
-
Might be time to crank up a new thread so we don't hijack this one.. I always triple check before the cut if my blade is running in that track. The piece is also aways clamped down so that it can't move. As for the hold downs, I'm assuming you're referring to the hold fasts? Depending on the thickness of your top, they could work. Hold fasts typically work best when the top is around 4 inches.. C'mon up to the shop and we'll toss you a dedicated bench together.. From experience, it can be done in about 4 days...lol
-
I sincerely hope that's not a kiln dried price? If it is, I'll buy it all....lol
-
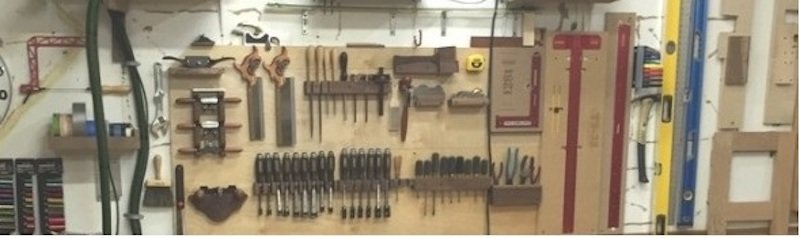
The "gap" works for a few things.. When removed, it becomes a great place to drop clamps in the middle of the bench When removed, it creates an awesome place for the saw blade when breaking down sheet goods! Because it's notched to fit the base aprons, when slid to the side, it raises up about 1/2" creating a planing stop The smaller gap in the very middle is just the right size to store chisels and handsaws. Traditionally, the Roubo was designed for hand tool users. As a mostly power tool person, I still appreciate the flexibility of the bench!
-
I just buy the bits to hang rods at the local big box store.. They usually have a decent selection..
-
I saw/read your post on my phone at work but, wanted to wait until I got to the hotel to respond where I have an actual keyboard..lol The end offsets really depend on a few things.. Any end vise that may be in the long term plans. If you're thinking the BC set up, this requires a little more overhang. I don't recall the exact measurement off the top of my head but, it's a consideration. If you go with the Veritas or HNT, then the overhang doesn't matter. And, you'll want to do some more homework if you want to go with Andy Klein's turbo vise as an end vise which would be pretty cool! Front or Leg Vise - If you go with a leg vise, you'll want a little overhang on this end to allow some design room for the chop. So, figuring that stuff out should answer your questions about where to locate the top side to side. Structurally, either is fine. I would look at the plans for the leg vise of choice and let that drive your decision. In the case of the BC hardware, you can download the plans without buying the hardware and it's a lot easier to cut the joinery without the leg attached. Even if you're not ready to spring for the hardware yet, this would severely pay off down the road. Reality is that this M&T attachment is ultimately to prevent the top from sliding side to side. What I typically do is just take the mortise as deep as the router bit that I have on hand for the job and it's always been fine. I've never had an issue. Assuming you're going with 8/4 material, what I did is only mill until they were flat trying to get as much material as possible out of each board. Doing this usually means you don't need the 1" thin board. As for the gap, I would not do a 4" gap. I noticed recently that Marc changed his insert. He cut down the middle so that it was a recessed tray rather than a tool holder. He did leave the ends the standard height to act as a planing stop. I don't know if this is right for you as I think you use a great deal more hand tools than he does but, thought you might want to go take a look.. It's hard to tell from your drawing but, one of the most important things (IMO) about this bench is that the front of the bench and the base all be flush. This is what allows you to clamp items to the front of the bench. Either in a leg vise of clamps. As for the joinery on these connections, just about anything will work. I've done them with traditional M&T as well as Domino XV and not had any issues. Couple thoughts in closing: Top Thickness - I know earlier you mentioned the possibility of a 3" thick top. Again, just my opinion but, I would stick with hardwood and as close to 4" as you can if you plan to use hold fasts. I use them all the time and love them! Dog Holes - Just something to think about in your design. Their location depends a bit on the tail vise that you choose but, it's much easier to take care of on an individual board rather than an entire slab! As for the round vs square debate, as far as I'm concerned, there's no wrong answer. I'll admit that I do like my square ones a little better than my round ones but, they both work just fine! Storage - Not sure if you're considering storage? Of all the ones I've built, I like the storage solution in my kid's bench better than any other's I've done. Just remember to measure the hold fast depth before deciding the height of your storage solution. The kid's bench - You may or may not know but, the plans for that bench are over on my website and free for the download.. https://www.kevswoodworks.com/plans-download Sorry for being long winded, I just wanted to be thorough since you took the time to type out all the info ?
-
That turned out great!
-
For the record, I have 2 FB accounts.. One personal and one for the woodworking stuff.. The personal one rarely get's used. It's primarily there for the PM feature and reading what others post. I'll make occasional comments on those posts but, that's about it. The woodworking one needs some attention. I'm the first to admit that I don't post enough in it to draw in traffic.
-
I'll be the first to admit that I'm not a fan of FB for these kinds of conversations. I'd bet on Marc's group, I could miss 15 conversations a day and not even know it. It's great for those that are looking at it all day from their phones. I'd rather not be glued to a computer or phone constantly to keep up. Also, you can't go back and find older information!
-
Hey Spanky, welcome!