
Every purchase made through our Amazon Affiliate Page helps support this site
Kev
-
Posts
6,324 -
Joined
-
Last visited
-
Days Won
583
Content Type
Profiles
Forums
Downloads
Gallery
Events
Store
Articles
Blogs
Everything posted by Kev
-
When I can build the way we build using the materials we use and do it cheaper including my time, it goes to show the knowledge level of the people paying those stupid prices.
-
Go look at a quilting desk made by Koala. Cheap MDF garbage and look what they get for them.
-
They’re custom fit for each machine. Other than that, there’s nothing special about them.
-
That’s cheap compared to the one for my wife’s machine! Lol
-
That looks like about the same lift. I’d check Amazon as well to see if you can find it a little cheaper. I’m working on a couple little glitches that we seem to be having.
-
To be honest, I haven’t been home long enough to see if she’s done any drawer organizing but, I haven’t built anything specific. I’ll look at Rockler’s site when I get to the hotel. I think there was only one option when I bought it. The inserts are specific to each machine and the manufacturers want way too much money for one! I made a template out of 1/4” ply and then used that to make the plexiglass insert. Be warned to make this template before cutting the hole. It’s way easier to cut a hole with a template than to build a template to fit a hole. as for the build, being individual cabinets it’s really pretty simple. The plans for this on are free on the website.
-

Bushwacked Garage Reno Complete in 2020 sometime ... Hopeful
Kev replied to Chet's topic in Member Project Journals
In the end, there's absolutely nothing wrong with that! -
Well, those backs have to be flat regardless.. Worth the time to toss them on the plates and at least see how much time you're in for! Yea, on the stones, I'd start over. If the paper did a good job, you won't be long on the stones.
-
If you're going the sandpaper route, I would agree.. If you're using stones, then I'd start at the beginning.
-
I would start over... It's just the right way to do it.. If they're in good shape, you won't spend much time on the lower grits anyway so, shouldn't add that much time to the process..
-
Bushwacked Garage Reno Complete in 2020 sometime ... Hopeful
Kev replied to Chet's topic in Member Project Journals
Fair point.. I guess I should modify my comments to remove "sketchup" and replace with some form of CAD software as there are more out there now. Point being that it's just simply more efficient than pencil and eraser.. -
You can download the plans from their website without purchase.. It's all free.
-
Understandable! I still suggest doing the joinery for the BC stuff when you build the leg.. Much easier when you can put the leg on the bench..
-
Yea, that's the early version of the BC vise as well.. The new criss cross is pretty nice! I haven't looked at pricing on them lately but, they weren't cheap back when I bought them (2 total)..
-
Ah, gotchya.. I think Jay Bates just used a block of wood on the floor and it seemed to work fine for him..
-
I don't have the deadman in mine and I'm not sure I ever really missed it.. One thing I did to is to locate the hold fast storage holes in the other leg in a place that they can be used if/when needed to hold long material. I hope that makes sense?
-
Bushwacked Garage Reno Complete in 2020 sometime ... Hopeful
Kev replied to Chet's topic in Member Project Journals
With respect, I disagree. I've used it on many projects that have never seen a single minute of video to help me work through design stuff or, just help me find that missing measurement that I can't figure out in my head. Case in point.. The miter station that I just built (videos coming in a couple months), I wanted a little different measurements than I used for mine. Different saw and no systainers being the biggest reasons. I didn't need any "joinery" information but, I did need to figure out the proper width of the modular cabinets to get to the final dimension they were looking for. By doing it in Sketchup, this was a quick and easy change to a single cabinet dimension and then copy/paste to get the entire bench. Also, I neglected to account for the swing of the saw in the initial design and was able to quickly re-design the saw table. I didn't know what the final width was going to be but, I just kept stretching it in Sketchup until I got the clearance I wanted and then pulled a measurement on the drawing which told me what size to cut the shelf. Additionally, I've used it to figure out is some particular joinery would work (think double domino) in a particular joint or just used it to draw a quick picture to illustrate what I'm trying to explain here. Now, with all that said, I think if I were starting fresh with design software today, I'm probably go with Fusion 360. I think it's more powerful and probably a little easier to learn. I do agree... It's a "use it or lose it" skill.. I've found that spending a few minutes each day drawing something - anything - helps! Fortunately, I've had quite a few projects lately that require me to figure something out.. For the record, all my projects start with me in Sketchup before sending to Mark to do his real magic with for the plans. -
Bushwacked Garage Reno Complete in 2020 sometime ... Hopeful
Kev replied to Chet's topic in Member Project Journals
You won't regret a little sketchup knowledge.. I'm not good at it by any stretch of the imagination. But, I know enough to get my thoughts in and be able to pull the measurements from it.. There's a couple free videos out there that will get you started and, frankly, that's all I've watched and learned from. -
Bushwacked Garage Reno Complete in 2020 sometime ... Hopeful
Kev replied to Chet's topic in Member Project Journals
There's a hidden gem in this comment! Spare shop time is exactly the right time for these kinds of changes! If you find yourself sitting at your computer typing on some silly forum looking for shop inspiration, take your back side out to the shop and start the drawer organization! ? -
Bushwacked Garage Reno Complete in 2020 sometime ... Hopeful
Kev replied to Chet's topic in Member Project Journals
Absolutely! You'll change it 50 times before you get things exactly where you want them.. Just part of the process.. I'll snag you some pictures of my drawers when I get back to the shop.. That may give you some ideas.. -
Bushwacked Garage Reno Complete in 2020 sometime ... Hopeful
Kev replied to Chet's topic in Member Project Journals
I agree with Chet! For me, I like my sandpaper lower and not stacked up where I have to fiddle with it to get. I tear the lids off the boxes and drop them in a drawer so they're easy to get at.. -
Bushwacked Garage Reno Complete in 2020 sometime ... Hopeful
Kev replied to Chet's topic in Member Project Journals
If you've used the right hinges, you should be fine.. Just something else to consider... If you build the doors first, now you have to locate your pull outs around those hinge locations. If you build the pull outs first, now you have to locate those hinges on your door around your pull outs.. My point is that they really go together. I would have a rough idea of where you want to pull outs before deciding on hinge location on your doors. -
Chet and T are spot on.. If the final dimension of the cabinet doesn't really matter or only has to be close, I'll often build the cabinet first. But, if the dimension of that cabinet has to be spot on then, I'll build the frame first.
-
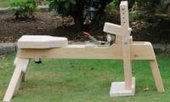
I'll admit that I'm not a fan of his design mostly because of the instability but, there are ways to solve that issue. Unfortunately, some of those "ways" also create storage issues when the jig isn't in use. Even with mine as relatively small as it is, I still don't have a good storage solution for it. It's on the bucket list...lol Another item I'll disagree with him on is a need to put a hole in your actual work piece. Yes, my version requires a pivot hole but, a simple piece of scrap under the "keeper" piece solves that issue. In the end, people have to take what all these YouTubers put out there (myself included) and make it their own. What works in my shop might not be best for someone else's shop. Take my plans and expand on them, make them your own. Drop in here with the ideas for discussion and feedback to make a better widget! That's what a place like this is all about! Helping each other be a little better at what we do! Welcome to the forums Kenlip!
-
I buy them.. I'm currently testing a batch of "off brand" dominos and they seem to do just as well at a much cheaper price. I know a lot of people make their own and there's nothing wrong with that. However, if you count your time, it's cheaper to just buy them.

