Every purchase made through our Amazon Affiliate Page helps support this site

Chet
-
Posts
2,277 -
Joined
-
Last visited
-
Days Won
92
Content Type
Profiles
Forums
Downloads
Gallery
Events
Store
Articles
Blogs
Everything posted by Chet
-
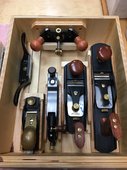
Submitted on the old forum by Kev Thinking about changing things up in the new shop! I've had a hand tool cabinet and I've had a couple of tool walls. They both have their pros and cons. So, I'm considering a mixture in the new shop. A cabinet for all the hand planes and items I don't use as often and the tool wall for the rest that I use more frequently. Currently, the planes live in a drawer but, I'm just not overly happy with that option. What I do like is that I can toss those little moisture packets in with them and don't have any rust issues. Beyond that, there's really nothing that I like about their current storage. I'd appreciate some thoughts and conversation!
-
Follow up posts 1) I remember this build and enjoyed It very much! Super nice job! 2) I’m taking some pointers on this. 3) Me as well! With the new shop coming, I am once again considering a handbool cabinet.. Still just considering Exploring all my options! 4) After Coop came up here to Tennessee, and wandered through my shop, and of course helped out with the casket build. It didn't take him long to realize that things have an organized place to live. And I think he liked it. Knowing where everything is turns out to be a plus when your working a project. He's started a rumor that he's gonna give consolidation a try. I hope it works for him. 5) Richard, after seeing your new shop compared to your old one, it was an enlightening experience. That you could build a dresser , after physically seeing it, in the old shop, made me realize what a slob I’ve become/have been. I’ll never be there but will become a lot closer. Thanks my friend for the experience. I now put back a tool to it’s place, even if I will need it in the immediate future. 6) One of the times Kev was here working in my shop, I was constantly putting things away that he was going to still be using. He is not a slob in his work at all, it is just my natural habitual way of operating. We laughed a little about it but I kept doing it.
-
Submitted on the old forum by RichardA I had 5 wall cabinets with hand tools that pretty much get used on every project, and to get to a couple of them required stopping what I was doing and going to get the tool I needed. So, I consolidated all the cabinets into one and it's within arms reach of my primary work bench. .
-
Follow up posts 1) I saw a version of this in Chis Shwarz's bench book and thought it looked like a fun build but in the end I sort of went lazy and built the Nicholson bench instead. 2) That’s pretty darn cool.
-
Submitted on the old forum by Kev Not sure how many have seen this? Thought it was a pretty cool idea..
-
Follow up posts 1) I tried watching but he seemed to ramble on to much. A miter saw is just to much of a space eater in a small shop, reason why I took mine out of the shop. At least with a true MS station, you can get a tremendous amount of storage, which is also a premium in a small shop. 2) He does ramble too much...lol Ok, let's get into the meat and potatoes he was going on about and that's the fence. He obviously has pretty much the same views as Marc about fences. Marc simply omitted the fences and put stop blocks in the table, problem solved. I disagree with not having the fences as I like the extra support. I'm also a firm believer that if you can't reference flat against you miter station fences ( he could in this video) that this is the wrong tool to be using to make this cut. For the record, my set up has adjustable fences for those rare occasions that they might be in the way. Now let's talk storage. Again I disagree that they're ultimately space eaters that ruin storage options. If you build a silly fence as he discussed, then, yes, you'd lose all that space. If you recess it in your storage cabinets then, I'd argue that you gain much needed storage space in your shop. Even when I had a small shop, I had a station because of the improved storage space. Ultimately, it depends on your work flow when deciding if this is an important tool in your shop. Personally, I wouldn't have a shop without one. So, where would this idea really work? If I were really in a crunch for space, I would still have a station for storage but, the saw platform would probably be a flip top so that I could get 2 machines in the space. At that point, I wouldn't have the extended fences that I like but, you could use his fancy support block to support your cuts 3) Here I go agreeing with Bryan, Lord help me . If I were more organized and had the space, I still don’t think I would have a miter station unless, as stated, I had the Kev real estate. I usually break my boards down to rough lengths with the circ saw, in the yard with my eyes closed as I don’t like the sight of blood. Future readers, don’t even consider it. Then to the jointer, planer and finals at the ts. 4) I have been thinking about this since it was first posted. Yes some shops are just to small to give space away to something like a miter station. But with a little planning a space that you think you can't afford to give up can be a real asset. In mine pictured below, (click to make the picture larger) On the left I can use it as an outfield for the bandsaw as well as holding a dock station for my drills. In the first drawer on the left is my sharpening gear. Then the cabinet of drawers - Top drawer is rasps and hand saws, next drawer down is chisels, drawer under that is measuring and making and the last drawer is my hand planes Under the saw it self is my shop vac and a bucket for wood scraps to the right of that is a cabinet that I keep a couple of nail guns a hand grinder. The last cabinet to the right has all my spray gear and the drawer has rags for finishing. On the counter is my spindle sander and I use the surface to set things during glue ups on the assembly/outfeed table in the fore ground of the picture. The right side surface is can also act as outfield for the drum sander when needed. The fences for the station are removable, the one on the right is off most of the time. This is a long way of saying that everything in my miter station needs a place in the shop anyway so if you stop and think about it my miter saw is actually only using 36" X 30" area of counter space and I have one of the larger saws. My shop is a two car garage. Just another perspective folks. 5) Certainly much smaller version of what I have but, Chet explains my point better than I probably did. If you're really in that "space crunch", you could change that to a flip top and mount 2 machines there. In Chet's case, he made great use of that space. Sure seems like a long time ago that we did that Chet! 6) I agree with what Chet said, and if I had the room, I would have a miter saw in the shop and have a complete station. My shop is 10' X 18' so taking out is the best option, I have mine in the basement, if needed, I can bring out.
-
Submitted on the old forum by bushwacked If you don't have tons of space, like Kev ... I found this video this morning that is genius if you have kinda the same setup.
-
Follow up Posts 1) Also ... Kev just noticed this may be in the wrong section. Possibly might be better in the Shop section? feel free to move if needed. 2) I’ve seen this before and failed to act on it. I made me several today. Thanks for sharing. 3) I did move it. I think it will get seen more here. I've seen this video before and I have a couple of these cauls. Mine are purchased and I rarely use them but, they do come in handy from time to time.
-
Submitted on the old forum by Bushwacked Came across this in my email and figured I would share ... www.finewoodworking.com/2013/06/06/how-to-make-cambered-cauls?source=W1724ENL&tp=i-H43-BC-FUg-kIq4J-1o-24w7-1c-kJYy4-XtOLf&sourcekey=W1724ENL&utm_campaign=fine-woodworking-eletter&utm_source=eletter&utm_medium=eletter&utm_content=fw_eletter&cid=59562&mid=684201515
-
Follow up posts 1) I like it! I might borrow this idea but, make them fit in the dog holes on my bench.. 2) That a good idea. I might have t think about that, although being able to slide them anywhere to get them oriented with the cut line... I didn't give any really thinking to the design beyond what I saw on the TV show. 3) I have been giving this some more thought and was thinking along the same lines as you.. I think for me, 2 fixed and 2 sliders would do the trick. For the 2 sliders, some way to actually clamp them to the table would be a good idea as well.. 4) Nicely done Chet. Simple but effective. 5) These are brilliant!!
-
Submitted on the old forum by Chet I saw these on an old episode of Woodsmith Shop and decided to make 4 to use when breaking down my stock with the jig saw. They allow you raise your stock and cut over the bench instead of having to have your cut hang off the edge and then needing to hold the off cut with one hand to keep it from breaking away and splintering. For storage I put an eye screw in he end of each to hang from hooks over head when I done with them. .
-
Follow up posts 1) Kev, this is a circle cutting jig for the bs? Maybe Ishould have stopped on the way home for a beer? When you get a chance, without wasting a piece of ply, can you do a short demo on how it works. Just can’t wrap my mind around this. Thanks 2) lol.. If you look near the blade on the center portion of the sliding DT, there's a pin sticking up.. This is the center point of the circle. Move the DT out to your desired diameter, tighten the knob so the DT can't move and cut circles. I'd be happy to do a demo on it for you.. As I'm leaving Friday, it my be a little bit.. 3) Definately not before you leave but if you have time when you return. I still don’t have a clue. Wish this had been a pm now as you already knew how dense I am! 4) All good Coop.. It's just a circle jig that's adjustable. Center of the circle is adjusted on the sliding DT. Still works like any other circle jig. 5) Oh crap bud, I see now that the pin is attached to the sliding dt. I thought it was attached to the base. Sorry to waste your time! 6) No waste of time bud, that's what we're here for.. It's actually easier to cover these things in video but, because of my travel schedule, I just wanted to bang out a quick shop project without dragging the camera gear all over...lol 7) Lol. Took me a few to find the pin too. That's a pretty simple little jig there. Thanks for the pics and explanation Kev! Is the radius of how big the circle will be .. be from the blade to pin, correct? 8)Yep.. That's exactly how it works.. Max size would be the size of your bandsaw.
-
Submitted on the old forum by Kev I didn't film this one as there's just so many of them out there.. However, my old one was getting pretty beat up so, I tossed a new one together today and snagged a couple pictures that should really explain it.. The jig is essentially 2 layers of 3/4" ply. The bottom layer is cut to the desired depth and a stop block screwed on the back. I also use the T slot in the table to keep it straight. The second layer is divided into 4 sections. Throat layer - Full length of your jig X the distance from your blade to the inside of your saw. Mine is a few inches short as I used my fence to keep the base layer straight. Back Platform - One edge cut at 45 degrees and oriented on the back half of the jig Front Platform - One edge cut at 45 degrees and oriented on the front half of the jig - This needs to be set as to allow the center section to slide freely without too much slop. I used a piece of printer paper in each joint to assure enough room. Center section - This is the off cut from creating the 2 previous pieces. Essentially creating a sliding dovetail. In the DT area on the outer edge, a recess and hole were drilled to insert a threaded T nut. On the blade side of the sliding DT, a cut off finish nail was inserted to create a pivot point.. Give a shout if there are questions..
-
Follow up posts 1) There's lots of ways to build them yourself. My last 2 shops had ones that I build with some 2x4s and some small chunks of ply for support. There's nothing wrong with building them yourself. However, to say it's going to "save quite a bit of money" I don't think is quite right. Actual dollars put out may be a little less depending on your materials but, your time is going to be significantly more. This is actually why I went with a purchased version in the new shop. Additionally, I didn't have the wall space in the last shop so, my racks had to be very custom as well. 2) Hmmmmmm ya true time vs just buying would be cheaper I would agree with that. I'm slow haha. Does adding ply to the poles as a base to lay wood on give make things stronger and allow for more weight? 3) I don't think you're slow.. There's another side to this as well.. What if those racks are something you "want" to build? In that case, then you're not wasting your time as it's something you want to do. My point is more that if you're doing something you don't want to do and don't account for your time then, you're not really saving money. This would actually probably be a good project for me to do in the shop and video it. Where I don't really want or need the racks, I would get some benefit out of the video. 4) That would be a fun video to get your take on a wood rack. 5) I tend to make them really simple just using some 2x4s and a little ply to stiffen the joints.. I could probably dig us some old pictures if you really want to see them or even just draw it out in Sketchup for you to see? 6) If be happy with whatever if you are bored enough to do that haha 7) I've build many of them much like this. Just 2x4 material with some small ply glued and screwed in. You can build this as long or short as you need and you attach them to the studs. 8)So you brace yours horizontally instead of vertically? Does that let you hold more weight? 9) Probably not but, I've never had an issue with them. You could really build them pretty much the same way vertically as well. Just the plywood supports wouldn't wrap under. My main rack in the Washington shop was that way and held up well. 10) you could also use black or galvanized pipe. Drill at a slight angle.
-
Submitted on the old forum by bushwacked I am thinking this is the right place for this one ... Feel free to move it Kev. I found this one after looking around after thinking of grabbing the Bora wood rack. This method looks like it could save quite a bit of money since I would just need a sheet of plywood. Plus not a crazy amount of overbuilding either which it seems several have done. I am thinking I could use left over hard maple I have for the arms. I would assume the load rating is at least the same as the Bora wood rack if not better??
-
Follow up posts 1) There have been times when I had just enough, probably because that was all I had. I would love to have, say twice as many, in case the need arises. I have a limited amount; 6ea. 31”, 8 ea. 24” and 4 ea. 40”, all Jet quick release parallel. I wish I had several of the smaller ones but beingthe Scrooge I am, I hate paying the price when for a couple $$ more, I can get longer ones. I have numerous Fclamps but I don’t care for them I don’t care for them on a lamination as the turn of the handle tends to misalign the pieces. Good for caul clamping though. 2) It depends on what you do, and how much of it you do at one time. I have had the same 8 parallel clamps since I started (same sizes, I did change brands) and never wanted more parallel clamps. I made my clamp rack purposely bigger incase I wanted more sizes. Nice storage for other crap, but I will be making it smaller when I finally put up the insulation so it fits in a different spot. I have 4 Dubuque panel clamps which I prefer for door glue ups and things around an inch or so thick. Aside from those, I really don't have any other clamps that I use. Couple of c-clamps, few spring clamps... but they rarely make an appearance. Oh, and blue tape. Love blue tape for clamping things. If someone is doing a bent lamination more clamps are nice... but, should probably be using a vacuum bag anyway. Yeah... there is something to be said about better joinery. For the tree inlay table I glued all 4 legs up and used five clamps for them. Five clamps for the whole thing, stacked those babies up and clamped it down. Probably could have used 4, but I grabbed 5 and used them Some guys love using tons of glue, and they need more clamps because they're silly. 3) I do a lot of gluing and laminating so use a lot of clamps. . . However and not sure where I found the article but last year I asked the great online orical [Google] this same question. Can you over clamp something? Too many clamps or too much pressure when you clamp was the main gist really of my quest. I found an article from some one, could even have been a glue manufacturer now that i think more about it. Where they ran a series of test using different woods, clamp numbers as well as clamp pressure. What I got from this is no you can't have TOO many clamps. But depending on the wood hardness you can over tighten your clamps. The article went on to explain how you estimate the tightness for various woods. BUT since 90% of the wood that I glue is similar to concrete, I will never over tighten my clamps because its physically impossible to do so and I most definitely will never use too many clamps because I will run out of room to add more. Soft woods on the other are a completely different kettle of fish. I primarily use a but load of clamps to get a consistent pressure along the entire length of the two or more bits of chopped up tree that i am gluing. Sometimes this concrete wood is a bit twisted so in order to get a slightly better join (when I'm building those garden tables) I'll run a thinner length of tree top and bottom, then clamp the hell out of it to straighten them up then screw them down [Using 100mm batten screws]. Usually works pretty good. 4) I have no C clamps but I bet as you posted, they come in darn handy, especially using the cauls to keep the primary pieces from shifting. 5) I'm sure you could have enough ... I have not hit that number yet haha. I always end up having to get crazy with clamps it seems because I don't have enough. 6) Anyone found a use for handscrew clamps where other types weren’t quiet as good? . I don’t have any myself. 7)I assume you're talking about the wooden ones? I do use them from time to time.. They're great when you want to stand a piece of wood on edge! Just screw them on and it's an immediate kickstand. I also will use them from time to time where I don't have enough clamp length to clamp something up. I just put them in the middle and clamp to them. Or, when I don't have a good edge to pull a diagonal clamp to. I think I posted a picture of this on the final cabinet of the quilting desk.. 8) I use one to hold pieces in place in a jig for cutting box or dovetail joints at the router table. To be honest I use that type of clamp because when I first saw the jig being used, that is what the demonstrator was using... monkey see, monkey do. 9) I just think they are neat, being made of wood. So not really clamping pressure but to hold things in place? Given the simplicity, recon HF are as good as any, well, probably not?
-
Submitted on the old forum by Kev Can you ever have enough? I've had some discussions with some people who subscribe to the thought that having a boat load of clamps is silly. If you do your joinery correctly, minimal clamping is all that's required so, there's no need to have a lot of clamps. Where I agree that proper joinery is a must for what we do, I don't believe that you can have too many clamps. I was doing some leg glue ups just this morning and thinking about this topic. I was laminating 2 pieces of 8/4 poplar that were fresh off my milling process. All my machines were tuned up and my joints looked great. The legs were about 36" long and I used 3 clamps under and 2 clamps over to equal out the pressure. All had minimal clamping pressure as the joints were good but, I still used 20 clamps in the process. So, let the discussion begin. Can you have too many? How many of which sizes should you have? What about parallels vs F style? For the record, I have 5ea 12" clamps, 5ea 18" clamps, 10ea 30" clamps, 10 ea 44" clamps, 1ea 54" clamp, and 2ea 64" clamps. I have a boat load of F style clamps (probably way more than anyone needs) but, they're easy Christmas gifts for people and I don't really think I've ever actually purchased any.
-
Follow up posts 1) That is actually a real nice design. I haven't had a call for cutting circles but I would definitely build this jig if I need to in the future. 2) That is actually a real nice design. I haven't had a call for cutting circles but I would definitely build this jig if I need to in the future. 3) I just watched and is an interesting concept. I would try to find a way to not have to use double sided tape. I don't know how to accomplish at this time. 4) Regardless, there would be some work.. CA glue would work too.
-
Submitted on the old Forum by bushwacked. Saw this and it seems like a great solution to cut circles without using a nail and making holes. Just thought I’d share...
-
Follow up posts - 1) Definitely a good and money saving idea in the shop. It can be a pretty common technique, bath room vanities come to mind. If you mass produce vanities in this way they will work in pretty much any bathroom's plumbing layout. When we bought this house the base cabinets in the kitchen were built like this also... made cheap cabinets even cheaper. 2) Time and money saver for sure but, not always the best idea. It's really dependent on the wall behind the cabinet or holes/openings that you have in the tops. I'll be building a new miter station for the new shop and all the cabinets will be modular, similar to what Marc did. Even tho I should have perfect walls, I may still put backs in the cabinets just to keep dust and crap from getting in the cabinet. We'll see when I get there. 3) So money and time aside ... would the biggest thing be dust and crap getting in there through the back? I guess especially on a liter saw station where dust will be plenty... My walls are ok. Mostly straight but not flat and typical quick construction built. However I’ll be redoing the drywall and I hope to get them flat and not warped. Also nothing crazy like he has at the bottom. 4) For me, yes. I put things in drawers and cabinets to keep the dust off. Another thought to consider... You know that little tiny, very important, item you store in that cabinet? You know it's going to fall out the back and under the cabinet forcing you to either tear up your cabinet or buy another very important little tiny item.. Murphy says that will happen.. Just saying... 5) Hah. Ya you are probably right on losing that important tiny little part. We could still take cabinets out though. As much of a pain as that is 6)Would that be a legitimate consideration being a miter station? A lot of work to get that set up again. If I were doing open backs, I would leave the bottoms removable for exactly that reason.
-
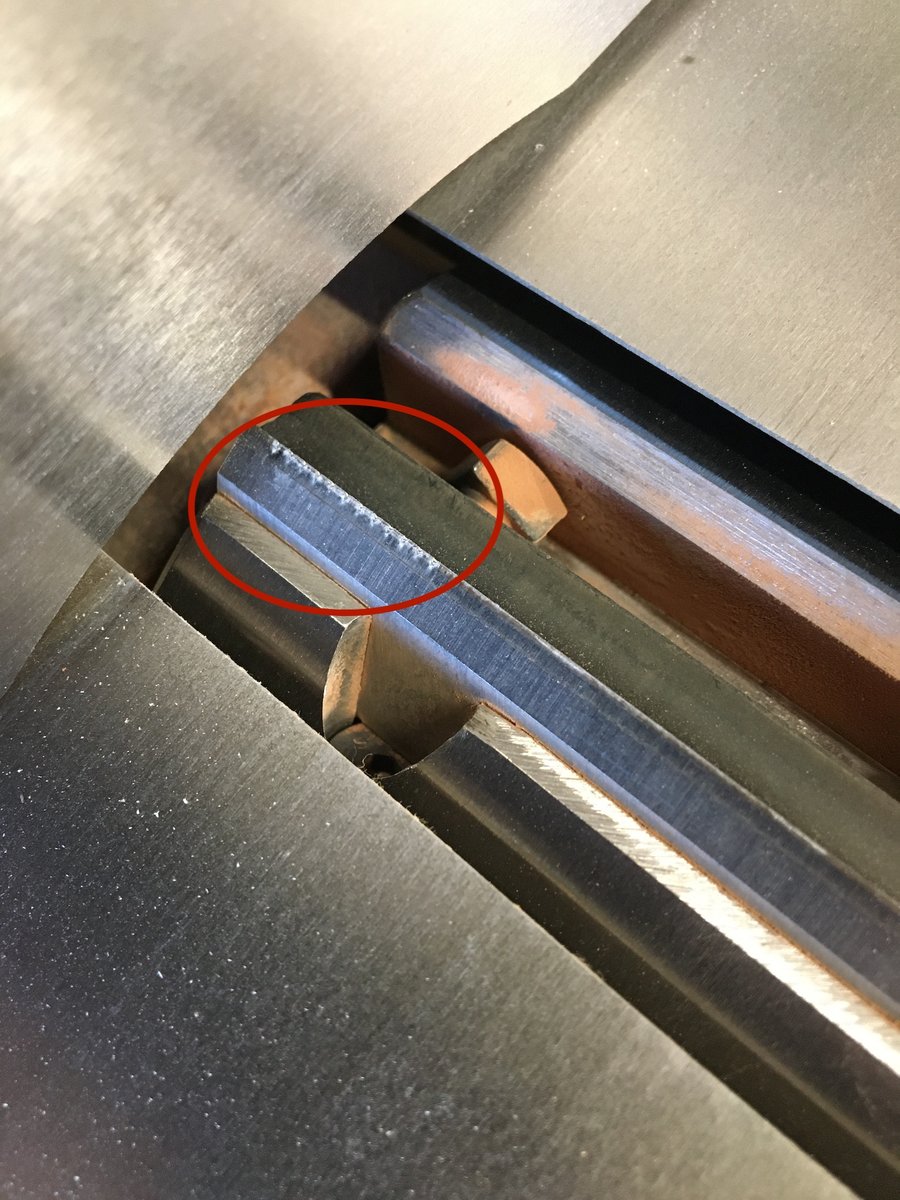
good point I'll have to check into that. They are the original Powermatic blade. When the time came to replace them I was going to up grade to a helical head but this is to early I haven't saved enough money to go that route yet.
-
I don't know what happened to my Jointer knives. Last time I used the jointer was when I was building the Morris Chair and I know I would have noticed this then. But the other day I went to edge joint a piece and it looked like I had the blade on a tape dispenser doing the cutting. I have no idea how or when this happened to the knives. It certainly seems like something you would have felt or heard at the time. It's about the first inch of the inside (closest to the fence) part of the blade. P.S. did I just post the first regular size picture here???

-
submitted on the old forum by bushwacked I have seen him do this a few times now and thing it’s a pretty cool idea and saves quite a bit of ply too. Sure it seems to take a bit of extra time but the trade seems like a good one. ... if it’s not clear I’m talking about how he uses the braces across all with dados to sit flush with no backs. I I think I’m going to try this on my next shop cabinet build.
-
Submitted on the old forum by terrymck I use Bosch blades or Piranha (I think the latter are made by Black and Decker) in my jigsaw. But to be honest when breaking down stock by crosscutting I simply use a 22" or 24" hand saw. I have a lot of them and found they are quicker to use, don't jam up or break, don't need any setting up, don't need fancy dust extraction, don't need PPE, don't get kick back and are immediately on hand. When I first saw TWW breaking down stock (on one of his Guild videos) with a jigsaw I thought I would give his method a go but soon reverted back to my traditional method as I wasn't saving any time and found that I spent more time setting up the vac/positioning supports etc. When breaking down plywood or any other sheet good I use my tracksaw. I also use the tracksaw to apply a straight edge on any stock that is straight off the slab and has a wavy/live edge prior to running on the tablesaw.
-
Submitted on the old forum by Kev I don't really.. I do like the Festool brands that go with the saw but, have no imperial evidence that they're any better than any other blade.