
Every purchase made through our Amazon Affiliate Page helps support this site

Chet
-
Posts
2,275 -
Joined
-
Last visited
-
Days Won
92
Content Type
Profiles
Forums
Downloads
Gallery
Events
Store
Articles
Blogs
Everything posted by Chet
-
Submitted on the old forum by Coop I have a Jet JPS-10TS contractor-style table saw and a hybrid, if you will, HF dust collector with a two stage system with the Wynn filter mounted on a mobile base. Having nothing to compare it to other than a Craftsman shop vac, it works fairly well, except on the ts. I attach the dc to each machine as needed with a 10’ or so, 4” flex hose. The problem is, I occasionally have to clean out the ts cabinet of sawdust. Where on the drum sander, bs and jointer, the dc picks up all of the dust and chips. Is the ts issue to be expected and if not, does the problem lie with the ts or the dc? Someday, I will connect the dc to the ts, both completely empty and see what the ratio of dust left, to the dust collected is. Follow up posts 1) Believe it or not, even with my system, I need to occasionally clean out the collection bit on my saw. If your collection system is keeping the dust from flying all over the shop when using the saw, I'd say your system is doing its job. I should clarify a couple things on my saw.. 1. The new saw is very different and is actually designed to collect in the bin. There's a blade cup (I suppose that's what it's called) that sits directly below the blade that has a hose where my DC hooks up to it. The bin collects everything that escapes the cup. 2. The old saw without the fancy new system still needed to be cleaned out about twice a year.. Maybe 3 times depending on use. 2) The only time I see chips or dust outside my saw is on the top when I take less than a rip cut, ie, a blades width or less. With as many openings as I have on the saw, it’s easy to believe that it’s the saw and not the dc. The reason for asking is that I’m thinking seriously of mounting the dc remotely and hard piping like others. I guess, if the HF system doesn’t perform, then I’ll need to upgrade. Thanks Kev for the response. 3) Coop, I would seal up the openings using foil tape, the kind used for HVAC. You probably can't seal everything, but worth a shot. 4) My saw is designed similar to Kev's and I too get residuals in the cabinet itself. I think this trends to be the case on most saws and I would guess that using a dado stack will cause more then the regular blade. My shop is all hard piped to each tool and my dust collector is just a 1 3/4 hp. 5) The four corners at the bottom, I did just that. But there is the slot in the front that allows for the tilt and a vent in the side, I guess for ventilation, plus the mass in the cabinet itself. Really my question/thinking is the dc as to whether it’s worth the hassle of moving and hard piping. Just didn’t want to put good money after bad. But, the ts seems to be a common problem so I may have a go at it. Thanks all. 6) So anyway last year I replaced my old Delta contractors saw 10" which had a square cone underneath the blade and twisty gear mechanicals that I attached a 4inch pipe to that then went to my vacum unit. anything that fell through from the saw was picked up and whisked away. It wasn't perfect, but large thin slices that fell through were easily removed. I up graded to a flash sliding bench top panel saw that was worth 6 times what the delta cost me and the saw dust pick up is seriously XXXX. Theres this thin box thingy that encloses the blade under the table, the dust extraction is attached to a eclipse shaped 4inch pipe on the right side that runs down to an inside duct. The vac on the outside is attched to the other side of this duct. Works fine till you get a think bit of scrap fall down inside that blade housing that cover the extraction port. Doesn't matter how much suck is on the end of that pipe nothing goes anywhere. Also a lot of dust ends up on the floor under the machine that doesn't go into the pick up. If it had the same sort of pick up as the delta it would be awesome, but it doesn't and I'm for ever having to clean out the pile of dust inside on the floor. So I leave the side panel off for easy access. Panel on or Panel off doesn't alter how much dust is sucked into the extraction pipe. What did alter how much dust was sucked up through my vac unit was when i vented the unit straight out through the wall instead of into a bag. The saw dust now just hits the ground outside and when it piles up too much I load it into a wheel barrow and dump it in the garden. Or if its treated into a fire or over the fence into the neighbors. I have run hard pipe from the main vac unit to the various areas where the gear is then i run a flexible pipe which i can then move from unit to unit. Back at the vac I just need to open and close a couple of gates to get the flow to go where i want it. The dust extraction unit is a 2hp 230vac I have a smaller wheelie unit that I is dedicated to the panel saw. Despite my hate of dust I pick up probably about 90% of it, the rest ends up on the floor, the walls, the ceiling and everything else stacked around the place. On the drum sander i have a 2 stage wet dry power vac that's designed to suck through a 2 inch pipe. Which is what comes out the top of the bench top drum sander. This works better than hoking the main unit into it via reduction fittings. For the hand tools I have a small cheap tool vac unit that plugs into the power tools outlet. And at the back of the shed I have a big two foot 3 speed industrial pedestal fan which i turn on when I remember and it blows a lot of the floating saw dust out the door.
-
In the first two pictures the workers are getting a lot done, then in the third picture dad gets in the way and slows the process down. Typical, management always in the way.?
-
Submitted on the old forum by Coop I have a Grizz G0555X bandsaw and one of the screws that tightens the bearing adjustments is stripped. It locks the bearings that ride on the side of the blade in place. Actually the aluminum block that the screw threads into is stripped. Should I order a replacement part from Grizzly or are there better after market replacement guides available? Follow up posts 1) If I needed to replace the guides on either of my bandsaws, I think I'd be looking at Carter for new ones. Certainly nothing wrong with replacing with the stock stuff, they obviously worked for quite some time for you. 2) I really like my Carter guides. Pretty easy to change out. They do have great customer service if you need to call them for help. 3) Thanks guys. I’ll give the Carter guides a look. 4) Kev and Kent, looking at the Carter bearings, they do not come with a lower thrust bearing from what I can tell. Do y’alls Have them? 5) Sorry to say that I can't offer a personal experience.. I only know that they come highly recommended and they would be my first look if I were replacing mine.. 6) Thanks. They are about $50 more than the Grizz guides but you never hear anyone bragging about how good their Grizz guides are ! I’ll give Carter a call tomorrow for the scoop. Also, on Carters thrust bearing, the outside edge of the bearing rides against the blade instead of the face of it which makes sense. 7) I was wondering about the lower “thrust bearing” that rides against or close to the back of the blade. The illustration does not show it but customer service this morning said that it does. Got it ordered. Thanks 8 ) The new retrofit guides from Carter came in today and I was amazed at the weight when I picked up the box and even more so when I saw the construction and mass of these things. I was a little disappointed with the instructions as they are mostly pics and they leave a lot to be desired but will probably be more simplistic as I start the assembly tomorrow. We’ll see. 9) Don't forget that you can give them a call if you need help. 10) Either I’m a complete DA or I got the only bad piece they ever produced. Unfortunately they are on the east coast and I’m an hour behind them. Something ain’t right and I’ll have to wait until Monday to find out. 1000 to 1 they’ll make it right. 11) I just spoke with Mr. Perez, the owner of Carter Products. He explained that the lines were all lit up and he actually answered the phone. He also explained that the Grizz bs is not the easiest to fit but that there is a part that will remedy my problem. The new part will go out today at no charge. Super nice guy and great customer service. A review of the new guides to follow. 12) Coop, hopefully smooth sailing once the part comes in. What's the part? 13) He called it the bracket. The cap looking part that fits over the bottom of the round vertical bar. Thru it, fits the horizontal bar that the upper guides attach to. The hole drilled in this bracket was offset and the thrust bearing was not lined up with the blade.
-
Submitted on the old forum by Kev I've created this thread about 4 times today and removed it each time because I don't want to step on toes or have it derail in a bad direction, that's just not my intent. But.... Once again today, my feed is full of SS owner making "mental" mistakes and having trips. Each time, their fingers were never in harms way. The trips were caused from either forgetting to put it in bypass mode or not realizing their miter fence was going to hit. All having to do with metal objects. My question is this.. Do you really want to pay a couple hundred bucks for these mistakes or would you rather just pay for the blade if it was damaged? For the record, I am not anti saw stop! They make a really nice saw! Had their technology differentiated between metal and flesh, I would have been right on the bandwagon. However the term "flesh sensing technology" is a bit of a misnomer! Follow up posts 1) I see pros and cons of SS, but I don't know if I would purchase 1. My biggest reason is I have heavy respect (overly cautious) of something spinning a sharp object really fast. I would probably forget to set in bypass mode and having an activation would really make me angry. 2) Its interesting that you mentioned this today. On my latest project I was cutting some miters just this morning using the Incra 5000 sled. Because of the high angle I was cutting I had to add a 45 degree jig to the sled to get the set up I needed. Everything I did during the operation was safe but my one hand was about 3.5 inches from the blade and I was mindful of this the whole time. Never once did I think that there was no concern because I have a SawStop, my mindfulness came from the fact that I don't want to hit a spinning blade with my hand. I don't work any different in my shop now then I did 7 years ago before I purchased this saw. To me you can't change your thinking, it is the only tool in the shop with the technology. My bandsaw, miter saw, router, jointer and planer don't have it and you can't move around the shop turning on and off your safe thinking, it need to be on the whole time. The technology in my mind is an "in addition to" not an "instead of" feature. I respect the spinning blade, never does it enter my mind that there is a safety feature there when I am using the saw. I wouldn't want to get lazy in my operation and find out in a really bad way that I had the one brake that SawStop made that is flawed. When I first got my saw I had a brake fire because I was using my miter gauge and I had the saw blade over at an angle and when you do that the fence on the miter gauge need to be adjusted to the right or it will hit the blade. My mistake and I paid for it, but it would have hit the blade on any saw not just the SawStop. Lesson learned. Yea, its expensive, the price of your blade of choice and the brake cartridge is about 70 bucks, more if it is the brake for your dado stack. But if I have a true accident that is so much cheaper then going to the doctor even if it was for just a single stitch. If you talk to SawStop the override isn't really there to avoid situations like using your miter gauge or any other jig that may have metal doing stuff like this still should involve proper set up. The override is there so you can cut things like pressure treated wood or any other damp wood and also you would need to override if you put a blade on for cutting ferrous metals. Flesh sensing, yea thats a bad choice of words. The whole system is set up on completing an electrical circuit and unfortunately there are a number of items that can do that. metal, fingers, moisture and the all to famous hot dog. The cartridge only needs to be messed with when you are putting you dado stack on, otherwise its just like changing a blade on any saw. I did have one incident with a cartridge when Kev was in my shop and I kept getting an error signal and this stops you from turning on the saw so we ended up using the override so Kev could get his work done. Following Monday I call Tech and their first guess was correct a little crud in the saw was keeping the cartridge from setting properly and there for the circuit wasn't setting properly. Just a little compressed air fixed it. Sorry about the long post I just wanted to share my thinking. 3) Knowing you're an owner Chet, you were the first toes I didn't want to step on and I know you're good around the table saw. In the case of the miter gauges, most are aluminum and won't damage a blade. But, with the technology, it's too late once its touched and you're out blade plus cartridge. Assuming my set up (blade choice) this would be about 200 bucks. Plus, if I'm not carrying extra blades and cartridges, now I'm down on production until I can get them replaced. Financially, it's not the end of the earth for me but, time wise it could very well be. I'm currently working a commissioned piece and had to cut some splines for splined miters last night. I got it all set up and decided to make a dry run first and sure enough, my blade would have hit the miter gauge. Easy correction before the cut but, had I of missed it and had a SS, I'd of been down on a client project until Tuesday at a minimum. I have no local vendors. Like Chet, I try really hard to practice safe practices at the table saw. From time to time, we all make mistakes and hopefully it's only equipment damage. But, to lose the use of the saw is not acceptable for what I do. Nor is paying a single company extra money to have their spare parts on hand if I do make that mistake. It's a catch 22.. You might be damned if you do and might be damned if you don't. But, the probability of a trip for a non injury related trip is astronomically higher than an injury related trip. Bottom line.. Be safe on the table saw regardless of your choice of saws. If you buy a SS because you question your safety standards around the table saw, I'd suggest evaluating those standards first. If you just want the extra layer of protection and are willing to accept the down time or money involved, more power to you. Who am I to judge? It's your shop, money, and your flow. 4) ==> If you buy a SS because you question your safety standards around the table saw, I'd suggest evaluating those standards first. Good point. This is absolutely true, you shouldn't be letting yourself off the hook in safe work habits by buying a SawStop. I will share my thinking on my purchase. I looked at them all when I was shopping and kind of what it came down to is I really liked the Sawstop it looked and felt like a top notch saw. The thing that finally tip the scale was I started thinking about the fact that I had worked in the meat industry for 32+ years and had worked around band saws with 10 HP motors, massive meat grinders and meat slicers and of course my knives. Add to that working in the wood shop for almost the same amount of time I figured that the odds were starting to stack up against me and it wouldn't hurt to had a layer of protection where I could. I have never had so much as a stitch in the meat shop or the wood shop and would like to keep it that way. Discussions like this are good. 5) I would say #1 for me was build quality. Everything I read was it was equal to PM plus being the industrial version it may even take the lead... also the black is cool. Won't lie, the safety part did play a little bit into it. I'm not a pro and only hobbyist so I'm not perfect. I've watched tons of safety videos and watched norm and how handles a saw. Plus chatting with my brother in law and father in law who are builders/finish Carpenters. So to me .. that 1 bad day I'll still be able to count to 10. I bought an extra break as well. I always consider my cuts and hand positions before I start to so it's not like I'm careless. I always treat it like it will take my fingers/hand off if I screw up. 6) The SS is indeed a very nice saw! Very solid with little to no vibration, solid fence, and plenty of horsepower. I've had the pleasure of using them in a couple different shops.
-
Submitted on the old forum by bushwacked Do any of yall use any of the big brand lifts? woodworkingtoolkit.com/best-router-lift-reviews/ After looking that over, Kreg made the list and seems to make most lists. Curious if anyone has any experience with any of them? Looking to add one to my tablesaw wing possibly as an upgrade for christmas .... Right now I built a plywood box that holds my router and any adjustments come from the router itself working with the adjustment on there. Works pretty good, but I have to clear off table space to put it on there and use it. Also, no dust collection either so it makes a crazy mess. Or maybe just go with a table, like you use Kev ... www.amazon.com/Kreg-KRS1035-Router-Table-Stand/dp/B00WMLYRW2/ref=bdl_pop_ttl_B00WMLYRW2 or build a cabinet that the top of it would hold the lift inside it? Then it would make for some router storage as well ? thoughts? Follow up posts 1) I have the Incra table with the LS super system fence and the Incra lift which is actually made by Jessum so I would guess it is similar to the Jessum lifts. I am real happy with everything but it was a little pricey and because of the fence system it has a fairly large footprint. With the exception of pattern routing the dust collection is excellent. 2) I've added a link below to the exact table that I have. I'll also say that I've used Chet's table and I can attest to how good that fence system is! It's only drawback IMO is the overall size of it. What I like about my table is the adjustment wheel on the side. I don't need an extra tool to raise and lower the lift when I need to. What I don't like about my table is the fence. So, to sum it up... If I could have my lift and Chet's fence, combined with the PC7518 router, I think that would be an absolute perfect router table! www.amazon.com/JESSEM-Mast-R-Lift-Included-Complete-Router/dp/B0074HJ3WI/ref=sr_1_3?keywords=jessem+router+table&qid=1562269281&s=hi&sr=1-3 3) Wow that incra fence is a big contraption. How long did setup take? That table with the side wheel turn does look awesome ... 4) Incra took no time at all to set up. The top comes all pre-drilled for everything, Its a matter of putting the top on the stand and then dropping four bolts through the holes and tightening them up. I don't know maybe 90 minutes. I took the most time to put the stand together. Incra really has their stuff figured out there was no tuning up to do to get it to work right. But like I said it is a touch pricy. The stand and wheel assembly, the top, the lift, dust collection chute, the fence assembly and the PC 8517 motor was around $1500 but I don't regret it at all. 5) Not to highjack this but I find that a good bit of my router table work involves cutting grooves in wood, whether hard or ply. Now kind of back to op’s question. What kind of dc will collect the dust/chips in this operation? BW, my current and future lift is manually from the underside of the table at the router itself and am completely satisfied with it. I’ll invest money elsewhere. 6) I personally don't think any of them do a good job collecting dust on the cuts you describe. The nature of the cuts directs the dust away from the dust collection even when you're collecting under the table as well as at the fence. As for the lift, once you step into it, you won't be disappointed! There are so many reasonably priced options out there now that it's just not that expensive to get into. Hmm... Maybe I need to send you one for Christmas 7) So doing more digging ... how much power do you need from the router? Mainly because the Jessem has 2 models and it looks like the big difference is size in the motors. cheaper one can hold 2 1/4 HP motors and the more expensive one holds the 3 1/4 motors... Is it $140 difference and a needed thing to have 3 1/4 motors in there? 8 ) Completely depends on your use. I chose to go big so that I never had to be concerned with it in the future. I currently have a huge panel bit in my router right now for the lids on the urns and I'm not sure I'd want to do that with the smaller router. With that said, I'll also say that 95% of the time, you're fine with the smaller router in your table. I'd be willing to bet that's what a majority of people are running. I'm running the PC7518 in my table. I know that there are others running different 3.25hp routers. Keep in mind that when you buy the router for your table, you don't have to buy the whole thing.. Most will sell just the motor without the base so, that will save you a few bucks as well. 9) ==> I'm running the PC7518 in my table. I am running the same thing and like Kev mentioned you don't need it all the time but when you do you will be glad you spent the extra money and you won't want for more. I also bought just the motor. 10) I can see this being another rabbit hole but most have been an adventure that I have enjoyed and benefited from. Glad this topic came up. 11) This one isn't nearly the rabbit hole as some of the others in this hobby!
-
Submitted on the old forum by bushwacked So between Amazon 5% back and my Citi double cash back card. I have saved $2k in cash back between then 2. So I could basically get any of the below since they are all in my price range free to sub 1k ... I'm looking to buy once and get something that solid right out of the box. Yes I know Kev you have not had the greatest experience with PM but the service people seemed good. Even though it was slow. rikon 18" for free RIKON Power Tools 10-342 18" Bandsaw www.amazon.com/dp/B01D35Z3KU/ref=cm_sw_r_cp_apa_i_nRobDbEFH3D1H PM1500 for like $700 Powermatic PM1500 1791500 BandSaw www.amazon.com/dp/B00A86U254/ref=cm_sw_r_cp_apa_i_-MobDbYAPARC7 Jet 15 for free JET JWBS-15-3 3 hp Bandsaw www.amazon.com/dp/B01HZHAH08/ref=cm_sw_r_cp_apa_i_xSobDbQ1Z89VB I know I could go cheaper and buy other tools as well. However there's not anything else big I need to buy and this would round out the shop. So trying to buy once cry once. Thoughts? Follow up posts 1) I would get the rikon 10-346. It is at the top of your budget, but has more hp and larger resaw. 2) Well my budget was $1500ish. But I've waited so long that all my rewards added up to more than I saved so if I wanted to go crazy my budget would be $3500... Which I'm not gonna go that crazy haha. So anything on the list is well within my budget. 3) Just noticed this was a diff model # than I had listed haha. I read this a few times and then went and validated my links above and was so confused ... Then I saw the difference that looks pretty beastly too!! One other thing. It needs to be available on Amazon so I can get my $700 cash back from there. 4) Even though I've had bad luck with PM, that would probably still be my choice on your list. However, I will never buy another PM product that I can't put my hands on first to ensure it's right. 5) Drew, did you think of looking at any of the Laguna band saws. I have had the 1412 for about 7 years with absolutely no complaints. With your budget you could look at some of the bigger models. I know a few people that have the bigger ones and they sound like a great saw. I have head a couple of complaints about their customer service but I haven't had a single problem with my saw so I can't speak to that. 6) I was seriously considering the Laguna 18bx but they stopped selling it on Amazon for some reason. Maybe it will pop up later? But I have not seen it in several months on there. 7) I completely like my Grizz 14” and at my age, it will probably be the one the kids sell. But if I were younger and with your budget, I would select the Rikon. 8 ) Rikon because it's higher capacity to resaw or the difference in PM and rikon are almost negligible ? 9) Best thing to do bud is to put your hands on both of them. That's hard with PM since most of their dealers don't carry any stock. I'd check the magazine circuit to see if there's a comparison or hit YouTube and start watching the reviews. 10) If you have a Woodcraft that ou can get to, you might check here. They carry a lot of Rikon stuff and the on Powermatic tool I see all the time in the Woodcraft here is the their bandsaws. 11) Both but mainly due to the fact that my brother has the Rikon and swears by it. I have no experience with the PM. 12) Ya I've looked for a PM1500 at stores online from Austin to OK city and nothing. Also I don't think I've ever seen anything bigger than the 14" ish bandsaws in any store. So don't think I'll get to play with the 18" rikon. I can find both their smaller models in store but not sure how helpful that is.
-
Submitted on eh old forum by Frank Waiting for my new PM2000B table saw to arrive. Wondering if the stock blade that comes with the saw is any good? I usually use a Freud 80 tooth crosscut blade and am wondering if the stock blade could be a good rip blade for 1" stock. Follow up posts 1) Welcome to the forums! I was actually pleasantly surprised at the quality of the blade. I normally run a Forest WWII and will again but, not until the stock blade is in need of sharpening. I've run 1/4" stock up to about 16/4" stock with it and it's done well. 2) Welcome to the forums. 3) OK great to here that the stock blade is decent. I already purchased a sharkguard for the over table dust collection. Should be all set tomorrow when the saw arrives. Thanks for the reply! 4) Happy to help! Hope you have fewer issues than I did with the saw! I have more replacement parts arriving Monday on mine. 5) Frank, welcome to the forum and congrats on the new saw! 6) Just finished assembling and tuning up saw. Everything looks good so far. T Glide was a bit too tight - fixed that up with some umhw tape. 7) Curious exactly what you did here as mine is also a little tight? Even the repair guy they sent me noticed it and was able to adjust a little of it out. 8 ) I loosened the two teflon screws in front of the fence and then added some umhw tape where t glide fence metal touches the front of the front rail. Initially this was really tight and felt some metal grinding on the front rail. After I loosened the teflon screws and added the tape the fence glides very smoothly. 9) Sorry, I meant to say loosen the two screws that adjust the fence squareness and not the teflon screws. 10) Thanks.. That's what I thought but, wanted to be sure.. 11) Kev, Adjusting the teflon screws also might help as sometimes it helps clear the table and also shifts a bit of weight of the fence to the back of the saw. Curious to know what replacement parts you needed for your saw? Everything felt bang on except for the fence. Even checked the belt and it was perfect. 12) I know we talked about this in another thread but, here's the list. 1. Extension (black) table - Original wasn't flat. First replacement wasn't flat. Next one arrives Monday 2. Power switch - Saw just shut off for no reason. - First replacement broken. Next one arrives Monday 3. Fence plates - All 4 corners broken - Replaced but, they were on back order for 2 months 4. Door - Known issue with PM. Replacement worked fine 5. Riving knife - Not replaced yet but, mine is very finnicky to remove 13) Wow. I never tried the riving knife as I bought the sharkguard and I really like it so far. Could you please elaborate about the door as I did notice that I had to lift it a little to get to close, but I thought how often do I need to go into that door. My table only has the 36" extension so I think there was less chance of them getting wrong. How long before the power switch stopped working for you? Really sorry that you had a bad experience with a great saw. 14) My extension table (the black one) is only 36" as well and was bowed nearly 1/4" in the middle. My door had the same issue but, was further off and wouldn't close. The repair guy that came said this is common and the easiest fix it to simply add a washer to the top of the hinge pins to lift the door into proper alignment. The power switch issue started about a week after I got it. PM sent me a new switch. The repair guy opened the box with the new switch to find it broken in shipping. He pulled the "old" switch off the saw and took it apart. He found some loose wiring in it that could be the problem but, I didn't get enough time at home to test that theory. So, in the mean time, PM is still shipping me another new switch. In the end, I think I just got a lemon. Because of my shipping (delivery) difficulties and the fact that they're sending the repair guy to me, I'm hoping when I get the stuff taken care of that I'll have a good saw? However, I've now had the saw 6 months and it's still not right. Some of that is on me because I travel for work.
-
submitted on the old forum by bushwacked What brands should I be looking at? I have really only ever used Timberwolf blades for a 1/2 and 3/4 blade ... However with the new bandsaw coming in a few months once the general 10% sales kick in, I am curious what else yall have used and like. I am thinking of getting a resaw king ... for obvious reasons of resawing. but what about the smaller 1/4 blade? Do I need anymore blades other than a resaw blade and then a small blade for everything outside of resawing/ripping Follow up posts 1) Nothing wrong with the Timberwolf blades, especially considering the cost! The Resaw King's are very nice too and last quite a bit longer.. As you may or may not know, I run 2 band saws in the shop.. The 14" is set up with a Timerwolf 1/4" 10tp1 blade and I primarily cut curves on this saw. The 17" saw is set up with a 1" Resaw King 3tpi and I use it for resewing and cutting straight lines. 2) I use both the TimberWolf and the Wood Slicer in the 1/2” and 1/4” and have never had one break. Both of the brands in 1/2” do a great job in resawing. 3) I have several Wood Slicers and they have given me good service and like Ken I have never had one break... hope I don't regret saying that. 4) Thanks guys. I think I'll stick with those then since they seem to be well received.
-
Submitted on the old forum by Coop I’ve had this sander for a year or so and really like it. It came with a “hard pad” and I accepted it as the norm. I am in the process of building the Maloof Low Back Chair” and Kev suggested using the soft pad as part of the sculpting and sent me his, never been used. The pad is very flexible and has been a pleasure to use. My question to those that have used both hard and soft, why would you ever use the hard pad? Now, I haven’t used the soft pad on flat surfaces so maybe, that’s where the hard pad excels? Follow up posts 1) I really thing there is a purpose for both. The soft would be great for what you are going to do with the sculpting but I wouldn't want to use a soft if I was going to sand a top surface like a dining room table, then you want the hard one. With the soft on a table top every time you got anywhere near the edge, you would be putting an unwanted round over. I do a lot of sanding before glue up and the hard pad is the only way to go in my opinion for things like this, just to big of a chance of wrecking you flat surfaces if you us a soft pad. Of course this is just the way I feel about it. 2) That was kind of the answer I was expecting. Thanks Chet! 3) Yea, the soft pad wouldn't be good around edges that you didn't want rounded over. Great for what you're doing though. Glad the pad worked out for you! 4) Chet summed it up perfectly
-
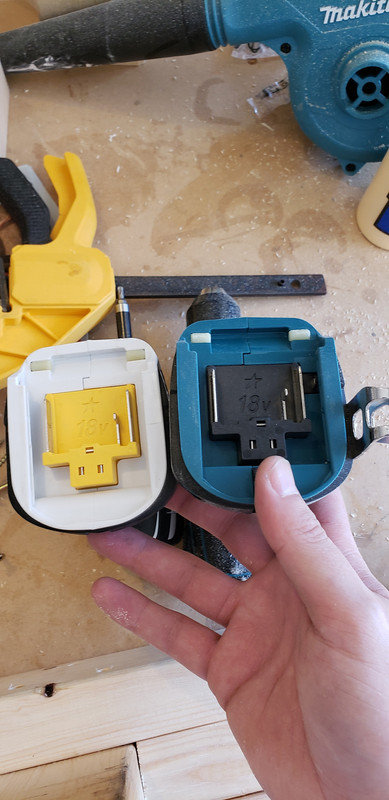
Submitted on the old forum by bushwacked I have had the white set of Makita drills for years now and I went to HD to get some stuff and walked out with another drill. However it seems the new drill doesn't except the old battery even though they are both 18v ltx series drills with the Stars on them..any idea why? Now I have to buy newer batteries and it's like a whole other brand of tools now with multiple batteries. Follow up posts 1) They are different lines. The white takes the LXT battery platform. 2) Yes, that is where I am confused ... They both say LXT... 3 ) That is weird, I have the black and white version so never looked that closely. 4 ) Yep. Both 18V with the star too. It was a good reason to buy this though lol... Makita BL1850B2DC2 5.0 Ah 18V LXT Lithium-Ion Battery and Dual Port Charger Starter Pack www.amazon.com/dp/B01MDKWI32/ref=cm_sw_r_cp_apa_i_VllXCbGN0G96B 5) New batteries came and charger ... The big batteries fit my white ... So it seems the original white batteries don't work but the new ones fit all which is cool!
-
Submitted on the old forum by woodenskye I have a Bosch 1617 router and for the life of me I can't get the bit out. I have no problem loosening the collet, but it won't come off. I have shot the collet and bit with WD40, liquid wrench, struck the shaft with the collet wrench and nothing. I have also tried heating the nut and bit, but nothing. Any suggestions? I don't care if I have to destroy the bit, I have other round over bits. Follow up posts 1) I had that happen with the same router as yours. I went at it the same way you are thinking, I may destroy the bit. After loosening the collet all the way, I wrapped a little bit if tee shirt around the lower part of the bit, still kind of hoping to save the bit, put the wrench on the lower part of the shaft and using some good channel locks, twisted the bit the same as if you were trying to loosen the collet itself. It ended up being a knuckle buster but it came out undamaged. I was prepared to go at it with out the tee shirt scrap if it didn't work but I got lucky and didn't have to go nuclear on it. I read somewhere that this mainly happens if you get the bit all the way down in the shaft. Now I put the bit in, snug up the collet just enough to hold it in place, then I pull the bit up a smidge and them tighten it the rest of the way. Let us know what happens. 2) I always put the bit in all the way, then pull the bit up about 1/16" and tighten. 3) I tend to lift mine out a little further but, I don't know that's the issue. I'm probably closer to 1/4". I also run 1/2" shaft almost exclusively now tho as well. I'd bury 1/4" shaft a little deeper. 4) Take a pair of Visegrips and hold the bit real tight and turn the router on. No, just kidding, seriously, just kidding. So obviously it’s not a straight cutting bit that you can slip the collet over and remove the collet completely? If the bit has a bearing guide, remove it and try tapping down on the bit to perhaps dislodge it. I would imagine by now, you’re trying to salvage the router and the heck with the bit if that’s what it takes? 5) Chet, give yourself a pat on the back, your method worked. Thanks. The bit hit the floor when I was getting it free and chipped the cutting edges really bad, but wasn't counting on it making it through. 6) Great news Bryan! I’ve been using two of the foam space balls down into the shaft of the router so I don’t have to worry about pulling the bit back out a tad. Glad you got it resolved. 7) Great news Bryan! I’ve been using two of the foam space balls down into the shaft of the router so I don’t have to worry about pulling the bit back out a tad. Glad you got it resolved.
-
Submitted on the old forum by bushwacked Looking for a better filter than the standard 5 micron bag on my jet DC. I think it was coop or Chet .. maybe? .. that had the 3rd party filter I just have no idea where that post was. Any ideas on the website / brand? Thanks! Follow up posts 1) Wynn Filters made about the best.. 2) Drew, my dust collector came with the canister filter but the filter was made by Wix. This is the brand that I hear mention on the forums. Mine is a 1 micron, I believe. 3) Thanks guys!! I will take a look 4) wynnenv.com/products-page/woodworking-filter-pricing/35ba222nano-cartrid Thinking of that little fella 5) Yes sir, that’s the one I have. 100% better than the bag! The bag reminds me on Linus of Peanuts, when you turn the machine on. 6) Confused on the install ... Do I need to order extra stuff that they have listed? I was assuming the materials they supply with it would be enough... 7) Is your dc the same as the one in the link you posted? I mounted mine to a HF system. It came with some cheap turnbuckle hooks. I ended up buying some ratcheting straps to hold it down. 8 ) After searching around a lot I finally found the info. I have to build the donut addition they speak of to use mine. 9) Ordered the Wynn filter last night. Apparently the new ones don't need donuts they come with some new mounting gear so that's cool. Hopefully doesn't take too long to ship
-
Submitted on the old forum by Kev So, the old adage of "buy once cry once" is valid (to me) when it comes to jointers. Buy the biggest baddest you can afford and you'll never regret it! Not, reality is that many of us bought entry level 6" jointers to get in the game. Frankly, that's fair and it is what it is. Now you're in a little better position and able to upgrade that original jointer. Are you really going to spend all that cash for 2 extra inches and buy an 8" jointer? For me, the answer is easy. Hell no! I've done a lot of cool projects with a 6" jointer although, I do have a drum sander. I can seriously count on one hand in the last year where I've said "gee, I sure wish I had an 8" jointer". So, for me, an upgrade will be just that, an upgrade! I have no interest in an 8" jointer! I'll go big or stay with what I have. Additionally, there's the conversations around the helical head or the straight knives. Mine has the straight knives and I'll admit that I just don't understand the craze around the helical head. Yes, I understand that it's helpful for those doing a bunch of work with highly figured stock but, lets face it, the average hobbyist is using stock lumber from their local hardwood dealer and getting no real benefit from a helical head. So, my 2 cents worth, if you're in a similar boat to me, don't waste your money on 2 extra inches and a head that you get no real benefit from! Save your money! Ok, rant over on jointers.. Go ahead and beat me up and prove me wrong now! Follow up posts 1) I'll bite. 8 inches is too small... A friend bought an 8" PM jointer and is over my house at least once a month jointing wide boards. Also, my planer is wider and smoother too... He makes alot of tabletops so the width is required. Simply takes too much time or mess with other workarounds. Same as anything really. It depends. I buy big wide boards, so I have a big ass jointer 2) Kind of my point in general Mel. If you're going to upgrade from a 6" jointer, why would someone spend the money and only go to an 8" jointer? Is 2" worth the money? I don't think it is. Now, if you don't have a jointer then, the 8" is a great place to start. With that said, I've never regretted my 6" jointer especially since it has the long beds. 3) I was in your camp Kev but the end of last year when I was shopping to replace my 20 year old iddy biddy Grizzly jointer PM was having a 15% off sale which made it just a touch more then the 6 inch. So I got the 8 inch. No helical head and that is fine. On the dinning table and the top for the sideboard I was pretty happy to have the 8 inch. And sometimes on the first pass of a piece that is a little wonky it helps to be able to run the piece at a slight angle on the first pass, yea you can do that on a 6 inch but... 4) I bought a 6" because with a small shop that is all I could dedicate when I got started. If I was to build a new shop where I had room, I would probably go 16" combo machine. 12" combo is great for jointing, but really as a planer offers little upgrade from lunchbox. As for knives or heads, I don't do a lot of figured wood, and not being a pro would probably stick to knives, unless cost was marginal. 5) When I bought my jointer my thought was I will think about helical when it comes time to change the blades, Soooo I will probably never get the helical. Last jointer I had for 20 years and never replaced the blade. 6) When I bought my jointer my thought was I will think about helical when it comes time to change the blades, Soooo I will probably never get the helical. Last jointer I had for 20 years and never replaced the blade. 7) I started with 6 inch and mostly got a eight because I wanted a longer bed. I wouldn't think build doors using 8 inch wide boards on a job. 8 I brought one of these last year has a 200mm width capacity which I'm guessing is that 8inch thing you guys are bleating about. Now I brought a smaller unit back in 2006, it was tiny, bed to bed it was smaller than the length of the smallest bed on the above unit. The thing I hated most about it was the chip extraction. The exhaust port was at the base of a wedge shaped chute and every time I used it it would clog up right back to the blade and jam it up. Didn't matter how much suck the vac unit had it always clogged up, I eventually fixed the machine with a 5.5kg sledge. The new machine as pictured above, is massive in comparison, weighs many times what the smaller heap of crap did and is in my opinion a stellar bit of kit. When i put this together i had to use my gantry crane to lift the table setup. I can drop a 6ft length of 2in x 6in botryoides on it and the thing doesn't move. This MOFO weights a ton and its solid. It came with straight blades (which i nicked with a bit of hidden nail) so i just pushed the fence across to hide it. The fence stands tall and which lets me run really tall bit of WOOD along it. There is an option for a helical head which I have been humming and haring about. It would make short work of the Botryoides I usually put through it and they would last longer before I'd need to rotate the blades. 100% of the wood I have so far been using on it is not commercially brought wood. So I guess in that regards I'm not your average user. I use it to get a flat edge and a 90degree edge to the main wood so that when I run it through my sliding panel saw I get parallel cuts. AND The best thing is the chip chute is at the end and bottom of a rectangular drop. I have never had a single issue with extraction on this baby. PS. The longer beds are a much needed as well. BIG IS BEAUTIFUL 9) Nice! Long beds are super important! Maybe Mel will post a picture of his beast? 10) I think the biggest thing that makes an 8 inch jointer the final option for most hobbyist is shop space and the other tools that you have. These days it seems like a lot of people are going in the direction of doing away with the table saw and just using a band saw. I think Mel has even talked about this recently. A nice band saw and a Felder beast like Mel's and you could almost set up shop in a 12 X 12 shed and be happy. I have been using a table saw for a long time so even though I have been using the bandsaw more the table saw and for that matter everything else stays. So the 8 inch is about as big as I have space for. Even if I had Kev's space I think I would still have dedicated jointer and planer, again it is just the rut I am stuck in. 11) All my gear that sits on the floor sits on mobile bases. I can shift anything out of the way if I need the space. If i'm not using something then it sits in the corner out of the way with my Gun Safe. I use my jointer more than I use the bandsaw. Used my bandsaw for the first time this last weekend in like maybe a year. Sometimes I wonder why I even have it. I don't have it in the work shop anymore because of this and have it sitting in the Garage attached to the house beside the wood lathe. 12) You're going to have to come for another visit but.. We need to get your woodworking priorities straightened out... 13) I am working on a project that involves 10” boards and I have a 6” jointer. Kev reminded me of a sled that can be used on my DW735 planer and I’m there. Am I missing something?
-
Submitted on the old website by tmize So I’m really wanting to build another workbench this year. Background for those that don’t know I use a lot of hand tools. So it needs to be solid and heavy. I had just about made of my mind an build bench crafted classic roubo know I catch myself looking at the Nicholson style now an can see the benefits of the wide apron. I know I want a leg vise for sure an thick top for pounding an holdfast an 8-9’ long. I don’t wanna do some hybrid I believe these designs have stood the test of time an i not one to reinvent the wheel. Follow up posts 1) Maybe @chet will post a picture of his bench that we retrofitted a leg vise on?? In the meantime, here's the video of us doing it.. 2) I’ve seen his in a few of his shop pic posts lately an that’s kinda what got me thinking about it. It’s a nice bench 3) He's a south paw but, the vise could go on either side.. It is a nice bench! With the leg vise and a tail vise, you pretty much get both benches. If there's a downside, you can't use that entire apron because of the leg vise. You could drop the apron on both sides for those rare occasions when you needed the entire apron though. 4) Not being to use the whole apron wouldn’t be problem I don’t think. I like it for being able to standing a longer piece up to work on the end grain. I won’t be doing a tail vice on this bench. I have one now on me bench an rarely use it. I use a shop made planing stop or sticking board for nearly everything now. The old bench isn’t going anywhere so if I do happen to need it. 5) Honestly for a second bench, I think the 1 Kev built with his son would work well. I'm sure you could easily modify to get all your work holding needs. 6) That bench is made from 8/4 poplar because at the time I wasn't sure that was the design I wanted, but I needed to start somewhere and didn't want to spend a lot on an experiment. The aprons on both sides and the top are doubled up so they are 3 1/2 thick and my Gramercy hold fasts work real well. I do have a Veritas inset vise on the opposite end from the leg. I would guess that it is some were around 275+ pounds but every time I have to move it it gets heavier. ? 7) Here's that build video.. Total build cost was around 1400 but, could dig up the actual number if you're interested.. It's a really good bench and all set up for the leg vise which would, of course, be an additional cost.. 8 So, this showed up in my feed this morning. It's not my style and certainly wouldn't work in my shop but, maybe you can find some use out of the video.. 9) Interesting build but not for me 10) So when figuring waste amount for a glue up top is 10-15% still seem about right? I know when I did my current bench seem like I remember sweating a lil bit getting toward the end that I bought enough. But it was also some narley looking white oak so I cut around some bad spots. I have thought about doing a popular base an most likely maple for the top an vice chop 11) Ultimately, that depends on the lumber selection if that's enough.. Absolutely nothing wrong with using poplar in the base! The kids (blue) bench, that base is all from poplar and I have zero complaints about it! 12) And as mentioned above mine is all poplar. Yea it has some dents in it but I guess that is because it gets used, sometimes for things it wasn't originally designed for. 13) My main work bench. I laminated a bunch of the cheapest pine kiln dried 2 x 4's that money could buy together. Made a frame up from rough sawn fence wood [was even cheaper than the bench top wood]. Once the bench top dried I router ed the top side and bottom side flat, though probably not parallel with each other. Welded up some brackets and bolted it down to the frame. Presto a nice solid work bench. BEFORE FINISHED I now have an old wood workers vice on the front side and a basic vice on the short side. I also routered some slots along the back about 100mm in and a slot at each end running at 90degrees which I added some T track to. Then drilled some holes big enough to drop some bench dogs into. Looks like this Now its covered in paint, blobs of glue, saw cuts, dents, drill holes, hammer holes, weld burns, skill saw fark up cuts etc. . . It ain't not fancy but it does the job. When It gets too rough a give it a bit of love with the belt sander and my big hand plane and start again. Yeeee haaaaa!!!! 14) Saw this one in the WTO FB feed this morning.. Here is a Nicholson-style workbench I recently finished up. Soft maple throughout with Benchcrafted hardware. The design is based heavily upon Ron Brese's design (from Brese Plane). Some of you may be familiar with the high-end hand planes he builds. His bench build with a little more detail is documented here on his blog: breseplane.blogspot.com/2017/02/new-bench-is-finished-jameel-comes-to.html While looking for bench designs online some time ago, I came across this design and it actually led me down a path to reconnect me with Ron. He was my soccer coach growing up and I went to school and played on the same team as his sons. I knew he did furniture and finishing work around that time but he moved into custom plane work after I graduated from high school. It has been fun to reconnect, get to see his bench and other projects in person, and talk shop when I go home for Christmas each year. He eventually convinced me to build this bench versus a Roubo and I'm pretty happy with it. Total time invested is a little less than 80 hours, so it was quicker than most Roubo builds. It is still plenty heavy and I suspect should remain dimensionally stable and flat as well given the stiffness provided by the aprons. And the overall design is self squaring as long as the leg structure is square. Plus it comes apart easily, which is a benefit for my basement shop. It certainly has been nice to have such convenient work holding as it is already seeing some use. Image may contain: people sitting, table and indoor 15) I like that. Unfortunately the bench build may get pushed back again due to life again 16) Shame you weren't closer! You could be my one week project 17 )Yea it’s a shame it would be a fun time
-
Submitted on the old forum by Chet The last couple of weeks had me doing some projects for the shop. I rebuilt my under saw storage. Kev helped me build the existing one about 4 years ago. It was built to fit in a certain area by the table saw but do to getting some new and larger tools I ended up moving it and the second location was okay but lest then ideal because of the size. One down side to the latest location was it made it hard to operate the hand wheel to adjust the blade tilt on the table saw. I spent some time trying to come up with a design that would make it a little narrower and still store the things I have in the cabinet. Thanks to Shawn posting a picture of his blade storage I was able to accomplish what I wanted and I have one drawer in the new cabinet that has very little in it. So I am real happy with the out come. But as you will see I need to get to the hardware store to get one more matching knob. Thanks for the idea Shawn!!! It really helped out. The other thing I wanted to do was rebuild my clamp rack. I like the one I had but because of an increase in the number of clamps it was no longer enough. In the past few years because of some larger projects I had to get some longer parallel clamps and then just at the end of the year I had a project that involves some bent lamination I had to up the F style clamp inventory form 4 to 18. The other thing I needed to improve on the rack was I needed things to slant back toward the wall a little. My shop wall on that side leans from the floor up to the ceiling in about a degree and a half. So if you mount something like a shelf at 90 degrees to the wall, the shelf would be sloping down back to front and the clamp rack does the same thing so I have to constantly push them back. The other challenge is I only have about 60 linear inches to work with. I would have liked t stay with the style of rack that I had but the room just isn't there for that and still have all the clamps in one location. So I went with a new design that Keeps everything in one area. The old rack. And the new rack. Follow up posts 1) Nice work on both projects! 2) Smart use of the space, nice job Chet! 3) The cabinet and rack both look really nice. I love the how the tabs are done for which saw blade is which. Very nice! 4) Love the under saw cabinet! Like how the blade storage area keeps the blades in their own place with nothing touching the teeth. Clamp rack looks handy and packs a lot of clamps in a tight space. Nice job sir. 5) Very nicely done! 6) Nice addition you did. Just a better way of adapting to fit your space 7) I have to give all the credit to Shawn on this one, it was his idea that I stole. 8 Are the tabs for the blades lasered? Looks great! 9) No, my engraver does traditional engraving where it actually "scratches" into the metal. It uses diamond tip cutters and operates just like a CNC machine. 10) Very well done Chet. Nice set of clamps. And your shop looks as clean as Kev’s! 11) Chet, will you take a pic when you get a chance of your ds stand/setup? I’m assuming those are extra belts for your sander in the cabinet below it? 12) Ah very cool! Great work! 13) Ken, my drum sander cabinet is almost identical to Kev's but with out the walnut. What you are seeing in the rack is my sanding discs for my Festool sander. 14) I really think I need to do a video on this build and create some plans! I really wish there was someone close enough to me to come pick it up when it's finished as I just don't need 2 of them.. 15) If you built another, is there a way for you to use for the mortiser or another current or future tool? 16) Very interesting question! I currently have a drawer dedicated to a tenoning jig that I just never use. I have another drawer dedicated to 1/4" shanked router bits that I rarely use and don't belong in this location in the current shop. Ok, time to shorten the story... I only have one drawer dedicated to things that actually go with this sander.. It was designed for the original shop. Yes, the storage space could easily be changed to fit the needs of individual shops. I don't think the HCM would fit in it, especially with a lift unless I made the stand much taller and I really like the height of the cabinet. The current cabinet also doesn't incorporate wheels. I could see this being very important in many shops! I have no issues building another and giving away the current one or, if I were building to someone else's shop, giving that one away. It would be cool to find a design that really creates a well rounded solution. 16) I like the idea to go after a well rounded solution. You should have plenty of time to think it through with no internet 17) I have a little bit of internet.. The issue is that the stand has more storage than a drum sander needs. So, what else lives in this cabinet? That will most likely be a different answer for each shop 18) For my setup I was thinking about pitching the steel legs, building a cabinet with paper roll storage and since it’s by my shaper, packing it full of dedicated storage for shaper cutters and wrenches. It would still have to be portable for my setup. 19) That's exactly what I'm talking about.. For you, a place to store shaper parts but, for me when I built mine, it was mostly about sanding supplies.. In the end, the space is the same, it's how you configure the storage within that space. I want to measure (when I get home) to see if there's enough space to mount a lift like I did in my OF table.. The end where I have drawers might be a cool place to mount something like a spindle sander.. 20) That is a great idea! Hopefully it will work!
-
Submitted on the old forum by tmize So I’ve been trying the past two weeks to be getting more organized. So I’ve started on the back wall behind me bench to start. I built a saw till and drill and impact slots with several drawers for small stuff. So far I like it all being right behind me. I also moved my miter saw over to left I don’t use it much except for construction project which come an go thru the year. I relocated my sharpening stuff to the lower part where it sat. I still have another bank of drawers that will go next to the other below the countertop. I’m trying localize all my dust makers to three different spot in the shop so when I start dust collection piping in the next month or so the drops will be easier
-
Submitted on the old forum by Coop This probably goes without saying, as simple as it is. I asked Kev if he did anything out of the ordinary to his clamps when gluing up panels with epoxy and he told me just Johnson’s paste wax as always. Well, I wax my tables but never thought about waxing the clamp bars. It actually makes them slide easier too. I’ll find out about the epoxy tomorrow. Follow up posts 1) Ya mine are pretty messy I'll need to do some major cleaning before I can wax them ... Although... How often do y'all feel you need to wax? Everytime you have to wipe glue off or what? 2) I wax mine once or twice a year. Not globs, but I do put a decently thick coat. It helps with removing glue and keeping them sliding nice. I use Jet clamps by the way. No experience with Bessey parallel. 3) I wax mine two or three times a year. I don't wipe the glue off the clamps, It just pops off after you take things out of the clamps. So when you project glue is dry so is the glue on the clamps. 4) Great tip! 5) Follow up. The epoxy squeeze out just popped right off the bars.
-
Submitted on the old forum by tmize I do a lot of hand planing so do y’all think a 4” floor sweep would be okay for this? I would need have to be more careful than now so to not suck up screws or something. Also any dust collection tips would be greatly appreciated as most the dc talk goes over my head. Just simple tips as I’ve never had one before. I’m planning on doing 4” pvc trunk line with drops at router table boush benchtop, table saw,bandsaw compound miter saw,bench top drill press, and soon a hcm. That should be all for a very long time if not forever. I take me planer outside and blow chips in the yard. Follow up posts 1) It ultimately starts with the dust collector itself. A couple rules of thumb that have served me well. 1. Run the largest main trunk as the dust collector allows. 2. Don't reduce to 4" (or the port size of the machine) until close to the machine 3. Reduce or eliminate any turns when possible 4. No 90s or Ts. Use sweeping 45s when you have to turn. Depending on the DC, you should be able to run your planer as well Floor sweep - Again, really depends on the DC. I wouldn't want to do this without a cyclone where the large chips are separated. If that's in place and you have enough suction - either decent HP on the machine or, close to the machine - you should be good. I've noticed that some of these come with a screen in them.. Yea, cut that out as your chips will clog that up in a hurry! Just my 2 worth and I hope it helps! 2) Dont copy my system if you want good advice! I went with 90s and ts everywhere, but hey I was on a budget. As far as picking screws up, they typically weigh to much vs the surface area to be sucked up. Even in very large dc systems that is true. With a floor sweep coming off a 4" pipe i would think that you would never be able to get a screw to go up it, just more surface area with the sweep area that the 4" wouldn't have enough suck. Not that a 4" pipe wouldn't work well for a sweep sucking up chips and dust. In my system even chunks that break off while milling get halfway up the pipe and rattle around. Gets annoying and I'll pop the hose off quick and let them fall to the ground with the system off. 3) I believe some people put magnets at their floor sweeps to catch the screws. Might want to glue some strong magnets to the floor sweep. 4) I don't now, nor ever have, had a floor sweep. That is an awesome idea and belongs in our reference material section! woodenskye 5) Thanks everyone for the good info. I’m guess hand plane shaving would clog it without running a separator which I’m not planning on. Magnet is a good idea tho. Nearly all the the dust made at my bench is from a handsaw so that lil bit wouldn’t be worth the effort. 6 Comment Added in the DC section.
-
Submitted on the old forum by tmize I’ll admit it I’m not the most organized person when I’m in the middle of a project. So I’m looking at building something to where when I’m at the bench working I have somewhere to safely lay my chisels,marking knives,gauges,squares and so on from rolling on to the floor. I already have a small tool rack mounted along the back of the bench for saws an plane screwdrivers. It gets in the way sometimes so I don’t want make it longer. These will just be as I need them so once the task is done I turn around and put them away in my tool cabinet behind me. Any ideas? Follow up posts 1) I would think a tray with magnets would be an idea. The magnets will keep the tools in place so edges don't get damaged. Not knowing how far your tool cabinet is from the bench, you could load up what you need to eliminate going back and forth. You could also mount 1 of the magnetic strips, like people use for kitchen knives to the leg of you bench, this would keep them nearby and out of the way. 2) This is actually one of the reasons that I like the split top. I have it in a bench as well as my OF table which used to be my primary work location. Of course, I also have the tool wall behind the Roubo where everything has a home. Assuming your question comes from a place where these thing don't work for you ore aren't feasible, how about a roll around cabinet dedicated to this type of storage? It could have a chisel rack, plane till, etc. and the drawer space would be great for fastener storage and other objects that you use on most projects? 3) Well this is more of a temp fix. I’m planning on building bench crafted classic Roubo this spring/summer. This should help some of my problem that my bench now is just under 6’. So when I’m doing joinery with my bench top moxon I run out of room on my top. My main handtool cabinet is directly behind me it’s a chest of drawer type and my hand saws are on the wall to the left of the bench. The plan is once I get the Roubo done it will replace the location my bench is now and the old one will go behind it along the wall and move the miter saw bench somewhere. So I’m a just need a box with some dividers in it to safely lay chisels off to the side to protect the edges. Like when I’m dovetailing I normally have 3 to 4 chisels an two marking gauges an knife an roll of green tape. I’m in a basement shop an still have lil ones so I like having all my tools away in drawers or cabinets so I can control rust with silicone bags. By the way those bags work very well even in Alabama summers. In the 4 yrs we have been no rust on any tools in my cabinets. 4) I live in a fairly dry climate and still use those descent pouches. Just a little extra piece of mind! Looking forward to watching the bench build! I highly recommend some storage in the lower area. I've built 3 of them with the lower storage and love it! Obviously, it can be designed to fit your needs.. 5) I’ll definitely journal it. It the simple version of the split top. With leg vise an plane stop. It’s actually very similar construction to your sons bench. 6) Lots of opportunity for storage under it.. I like it though! 7) I can’t help you with ideas but you helped me with one. Where do you get the silicone pouches? 8 Here you go www.amazon.com/Wisedry-Rechargeable-Desiccant-Microwave-Reactivated/dp/B0781BR7V7/ref=mp_s_a_1_19?keywords=safe+silicon+packets&qid=1575944890&sr=8-19 9) Yea I’ll will add some kind of storage under it. The only thing I don’t like about the bench I have now is I can’t use hold downs but in a few spots due to the cabinet base under it. I built it like a kitchen cabinet with a 2 1/2” thick top. It doesn’t move even under heavy planing. 10) tmize, thanks for the link. It says 2.2 lb. bags. Do you divide these into individual bags? 11) I can’t remember what sizes I have but if you will look in the info section it tells you the sq inches it will protect. I normally oversize the area I’m trying to cover. The reason I like these is about once a year you can throw it in the microwave and dry them back out and reuse them over an over. It comes with instruction also that tell you all about how. www.amazon.com/Desiccant-Odorless-Non-Toxic-Moisture-Absorbing/dp/B07HRNRNM6/ref=mp_s_a_1_12?keywords=desiccant+packets&qid=1575947074&sprefix=desiccant&sr=8-12 These would be all you need in a normal drawer size 20”x20” 12) So, word to the wise.. Decide on your hold fasts before you design your storage as they can be different lengths and have different sized heads. When I built my Roubo, I had a couple of Rockler hold fasts and then switched to Gramercy. They do not fit nicely in the leg holes on the bench and it drives my OCD nuts! 13) Yea I’ll buy new hold fast before I drill holes in the top for sure 14) I might not have been clear.. More important to know what you're going to use before designing the under storage for clearance reasons.. 15) It was clear as a bell. It just reminded me I need a good set of holdfast. I have the blue rockler set now an they are ok but I know their is better sets out there. Considering the bench I’m planning on building only has a leg vise I’ll need a good set of them. Just to derail the topic more since it’s my thread I can do that. I’ve always heard the gramercy ones are great. Has anyone used the crucible ones bench crafted sales. Since I’m ordering bench hardware from them I thought about just getting the holdfast to. I maybe wrong but I think they are 1” holes tho? 16) I have 2 sets of the Gramercy ones and haven't tried the Crucible ones.. Interested to hear reviews!
-
Submitted on the old forum by Coop This may not be an accurate statement as I really don’t know how long I’ve had this roll but, my Scotch blue tape sure doesn’t have the holding power as 3M. It sticks to itself very well but sure doesn’t hold that well to bare wood. Anyone else have that problem? Follow up posts 1) Yes Coop, but I always forget which brand is the better choice when at the store, then I curse myself with every use. 2) 3M has my vote. And you would think with today’s technology, that when you tear a piece off, an indicator arrow would appear telling you which direction you left off! 3) 3M is my vote as well. Messing with tape is on my list of things I hate 4) I'm not even sure what I have in the shop to be honest.. Just whatever was on the shelf at the big box store when I was out. However, I've never had any issues with it. Curious what you're doing with it that you really notice the difference? It's also possible I have the "good" stuff so, don't understand the "bad" stuff.. 5) I was banding some 3/4” ply with some hardwood and was attempting to hold the strips in place while measuring for the next piece. The Scotch is called Edgelock and was perhaps made for it’s original intent of providing for a painter’s edge and not for holding two pieces of wood together. 6) I use green frog for most everything of importance generally. There is a true difference when it comes to blue tape
-
Submitted on the old forum by tmize So on a whim today I started rearranging my shop today. I’m wanting to move my router table. It’s just a boush bench top model I built in to the end of counter that runs along the outside wall. So I got to thinking where does it fit in placement among other people’s shop. It’s not used much cope stick doors and edge treatments occasionally. Most I’ve seen have them on some kind of cart that rolls. Personally I’m the type that every tool stays in its spot. So where would you group it. Follow up posts 1) I would suspect most will say, wherever best fits your workflow. For me, I added an extension to my table saw because it was convenient. 2) Mine's a stand alone set up that doesn't move. Like you, I don't use mine all that often. I did want a significant indeed/outfeed for it but, I'm lucky in that I had the room for that. I guess this is just one of those tools that fits in the "others" area of your shop. It's not really part of your work flow. Kind of like a belt/disc sander. Something you use more often than you realize but, not a tool that you really count on to get the job done. 3) I had thought about put in router wing. The other thing is I’m about to pull the trigger on a bandsaw. So I started moving stuff around because I’ve never been happy with my table saw placement and now I think it’s found it’s happy home. An where the router table is now is far enough away that it may not interfere on big pieces. 4) Finding that shop configuration that genuinely works for you is sometimes the hardest part! The router table was something I was willing to walk a little further to get to when I needed it.. 5) Extension wing of my table saw. 6) I currently dont have a router table in my shop. Did have one in my old table saw extension wing. I think on placement of tools is a priority of work flow and how often the tool gets used to have the easiest access. In my shop about half of the tools have to get moved to be used, granted the move is just a slide to the side to get the work piece to travel through. 7) So far I’ve left it in its original place I did take the out feed table I built on to off for so clearance issue now. So I’m going to leave it alone til I finish the project I’m on now and see it bothers me any
-
Submitted on the old forum by tmize Two years ago almost exactly I drove off into using traditional joinery an handplanes. So I decided I wanted to a nice simple classic project. I was so proud when I finished it. At the time is was the nicest piece I had ever done. Over the past two years I had started seeing the flaws in from the large areas of tear out, poor fitting drawer and plane tracks in the top. Also my first attempt at hand cut half blind dovetail the fit was good even now the spacing tho was awful an to spaced out. So the wife asked for another side table. To set the record straight this has been the table that refused to be built. Luckily I’m more stubborn than the material I’m working with. To name a few of the issues I cut one of the leg tampers wrong well to be honest I started cutting it the correct way a 3/4” into the cut I thought I was wrong. I stopped flipped it an finished the cut I was wrong. I choose to see if I could fix it before I would recut the mortises. I glued a piece on the grain matched an squared it back up. The repair turned out well where it meets up actually come out looking like curly portion of the wood. So that explains why the new one is a touch shorter than the original. Some if my tenon shoulders aren’t great the tenon fit well. I still need a lil more practice of them but a 5” shoulder line is tough with chisels an hand saw. At least it is for me I look at it as a place to improve. Now the biggest improvements from this table from the last is the plane finish and dovetails. But enough talking here is some pics. I learn from y’all’s experience an criticism so the next will be even better Follow up posts 1) Hey bud, I think you’ve come a long way, much further than I would have ventured. Great job!! 2) I think I have said this before but part of the journey in this hobby is getting better as we go and to challenge ourselves to develop new skills. I use hand tools to fine tune my work's fit and finish but I will tell you right now that I don't think I have the patiences to go all hand tools as you have. my hat is off to you tmize. 3) I think it's always interesting to build the same project twice with some time/projects in between! I've built 2 large beds now. It would be a natural thought to say that the second one turned out better than the first. However, reality is (for me) that I like the first one better. Fewer mistakes most likely because I was going much slower finding my way through the build. Regardless, they both came out great and only I really know where the bodies are buried.. 4) Like you all said it’s the same details that makes a project better even if you are the only one that notices. Chet I’m not all hand tool but a lot of. Nearly all joinery an finish prep. I still not crazy enough to do all the grunt work by hand. I have a planer, table saw and bandsaw I do joint everything by hand tho. To me I make fewer mistakes doing it this way. 5) I think it is absolutely amazing that you do all that with hand tools! It would be an awesome table built with nothing but power tools, the fact that it was done with hand tools makes it all the more impressive. Great progress in your skills! Am jealous as all hell in your abilities!
-
Submitted on the hold forum by tmize It’s not “fine” woodworking but I do a lot of diy household decor projects. To me woodworking can’t all be fine furniture a shop builds they just a part of it. I see a lot of people do picture frames but that’s about it. What I don’t see is other types of projects. I collect user grade hand planes my wife collects mass produced pottery from this one brand and she loves displaying around the house so I build a lot of shelves or display type pieces in between furniture or during them as the need arises. So anyone who cares to show off just random stuff you have built. To me woodworking can’t all be fine furniture a shop builds they just a part of it. Follow up posts 1) Awesome stuff! I think we all build stuff that fall into this category. I did the glove shelf last year as well as table lazy Susans and cutting boards. There was also the floating shelves from a couple years ago. In the end, you still apply the same techniques as you would a piece of "fine furniture", it's just the piece serves more of a utility purpose. 2) Exactly kev it’s these small utilitarian projects that rarely get shared that I was trying to bring light to. The practice squad never gets interviews or the trophy ceremony but they are what help to make first string so great. 3) Some good stuff there. I know that at least in my case this is the type of project that got me started on this expensive hobby. 4) Good work. Some of the most satisfying projects are the most utilitarian in my opinion. 5) Yes same here. Started with a napkin holder for the kitchen table. Just a small tray that I screwed together with wood I found at work. Thousands of dollars later I’m still building trays and stuff but without all the screws 6) The good part about projects like these is that I try and incorporate my fine Woodworking techniques into these for practice. The bad part is that it takes longer than it should. Great topic tmize. 7) Coop, did you use a normal mortise and tenon joint or a sliding dovetail when you attached the stripper pole to the floor? 8) Hell, at my age or any age, I only wish! 9) These projects is what it’s all about. Sense of pride where ever you look around your house. I think us woodworkers are wired a lil different than the average folk 10) I agree wholeheartedly with you Jamie. Use to be the man would live in the house he built by hand to the best of his abilities. The the house was his testament to his craftsmanship. Now of day us woodworker show our craftsmanship thru the furnishment thru out our home. I do dream of building my own house or day but I still will not do everything to build it. My wife couldn’t stand to wait that long to move in 11) Sweet so when I come around for a cuppa you have it sorted for a brew. PS...Down here in NZ there are two types of wood workers. Builders and Joiners. Builders build houses and are for the most part that I have seen rough as fark. with the attitude that she'll be right because any imperfection is covered up. Not the builders of yesterday back in the early part of last century when the builders then must have been part joiner. Because now if you want a really well constructed house where the wood fits perfectly and is super well made. You need to employ both. Because a joiner is a fine woods craftsman. And neither can do the others job. But as I am finding. Being a builder doesn't take a lot of skill. Its a lot like building a model airplane all you have to do is follow the plan and stick to the rules. All the wood frames come pre built these days, so its just a matter of erecting them in the right order and Bobs your aunties live in lover. So framers do the framing, the builder does the foundations and helps lay the concrete or rib raft floor, piles etc...Plumbers do the drainage, the glass people do the windows, sparkies do the wires, carpet layers the floor coverings, curtain hangers, painter/decorator, roofer the roof. Builders don't do much. Brickies do the walls if it has bricks, or some other crafts man does the outside wall covering. Oh and plasters or gib stoppers they come in and make the drywall all smooth. A full on builder that does the lots is a thing of the past. 12) “Bob’s your aunties live in lover”? Ok, translate! 13) Function first, beauty second. Look at Shaker. Function first, beauty second.
-
Submitted on the old forum by Puka I know we have all built a green house or two before. But here is my first. A couple of pictures so far. I put the posts in a few years ago and then my project stalled. I brought some wood a couple of weeks ago to get things moving again. Before One wall framed up. The goal is hydroponics. Nutrient Film Technique. So flat pipes not round ones. using round pipes is called NOT NTF. So anyway...what aren't I going to grow. Wacky Weed. I intend to grow vegetables. The usual sort you get in the shops that cost an arm and half a leg. Lettuce, beans, corgettes, tomatoes etc. . . Did this the other night. So that's bother sides now. Tomorrow being Saturday, I'm gonna go into ITM and pick up the rest of the wood to finish the framing. I have the cladding already so all that's just waiting for a frame so it can be screwed down to it. Then it will be a matter of sorting out the vents along the top and the sides. I have some of those heat activated rams. So need to figure out how to mount them, they will go into the roof along the ridge. So when it gets hot they will all open and then when it cools off they will close while the side vents will be manual. Seriously sweating at the moment as we are in a DROUGHT. Haven't had a decent amount of rain since before November last year. [Not counting that down pour we had the other week in Taranaki] different part of the island to where I live. Wish we'd had that rain here. Tomatoes get planted in November'ish. But as Kevin Said we're pretty much the opposite of you guys.
-
Submitted on the old forum by Puka A couple of years ago me and a buddy brought some land down country as a hunting block and place we can go to get away from it all. Since hunting was becoming a dirty word in public circles and access was drying up, we wanted our own so brought 220 odd acres of bush. The place is crawling with wild goats and pigs, with the odd wabbit and smattering of possums. There was a pre made crib on site when we brought the place but I decided that when I was down there at the same time as my buddy then I needed my own place. The maximum sized building that you can build here and not need a building consent is 10 sqm. So I have designed two 10 sqm buildings to make up my bush crib. One building for the bedroom and one for the kitchen and dining. The dunny will be a composting toilet in an outside court yard where i will have the shower and a cast iron bath tub set up over an open fire. The building is setup right beside a creek, which unfortunately only flows in the winter time. Drys up completely in the stinking hot summer. But I'll be building a deck right up to the edge of it anyway. The enclosure around the shower and the bath tub will have some big doors that will open and allow views up the valley. The build so far is only foundations. I've progressed a wee bit passed this stage but as of yet haven't down loaded the pictures out of the surveillance cameras I have setup over looking the site. I've had to brace all the wood due to the fact that if I didn't the sun would twist all the wood into pretzels before I could get it braced in the build. Some extra photos of the block and a photo of the aerial picture. 2nd pic across is where I'm building the crib, which is the first valley on the last pic, the 3rd pic across is looking down the 2nd valley on the last pic [or second down from the top], white dot on the left looking to the white dot on the right. The first pic above is looking across the second valley from about mid way along the ridge between the 2nd and 3rd valleys. Square area of the block is approximately 222 acres. ROADS . . . HIGHWAYS . . .what are these things you speak of?!? Actually the Local Highway for the area is about 20k behind where the photo was taken. But if you were to look at it you'd probably just see a scungy local road in terms of the American highway system. The third photo has a road on it that will take you state highway 3 such that it is. Another pic looking across from one ridge to another. SELFIE. . .I remember when only loosers did selfies . . .which is why I feel like such a trend setter because back then it was the only way to get me and where I was in the same picture. Wasn't anyone else around the hold the damn camera. This is me looking back up the back valley. Like I'm way way way up the back valley, as you can see the bottom of valley gets really V shaped ad is only about a bout a metre wide in places. There is also a creek running down it. I'm back down on the land next week for the week so will take a bunch more work in progress pics. Hopefully by the end of the week it will be at a lock up stage. With a roof and stuff. Well my report for last week is that the first two days were stupid hot so I stayed home and sweated my ring out there instead of going there and doing the same thing. I went down late Monday afternoon and got things sorted to start early Tuesday. Tuesday dawned overcast and it drizzled all day which suited me fine since it wasn't hot. I managed to get up the four wall frames for the crib. Wednesday it Pissed down so i went for a walk around the property to change out batteries and down load footage off my game cameras. After a comfort stop I tripped and ended up falling bare arsed into a Tree Nettle bush so that curtailed that. After a couple of hours I started to feel the effect of the Nettle Toxin so I drove to the nearest Hospital Emergency Room to get myself checked out [Basically that was a waste of time, petrol and money]. While I did suffer 30 seconds of the most excruciating pain I have ever felt in the areas that came in contact with the Nettle and 2 days of mild pins and needles in the skin nerves of my entire body, not just my bum, and groin area. Not to mention huge welts for each nettle pin prick, the welts only lasted about an hour. I came to the conclusion that for it to be really bad for me I'd need to do a lot of rolling around in said Nettle Tree before the symptoms became life threatening. Check this link if your interested. en.wikipedia.org/wiki/Urtica_ferox Anyway that kinda screwed things up for awhile as I didn't get a lot of sleep thereafter. Thursday was fine but windy so had trouble building anything that required balancing to hold in place since the wind would blow it around, then the generator stopped working so the drop saw was cut from the equation. Bugger using the hand saw to cut everything. Friday I measured out, then dug and concreted in the 3 footings for the rear deck and roof support. Weather was over cast so not too hot. Also started my new plan to try and eradicate the Tree Nettle from the property. So went out and about with clippers and cut every one I could find at ground level so yeah! I managed to get the odd sting on hands and arms. Which wasn't quite as bad as getting my entire crotch covered in the stuff. But it was enough to kick start the pins and needles again so I figured that the Toxin from the previous event hadn't entirely been flushed from my system so I gave that up until me next visit. Saturday. . .not a cloud in the sky and stupid hot again. Silly me I went for a walk up the middle ridge, behind the main hut to collect a couple of cameras and their backup solar panel. Basically a 200m climb up a steep narrow ridge goat trail to the top of the main ridge. Got to the top and discovered I'd left my water back at the hut. I was not having a good time so I decided then and there that I was going to pack up and leave. So I did. . .arrived home about 6 hours later. Sometime between when I left Taranaki and when I got home in the Waikato the pins and needles feeling finally vanished. YAYEEEEE! The pic on the left shows the walls I did get erected, also shows the temporary deck at the front I got down so I could more easily walk around that side of the crib. I had to put joists down on the bearers that I'd bolted up last year. The pic on the right shows the three posts that I concreted in for the rear deck and what the roof support posts will sit on. Luckily I'd taken the time last year to nail support strips to all the tall posts out the front. Only the posts at each end had suffered any twisting and only a we bit. The ones between were still straight up and down with no rotational twisting. I put my phone against the eye piece on my spotting scope. I spied these guys across the valley on the neighbors place just below the top of the ridge about 900m away. This is 60 x magnification. I have a phone attachment somewhere to do this properly, but not with me at the time. Objective lens on the spotting scope is 100mm [that is the big lens at the opposite end you look through]. Just add water. . . say about 6 and a half inches. Early Saturday morning NZ time we had a bit of a storm starting at around 6am, a bucket load of water fell in a vary short amount of time. Really big buckets. All that crap in the left picture came from the right photo. Luckily I wasn't parked further up the left end of the track. I had planned on coming out here Friday night but was delayed drilling holes in my steel brackets so came over Saturday after the storm. That little truck is my buddy's, it was he who discovered this little bit of slush, since when I arrived I got stuck into building my crib. I didn't come around to this valley till it was almost dark. Didn't actually get a lot done on the crib, rained on and off Saturday afternoon. I put another post in the ground with quick crete. Bolted the rear deck bearers to each each set of posts plus the new one and now ready for joists. Need to buy the deck wood before I install the joists. Finished framing out the door way. Finished framing the end wall diagonals. The sloping bits at the end that fill the gap under the rafters. Discovered that my posts at the rear were 200mm too short so i was unable to lap joint and then bolt them to the piles. Which intern meant i was unable to do the rafters and purloins. Because to leave the roof hanging out 2 meters over the back wall in a high wind area without the pinning support underneath would have meant that the next time I showed up i would have found the roof somewhere up the valley. NOT ATTACHED TO THE CRIB ANYMORE. While the rain was good in the fact that it filled all our empty tanks. It was crap in that it screwed up my weekend of building and weed spraying. It did clean out the creek that my crib was built beside so i can't complain too much about that. So many of pros and cons. yip One road in, but my crib is not this far in. Its the valley before this one. The existing hut thats here is opposite these photos, which is where I stay while I build my place. Its where my buddy stays when hes down with his family. He's been doing all the work on the place so I have given it to him.


