
Every purchase made through our Amazon Affiliate Page helps support this site
Kev
-
Posts
6,301 -
Joined
-
Last visited
-
Days Won
573
Content Type
Profiles
Forums
Downloads
Gallery
Events
Store
Articles
Blogs
Everything posted by Kev
-
Yes, originally I thought the finish was going to be Rubio so that's what I quoted. However, the client wants the feel of Rubio but, the look of Potassium Dichromate. So, I'll be doing both finishes on the table top. I already had the Potassium Dichromate on hand as a tiny bit makes a lifetime's need of it so, didn't charge any extra for material. The cost will come with the labor.
-
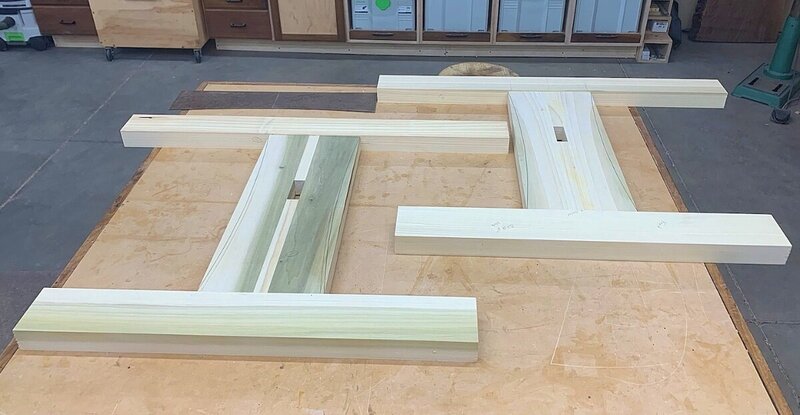
Another really good day in the shop! I final milled all of the leg pieces, got the mortises for the center stretcher done, and got the M&T joints done to be able to put the legs together. I also created a template to mark out for the curves in the side pieces and got them marked. Still a lot of work to do before gluing these up but I'm happy with the production for the day! So, where's the cost at? Currently sitting at 9.75 hours A little over 31 hours left to finish this project. Maybe the finish won't bite me as bad as I thought!
-
Nice! I do use a lot of spiral notebooks that have graph paper in them to sketch out some rough drawings.. I usually transfer them to sketchup but, not always.
-
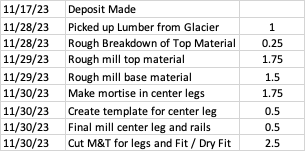
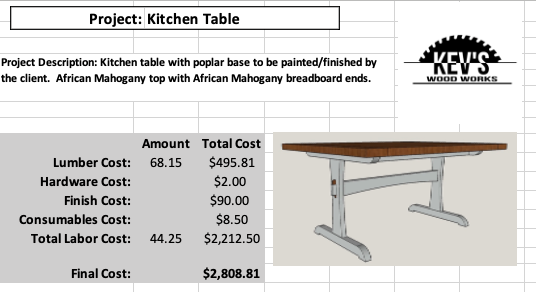
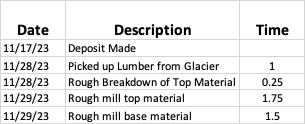
Ok.. Regardless of coming in under or over my bid, I'll try and take this step by step and explain myself along the way. Any question is fair and I'm happy to answer them.. For starters, the client is in a bit of a rough spot in life and also a distant neighbor. So, I lowered my hourly rate to try and help her out as well as generate some future business as she wants a lot more than just this table for her kitchen/dining area.. This is what my normal bid on this table would have been.. Because of what's mentioned above, I lowered my shop rate and here is the quote submitted to the client. I lowered my labor cost to $30.00 per hour. Since this is the actual quote given to the client, these are the numbers I'm trying to hit. If I missed anything, that's on me. If I totally underestimated something, that's on me. Barring change orders, this is the max that the client will be charged. I may have missed a bit on the finish but, we'll talk about that in a week or so when I get there. The client wanted a little different finish that I probably could have charged more for but, didn't. I'll go into detail when we get there. Lumber: To catch things up to where the project actually is.. I was able to cut a "cash" price with my local HW dealer so, lumber came in a little less than expected. Bid: $495..81 Actual: $416.25 Difference: $79.56 Assuming I don't need any additional lumber, this amount will come off of the final bill to the client.. Note: I do need an additional board of poplar for the center stretcher on the base because of my error. I just have to eat this, it was my error. This kind of stuff is captured on my quote sheet for the client to see in the end. Labor: Labor will be an ongoing increasing number as the project progresses but, I will try and update to real time numbers at the end of each day.. We're only in one day and only 4.5 hours of that was actually billable. This includes a reasonable time to pick up material at the HW dealer. I keep track on the white board in my shop and don't claim time that's not actually spent working on the project. This is transferred to my quote sheet so that everything is in one location and completely viewable to the client. I also keep track of deposits or changes here as well.. Here's what the list looks like so far. Total: 4.5hrs I didn't charge for consulting time today figuring out the board configuration for the top. She really didn't make any changes to what I had come up with so, was just conversing with the client time in the shop discussing the project. Bogs down the progress but, keeps the client happy. So, what's all that boil down to? There's $1192.50 left on the budget and a $79.56 refund due on lumber since I got a break. In other words, I need to find a way to complete this project for $1112.94 or about 37 hours of work including finish to stay on my quote. So far, I'm feeling like my quote is pretty accurate to what the final will be.. We'll see Note: This doesn't account for the finishing stuff mentioned above which will probably bite me a little but, shouldn't be too bad.

-
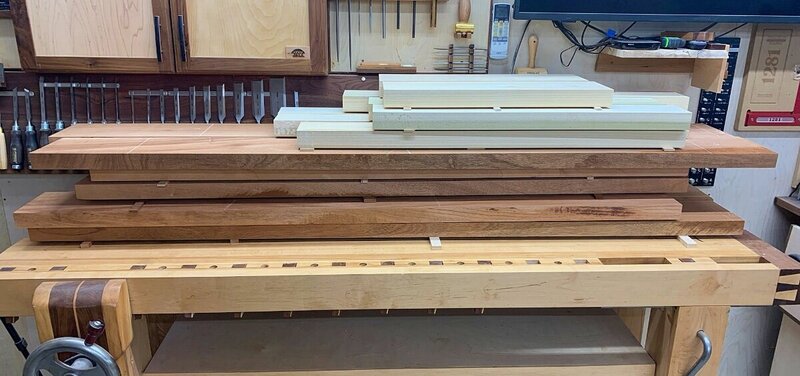
Good day today overall! Got all (all but one piece) the lumber rough milled. Also had a good visit from the client to approve the orientation that I picked out for the boards in the top. African Mahogany is tough since it looks different from all angles! I thought it was important to have her approve the final look of the top especially since it's purely an aesthetic decision. I did cut the center stretcher too short and had to reorder one piece of Poplar for that. My mistake at no charge to the client. Will pick that up tomorrow or Friday. Here it is, all stickered and stacked up! Hoping for little to no movement since it took a bit to get the African Mahogany flat! Will probably go back to the top tomorrow and see about getting it glued up! Hard to believe there's a dining table sitting in that pile!
-
Far from a "young whipper snapper" but, too old to keep up with the technology I guess..
-
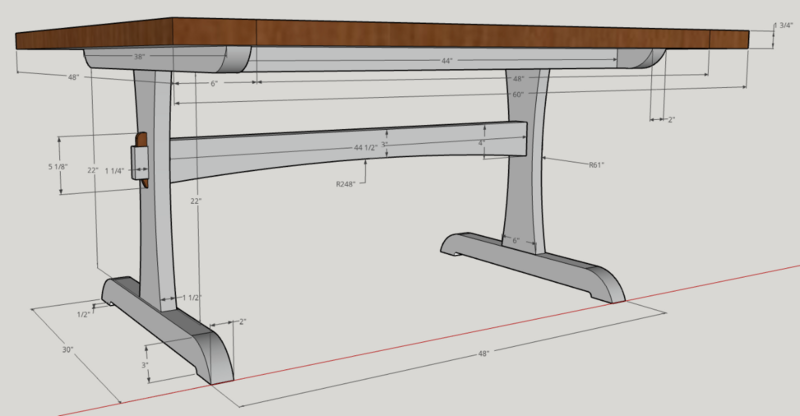
Still sorting through my Sketchup issues but, I did sign up for their cheapest version so that I could add dimensions to this table and make a workable shop plan. Ready to get going on this one! If anyone is truly interested in how I bid this project and how I keep track of things as I go, I'll be happy to share that here with you???? I'm more than happy to share real time numbers with you throughout the project. I picked up all the lumber yesterday and am getting ready to head to the shop to do the rough milling for the top. So far, the client has a refund coming on the material since I was able to get it cheaper than the original estimate. I'll hold on to this information until I determine that I have enough material and that it meets standards. Always nice to have a little cushion!
-
Mine isn't much newer 😂
-
Back on this subject.. Sorry... I'm contemplating some major upgrades in 2024 so, may need to actually check out the free version of Sketchup on line and then see if I need to upgrade. Has anyone else tried the online version? Were you able to export to 2D or 3D which is what I need most? Were you able to open older drawings done and then add to them?
-
Unfortunately, I know that traffic jam well! The hotel I usually stay at is about 6 to 7 from the plant. I always have to leave for work one hour early just to ensure that I get there on time..
-
So, here's what I did on the rail and it works well.. Fills in that gap nicely and still leaves room for the DC.. Here's mine which obviously needs to be cleaned! If I wanted/needed more room back there, I would just laminate another piece(s) on until I had enough room to keep the saw in tact and allow enough room..


-
What we missed was the location on the saw.. I'm just not sure yet if this will be an issue on this bench.. I'm sure he'll need a day or 2 to get things in place and assess it see if it's going to be an issue or not.
-
Well, admittedly, we didn't do enough talking/designing around the DC so, may create an issue in the future. We didn't consider his DC out on his saw (which also has an over arm collector) so, may create an issue with the cabinet we installed. On the bright side, there should be enough room in that cabinet to allow him to do what he needs to go.. I'll let @Olie go into how that actually fits up to his saw and what he'll need to do to correct any issues.
-
No.. The weight on this bench is pretty significant for most casters..
-
Well, I know both of these have been in 2 car garages and only chew up the space of an outfeed table.. It's customizable to fit your needs..
-
Yes sir..
-
@Ray Martin, how's it coming? I know I've been jammed up for a bit and you've gotten a little done.. Fill us in!
-
Safe travels @Coop! I'll be back there in January for another job..
-
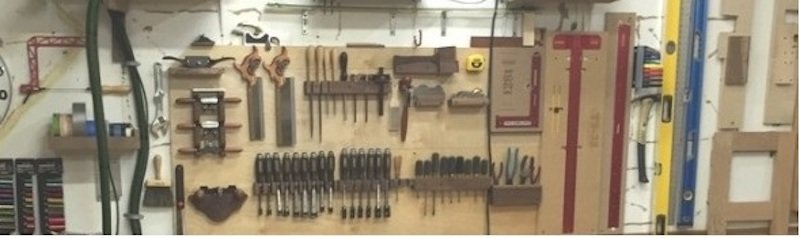
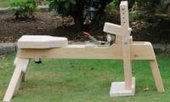
@Coop, it seems I needed to make a run out the the shop for something else anyway so grabbed some pictures while I was there to help better explain the "stop gap" or "tool Tray".. There's a few different names it's referred to.. Here's my bench with it set to its normal position. Just functions as a normal bench.. In this position, it's pretty much just part of the work surface but, with a little tool holding if you want/need it.. It has notches in the bottom that fit over the bench rails that allow it to sit flush with the top. Mine were originally cut too deep so had to have some material added to fit properly. So, if you lift and slide it a little, it will sit proud of the surface making it a planing stop. As I said a few minutes ago, I really like it when removed all together where it provides a good place for the blade on my track saw.. Also, with it removed, I can also add clamps from there to get clamps on both sides of a project.. Anyway, there's a brief overview of the stop gap, planing stop, or tool tray.. Pictures show me that my bench might need some love in the near future! 😙


-
I'll let him answer the question about his shop but, I'll tackle the stop gap question.. This is a bench feature that you most often see in Roubo workbenches. It serves a few different purposes. If you lift it and slide it to one side or the other, it sits proud of the bench by about 1/4" and becomes a stop for planing material. The gaps in the middle are for tool holding. They're wide enough to slide a saw or a chisel into when not in use. Ultimately, I like it because when removed completely, you have an additional place on the bench to clamp to. Super handy with larger projects that you want to clamp flat from both sides! Additionally, when removed, it provides an awesome space for my track saw blade. Really nice when breaking down sheet goods! Great support on both sides of the cut. So, even though it's original intent was based around hand tool work, I use it often with power tools with absolutely no loss of function as a work surface.. I'll grab some more detailed pictures in the morning to show this in better detail..
-
I'm sure that @Olie got a lot more pictures today than I did and will post but, for now, here's where it's at when he's taking it home to finish it up.. We used Dominos in the 4 corners to align the slabs where they needed to be. We did it this way to make it easier to transport since we could disassemble it easily. Once he puts it back together in his shop, he'll attach the top with Spax screws accordingly. We did manage to get one cabinet built and installed. Although there's a small gap on the side, there's rails under the cabinet so, it's fully supported. We also set the gap stop so that it sits just proud of the bench top. We did it this way so that he could do the final finesse once the top is fully fastened down. And, we got all the dog holes in as well as the leg holes for the hold fasts. So, what's left? Screw down the top Finalize the gap stop height to the table top There's 2 cabinets in the front that have to be built and installed. Drawers for all the cabinets Cut the miter slots for the table saw runners Install the spindle sander lift Install the Veritas tail vise Install the BC leg vise Lots of sanding Finish. All in all, not too bad for 2 1/2 days work! Couldn't have gotten this far if @Olie hand't done all the slab work before coming! I think there's some things left that will challenge and stretch @Olie a bit to finish the build but, I'm sure he's quite capable of pulling it off! Pretty sexy table in my opinion and should match his bench nicely!

-
Unfortunately, just not a lot take pictures of today.. I think @Olie took a few more pictures than I did.. Spent the day cutting rail parts to length and cutting dominos.. Just a long tedious task on a project this size! We did manage to finally get everything glued up and started installing the internal supports.. We also got the joinery cut for the BC leg vise that he will add later. This was a long tedious glue up to say the least! Finished up all the internal supports and set the top on for a good look. It's not secured yet but, it's getting close! Wenge plugs for the screws on the internals. We're having some issues with a leg that bowed a bit. We're going to install the cabinet in that location tomorrow and see if we can force the leg to where it needs to be before marking and securing the top.. Still a lot of work and I'm not sure we can get it done before @Olie has to head for home tomorrow.. We'll give it a good college try and get where we get..


-
I didn't.. They were all the tight setting. Nothing wrong with using the second setting to allow some adjustability during the glue up though.
-
Yes, they're non abrasive. They're more of a polishing pad and really do a great job. It's a little more elbow grease to apply but, I feel like it really works the finish in and does a bit of polishing at the same time. Correct, different one for different screw size.. I typically only run #6 and #8 so have two of them set up in drills all the time.. I'll use a different counter sink for the odd time that I'm using a different sized screw..
-
As normal in my shop, it's tough getting signal out or we probably would have posted a lot more during the day... So, to recap the day... We started by getting the leg blanks into clamps to allow the glue time to cure.. While that was happening, we pushed the slabs @Olie brought through the jointer and planer to get flat and square. We would have been most of the day doing this had he not done this stuff in his shop! Once the milling was good, we used some dominos for alignment and glued up the 2 halves.. Sorry, I didn't grab a picture of this but, at this point, all but 3 of my clamps were off the wall! Next, we got the legs out of clamps and got them completely milled to 3 1/2" square. After that, we milled (rough) all the rail material in prep for tomorrow and cut the top slabs to final dimensions. While @Olie was doing some clean up sanding on the top slabs, I put together the gap stop that will match the one we build in his roubo bench.. And that's where the project sits at the end of day one.. A long day for sure but, a lot of progress! Shout out to @Ray Martin for stopping by and helping out as well.. Although, never let him bring his own tape measure to your shop! 🤣 Will work on assembling the base and breaking down ply for the cabinets tomorrow..


