Every purchase made through our Amazon Affiliate Page helps support this site
Kev
-
Posts
6,314 -
Joined
-
Last visited
-
Days Won
578
Content Type
Profiles
Forums
Downloads
Gallery
Events
Store
Articles
Blogs
Everything posted by Kev
-
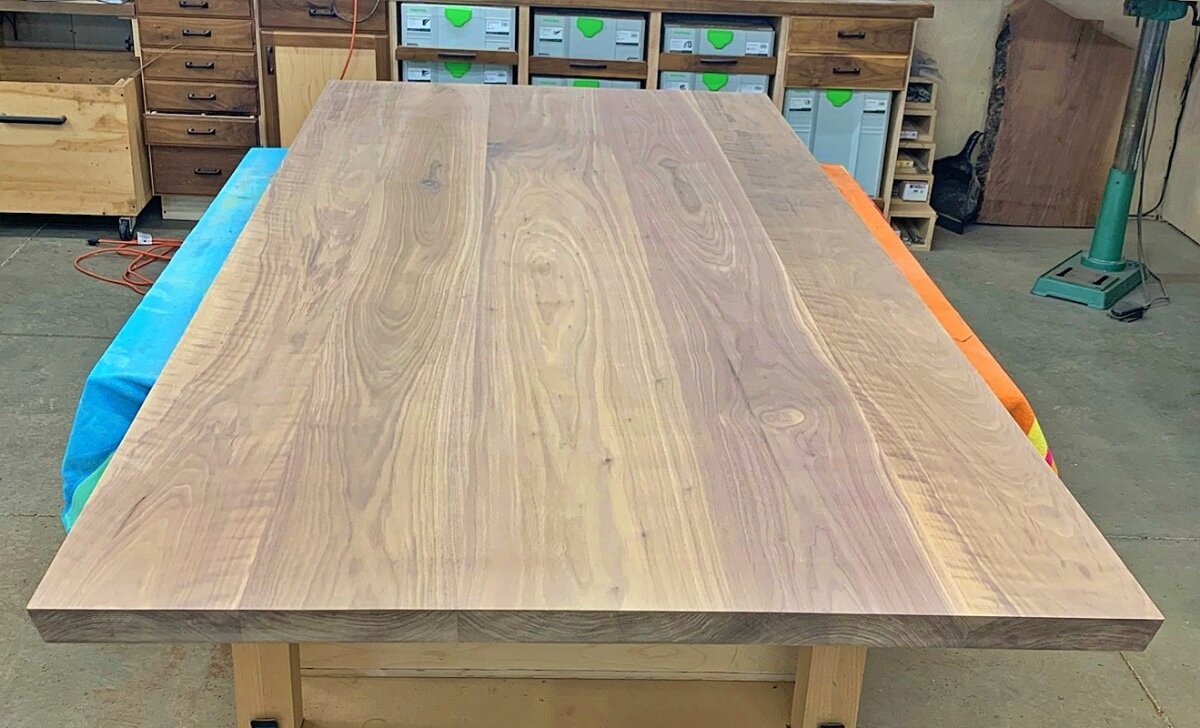
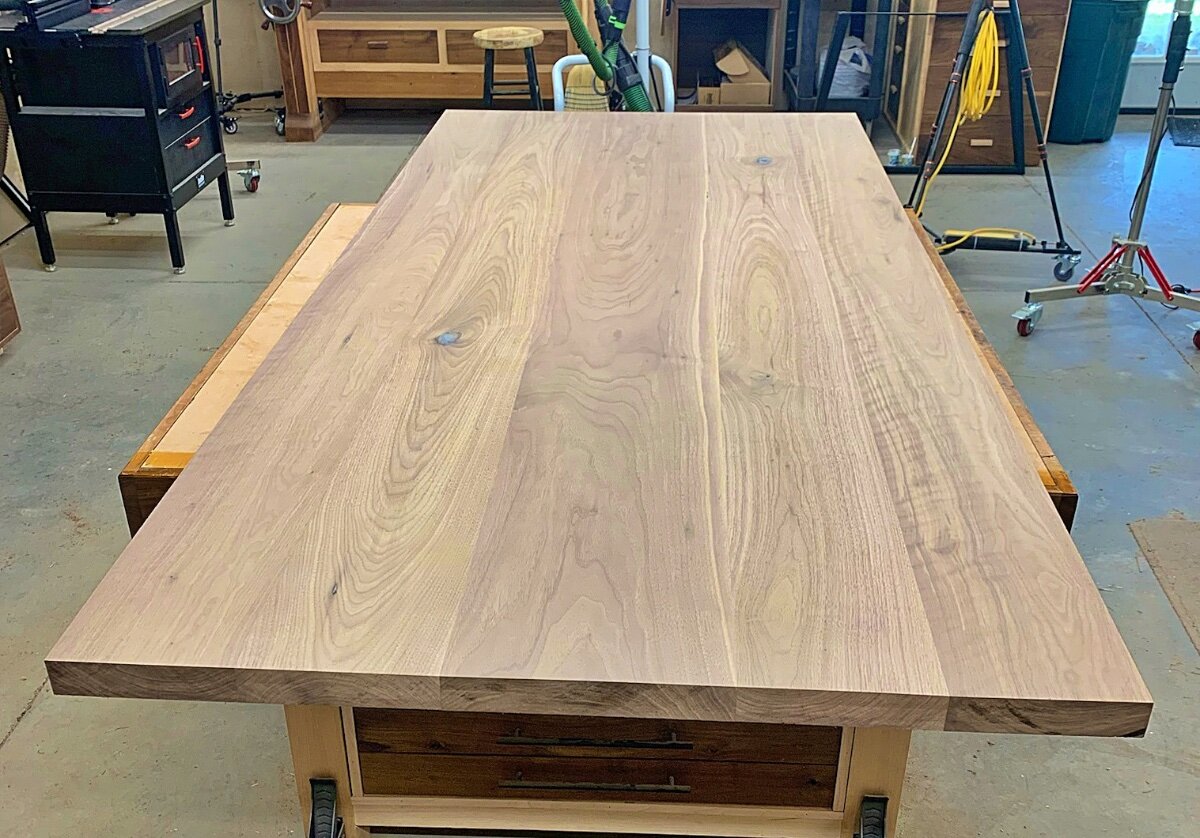
A little later than I'd like to be in the shop but, I needed to get some more done so that I'd have help at the appropriate times.. Finished sanding the top to 180 and cut the bevels. Next I got a little help and flipped this over and got the Rubio applied to the bottom.. I'll get up in the morning when my wife does and flip this over so that I can start applying finish to the top.
-
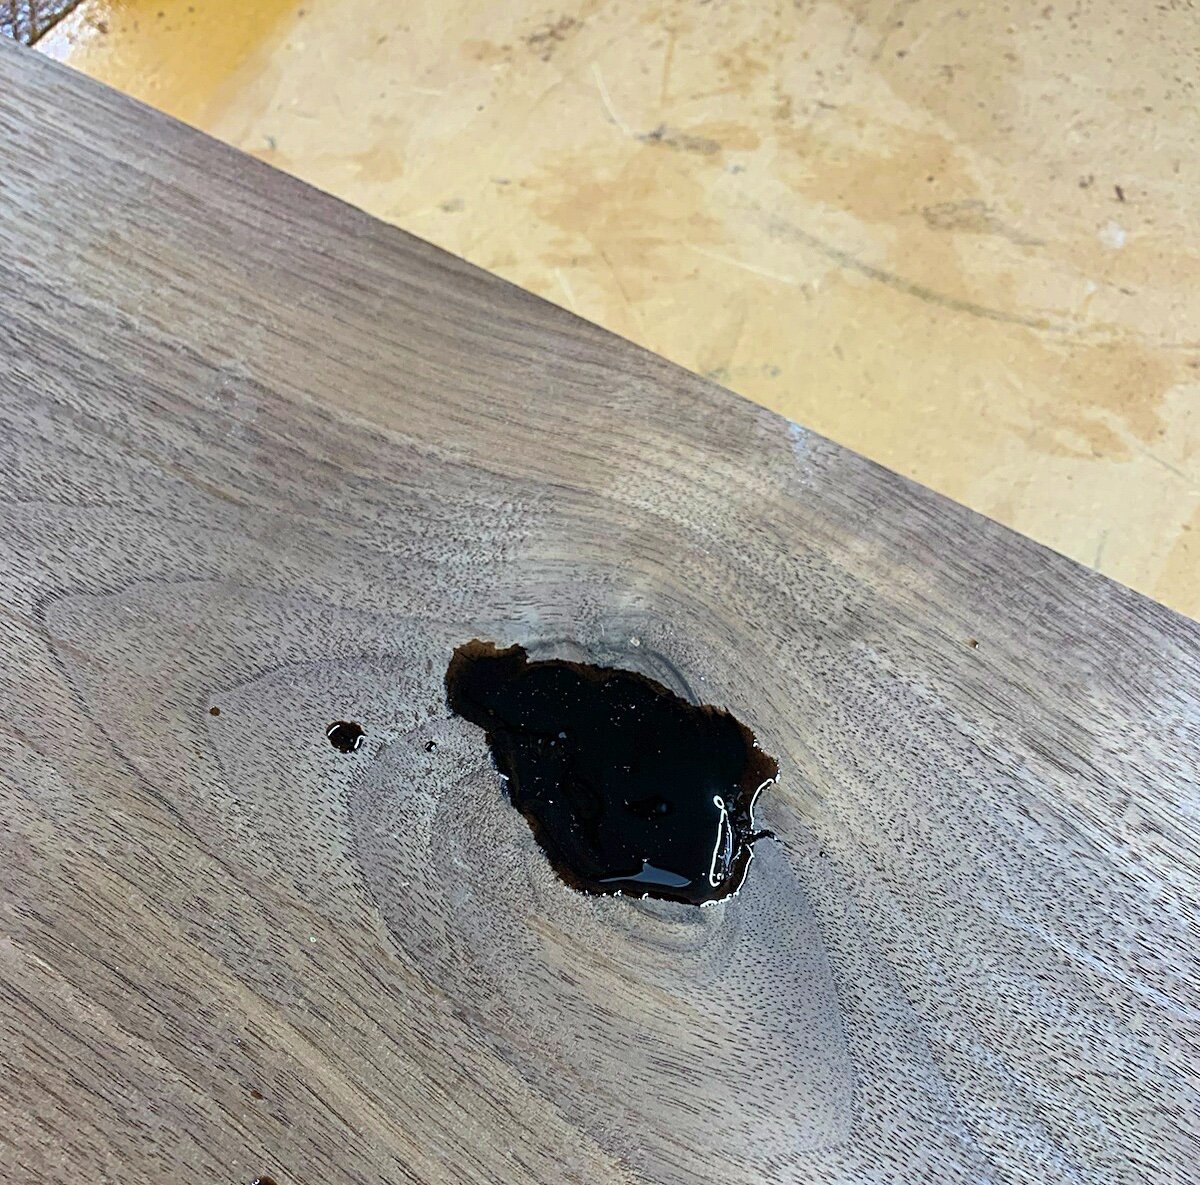
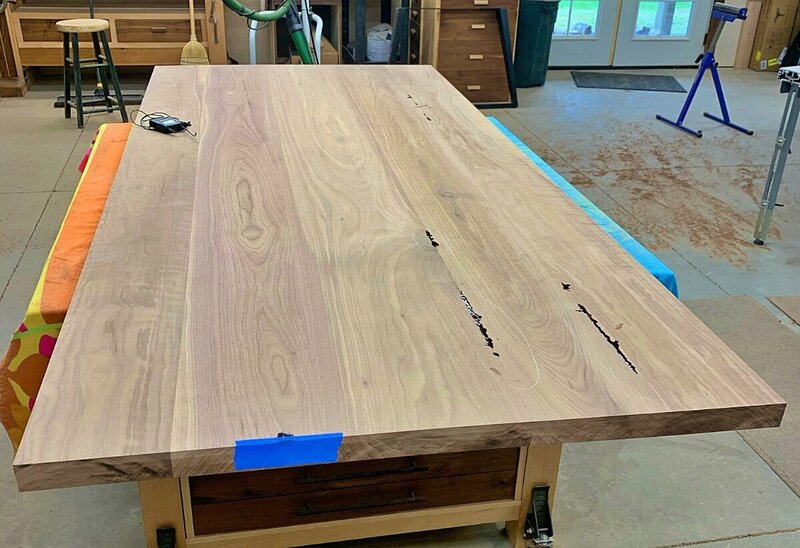
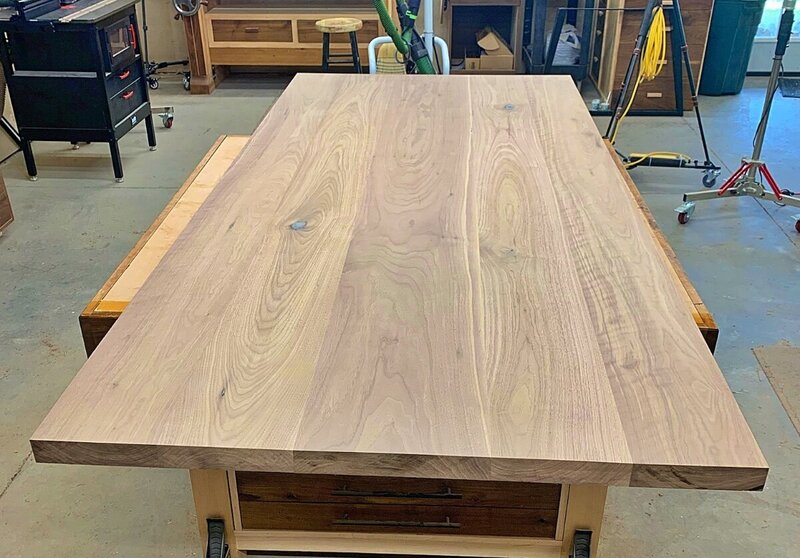
Got an early start today and got the top sanded to 80 grit. I noticed a couple imperfections so decided to stop and epoxy fill.. I had one hairline crack on one of the seams and some chip out in various places. Most likely caused from trying to handle these big pieces as they looked good coming off of the jointer.. So, waiting for epoxy to cure and then I can do the angled cuts..
-
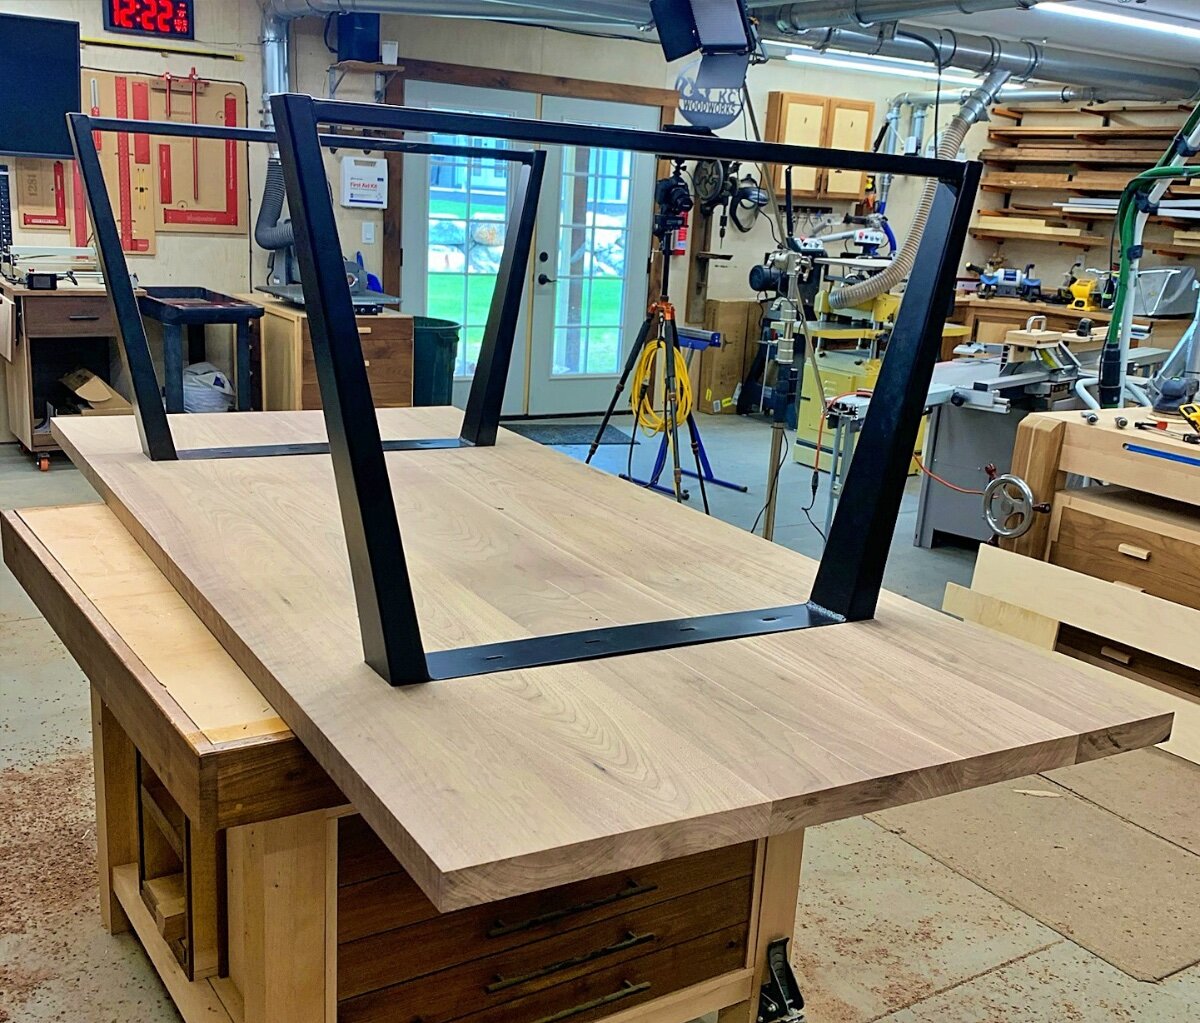
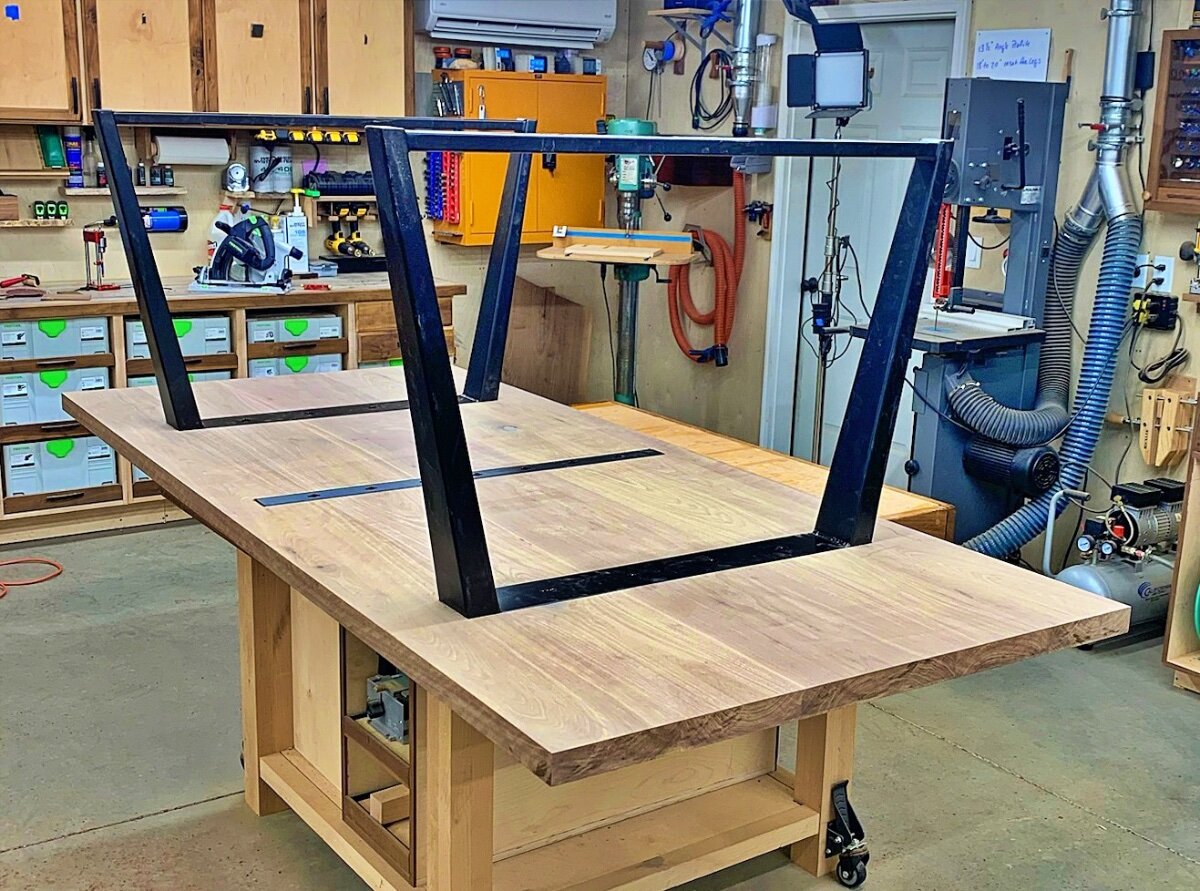
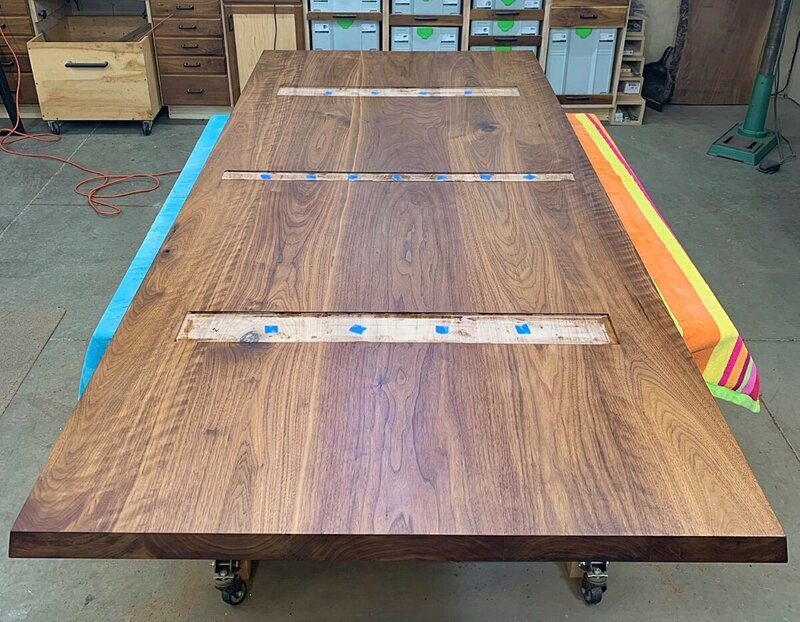
It's a fair and awesome question and one I'm not sure I have the perfect answer to. I don't know that there's a specific formula for spacing on the C-Chanel. If here is, I don't know if it accounts for legs like this with 1/4" top plates that also serve a similar purpose. I honestly believe that the C-Channel isn't needed at all. If the lumber is properly milled and dried, there should be no need for the added support. Also, if the wood truly wanted to move, that little C-Channel shouldn't even slow it down. As I said in an earlier post, I referenced some Black Tail videos to the client for inspiration. This is another item that the client thought was necessary to prevent the table from warping. We certainly had a conversation on the subject but, the client wanted the "insurance" regardless. If you look at the end grains, you'll note that I did alternate most of the grains. As well, the lumber was at about 8.5% moisture content which is just about perfect for this time of year for me and it was properly milled and allowed to move before final milling. The final home for this table will be in a climate controlled office. I really do not suspect that this top will move (other than seasonal which is accounted for) at all but, the client wanted the added insurance. I had 2 of these C-Channels on hand to use on this table. After conversations with the client, we agreed to use only one. I still believe it's not needed but, this client wanted it. I don't feel like I cut any corners to ensure that the top doesn't create an issue for this client in the future. Awesome question @Coop! I wish I had a more definitive answer but, did try and explain my thought process and the client input.
-
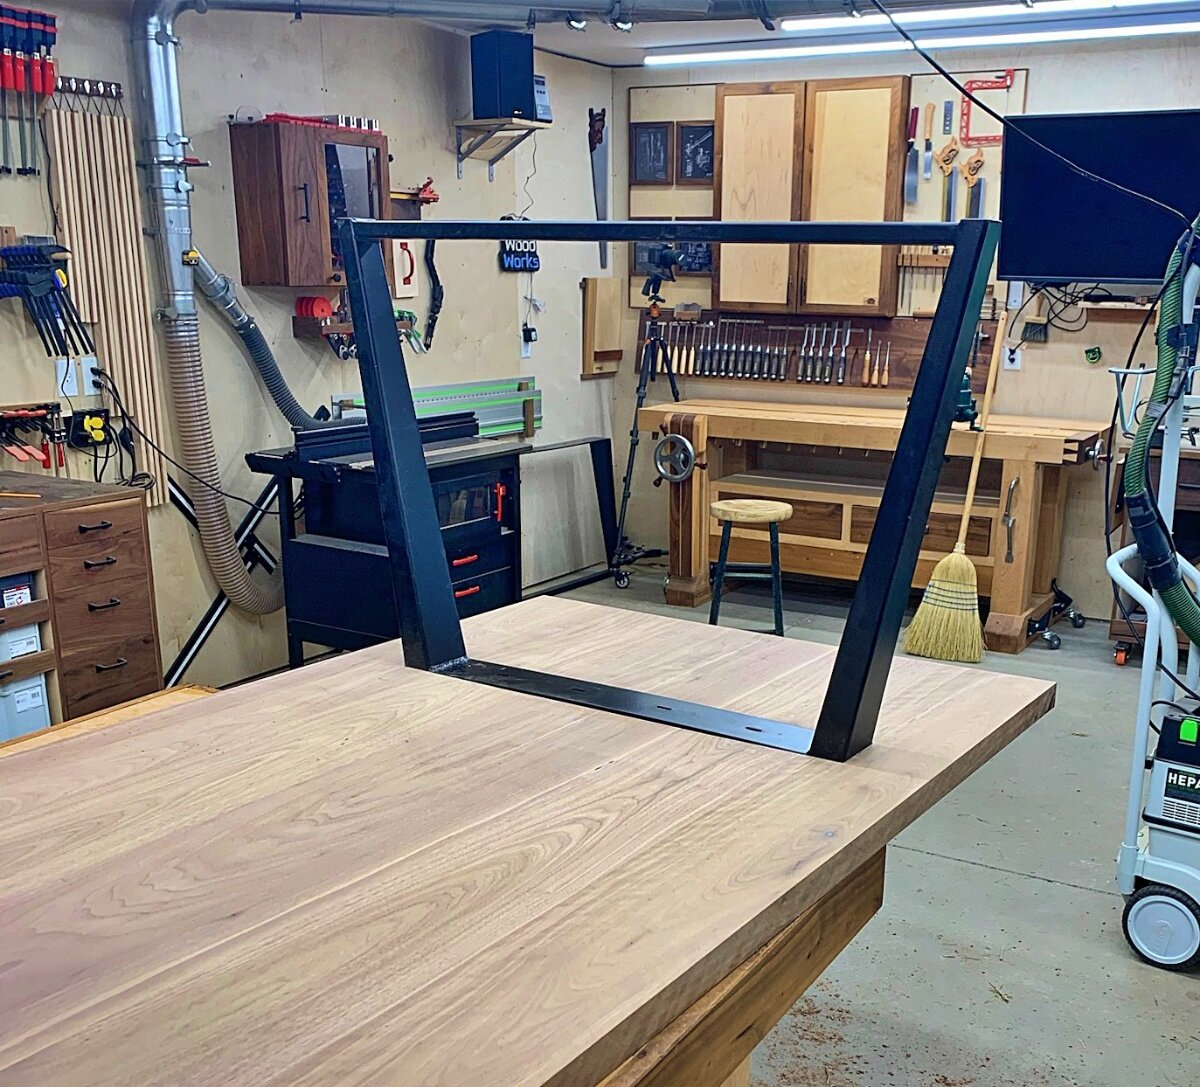
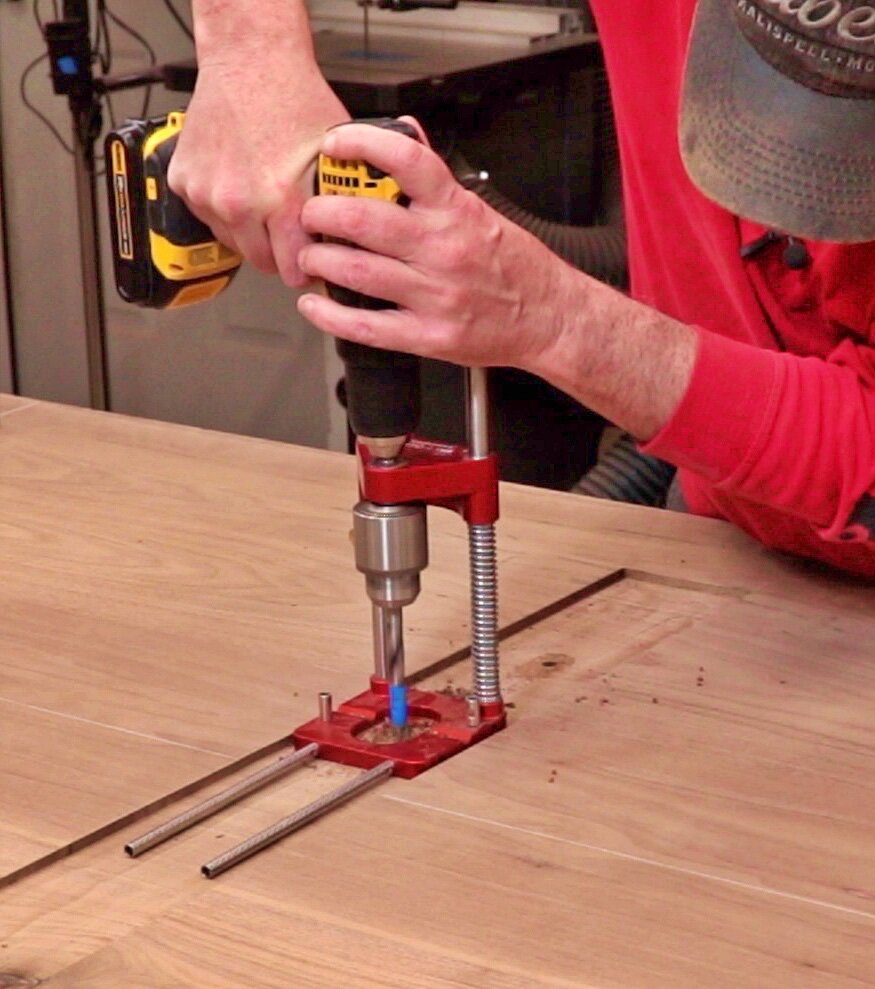
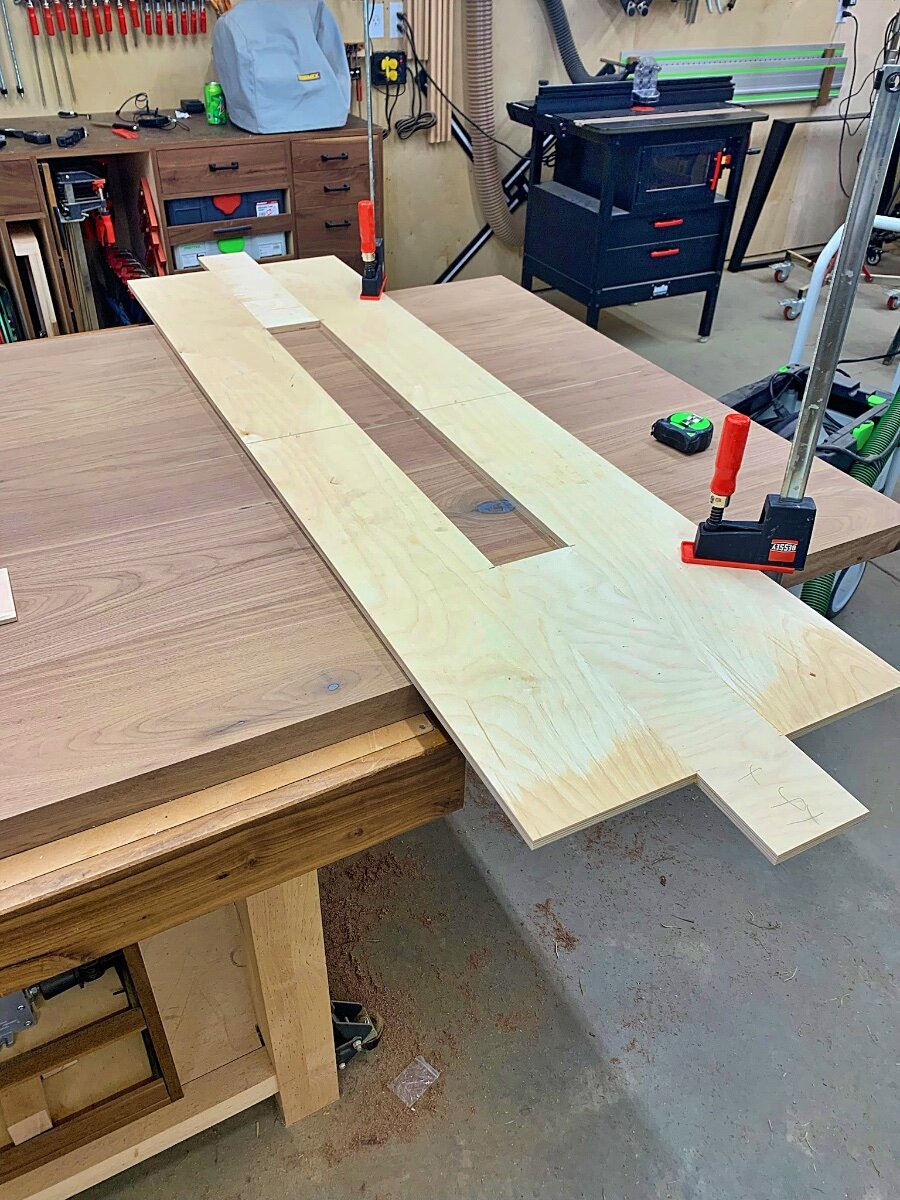
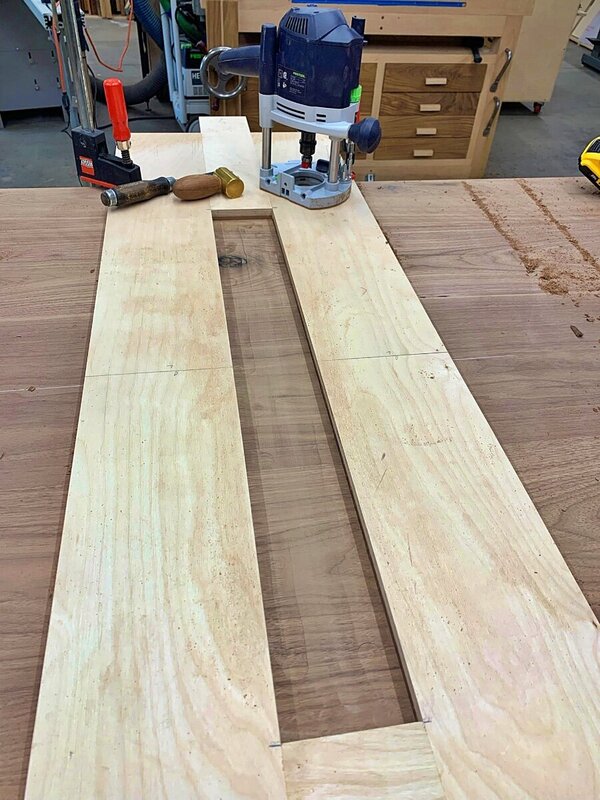
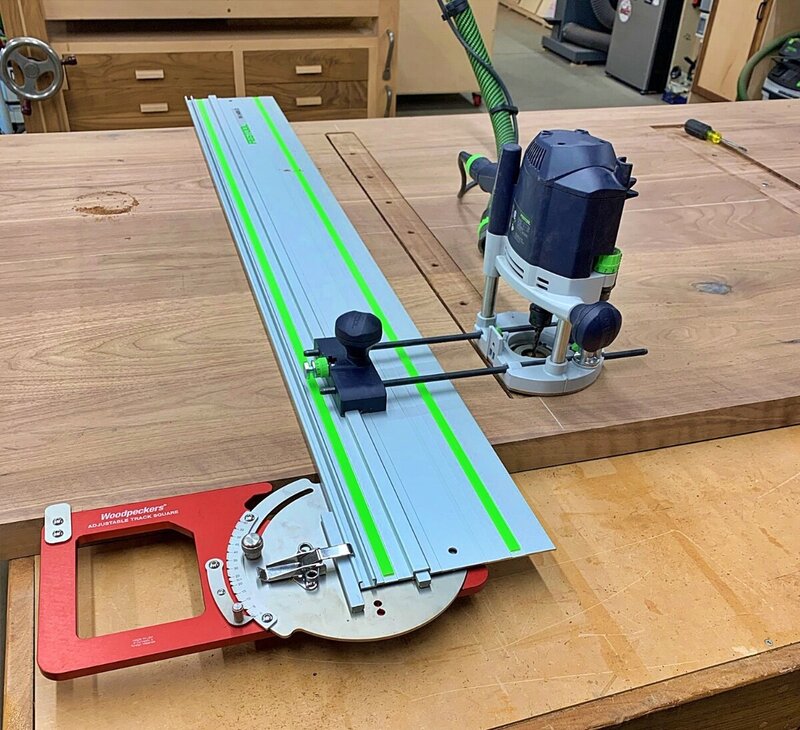
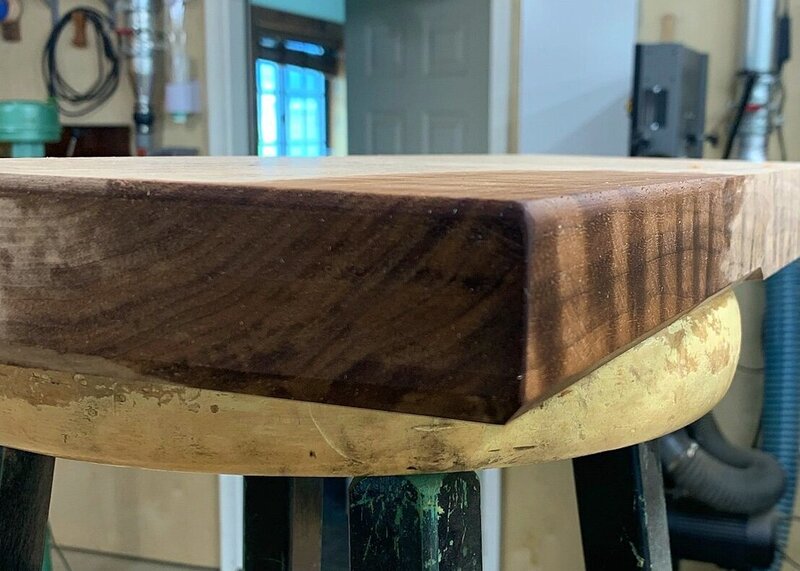
Well, another good day in the shop! I started by cutting the mortises for the legs using the template I cut yesterday afternoon.. I used a chisel to square up the corners and did a dry fit.. Both of the legs had some imperfections that I needed to adjust for so, each leg is custom fit to a specific location. I then marked the locations for the threaded inserts and installed those.. I used a drill guide to ensure the holes were drilled straight. Next I routed for the C-Channel.. I started with a similar template used for the legs to route recess into the surface. Then, I set up a track guide and router to make the grooves for the longer portions of the C-Channel. I also sanded all of this up to 180 so, it's ready for finish on the bottom! I'll pull all of this apart tonight so that I can get my wife to help me flip it over.. Tomorrow is sanding, edge profile, and maybe start the finishing.. I will apply finish on the bottom first so that means one more flip..


-
Completely agree.. I had directed this client to some of the Black Tail videos for inspiration on what they wanted.. So, we end up with his nanocoat at the client's cost. That's the stuff....
-
I'll soften it some. Probably just by hand.
-
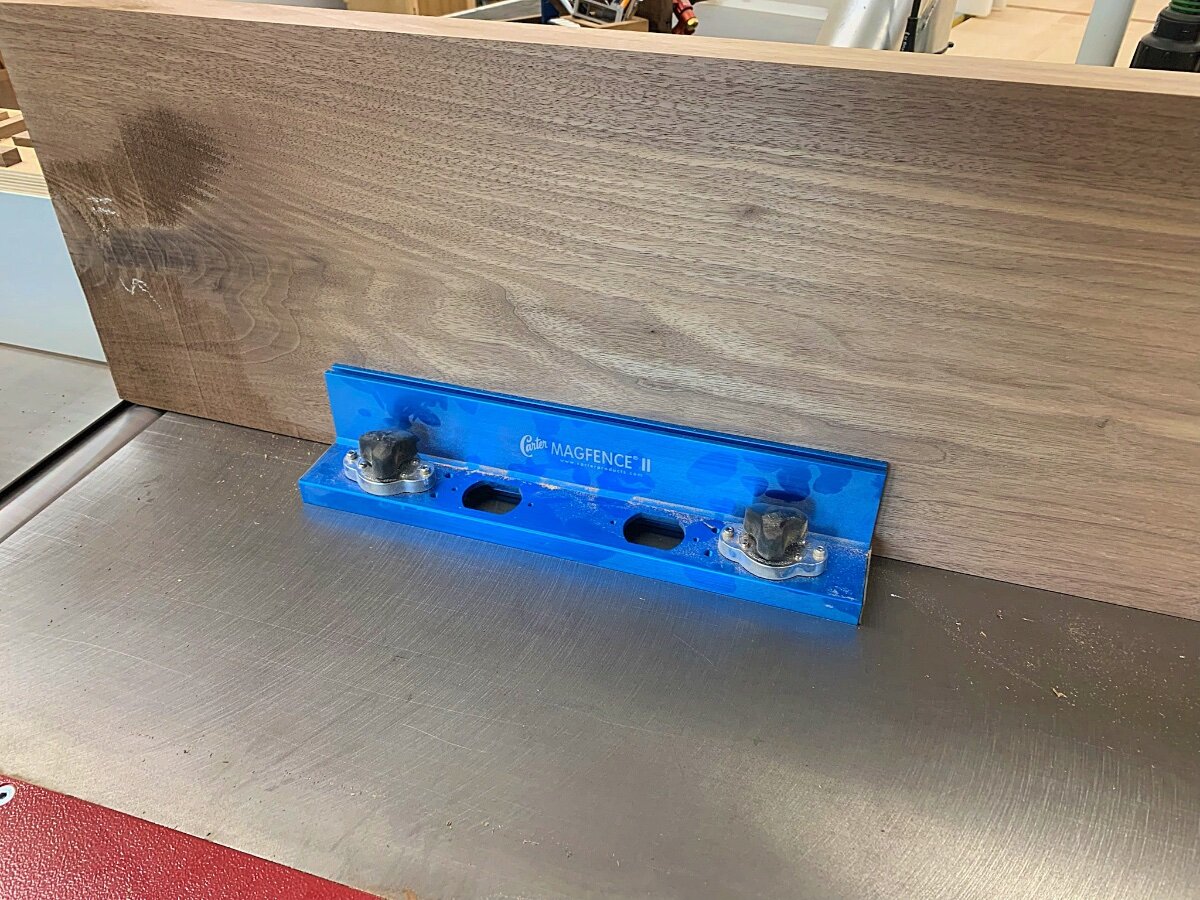
Depends on the featherboard.. I have one of those taller green ones that does really well and it's actually taller than the Magfence.. I also have the Harvey which is similar in height to the Magfence and also does a nice job.. The issue with both of those is that they rely on the miter slot to lock into.. The Magfence relies on the magnets so can be placed anywhere on the surface.
-
To be honest, I'm not sure I've talked much about the finish on this one. Finish will be Rubio pure. I'm going to follow up the the N3 Nanocoat that seems to bee all the rage right now so that I can see what all the fuss is about..
-
Not left handed but, dependent on the tilt of the saw... The saw only tilts in one direction and there's no support for the track on the other side.. 😉
-
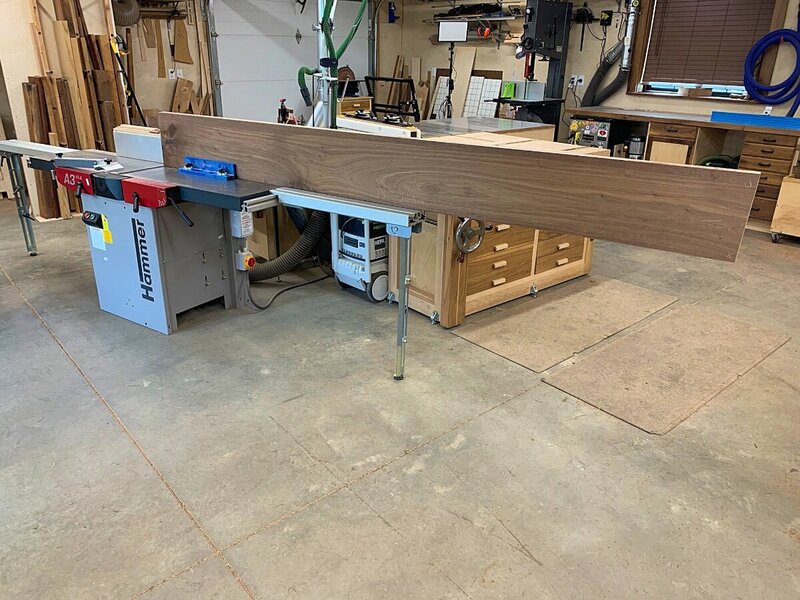
I posted this in another thread for the current project but, thought it deserves a little "stand alone" attention.. The current project required me to run some rather large pieces though the jointer. To say the least, they were difficult to wrestle let alone keep up against the fence as needed. After struggling with one of them, I remembered that I had picked up a Magfence to help with some resawing at the bandsaw. Since it's magnet based, I figured I'd give it a shot at the jointer. Super impressed it how it worked! This allowed me to focus on just feeding the material through the machine without worrying about its alignment to the fence. This is not an ad for Magfence as there are several out there with similar products. Most are advertised for use at the bandsaw and a couple for use at the drill press.. Not sure I've ever seen one used this way so, wanted to pass it along. For what it's worth, the board in the picture weighed about 80 pounds.

-
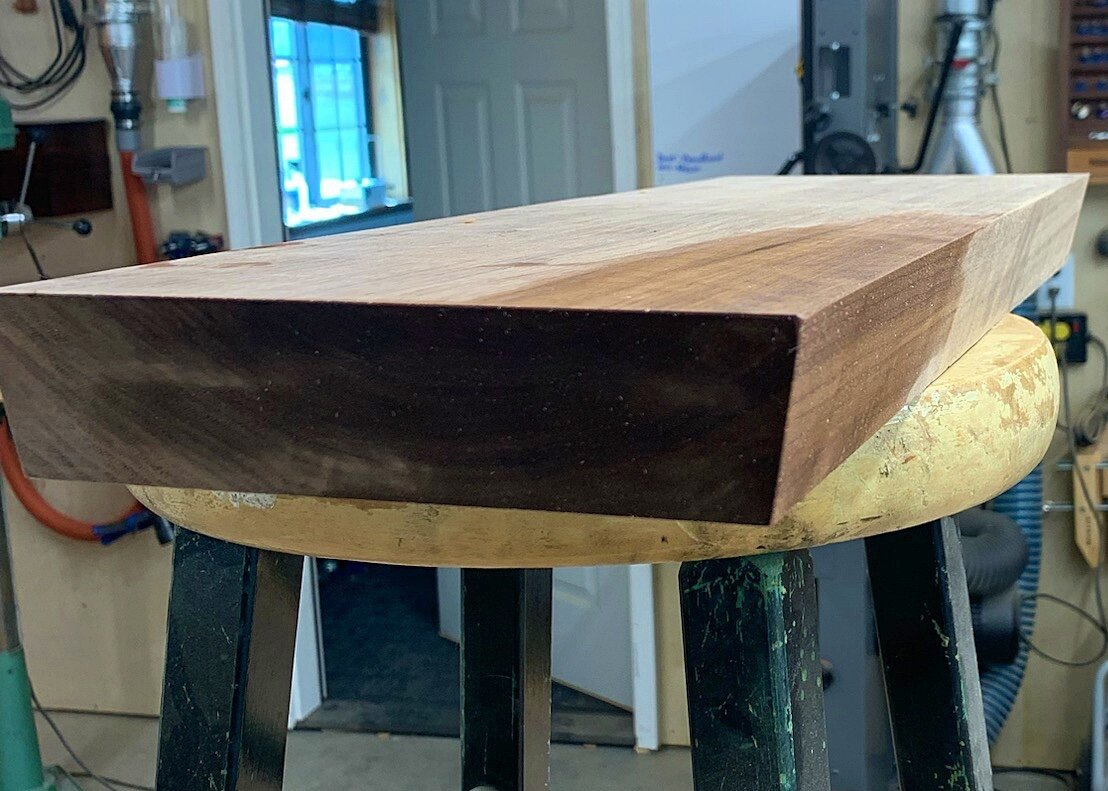
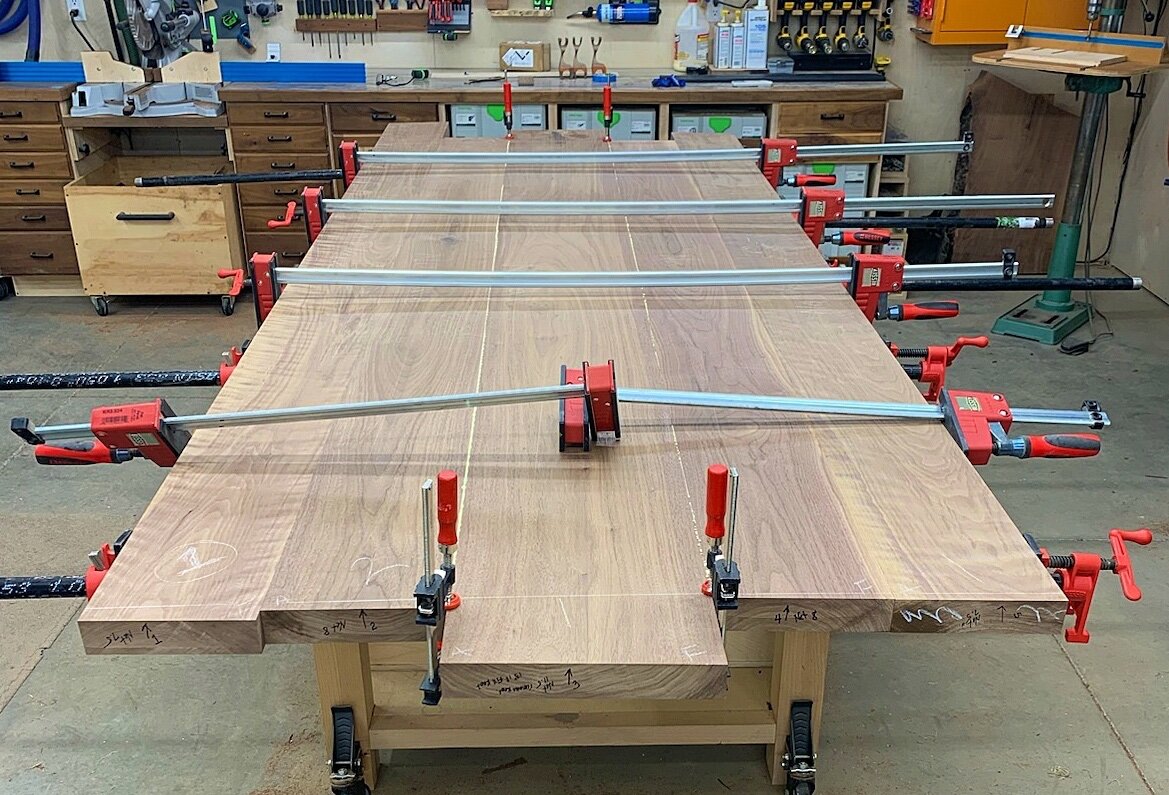
Well, as predicted, it was a long day of sanding and I only got the bottom sanded through 120.. I also got it trimmed to length.. I also needed to talk with the client about edge treatments. I tossed a few options at them and got it narrowed down to a couple choices. I went ahead and created those profiles from an off cut from the top. The client chose the simpler angled option to match the angle on the legs. I'll have to do this with the track saw from the top so, I started on making the template for the feet. That's as far as I got today.. I'll route the recesses for the legs tomorrow as well as doing the C-Channel. Still a fair share to do on the bottom before flipping it over to do the marathon job of sanding the top..


-
That was the board that I flipped 😎
-
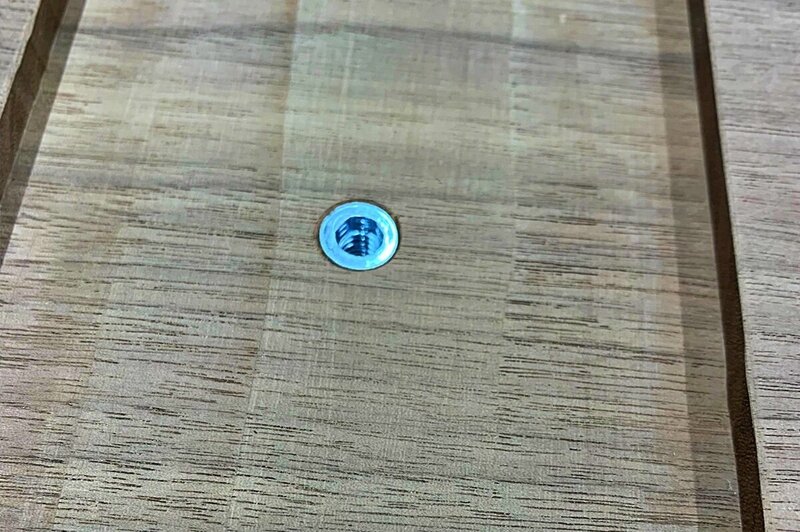
Sorry, I must have missed this question... The feet will be inset in the top and attached with threaded inserts and bolts. The bolt slots in the legs are slotted to allow for wood movement.
-
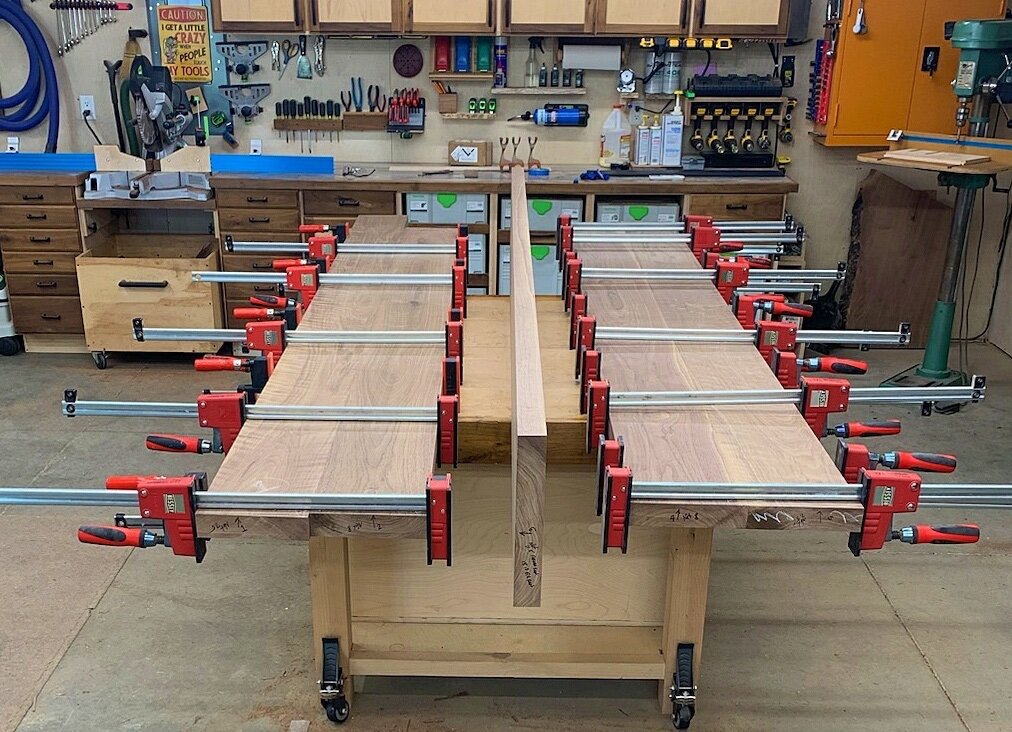
Thanks! Definitely sore in a few places I haven't been sore in a while! Fortunately, most of the heavy lifting is behind me now! I'm sure it will be a full day of sanding now so, I'll rediscover a few other muscles I'd forgotten about.. 🤣 It was all that her and I could do to flip it over so I can work the bottom tomorrow. Will probably be a light day of pictures tomorrow since sanding is boring.. Unless I get into inlaying the c-channel and the feet..
-
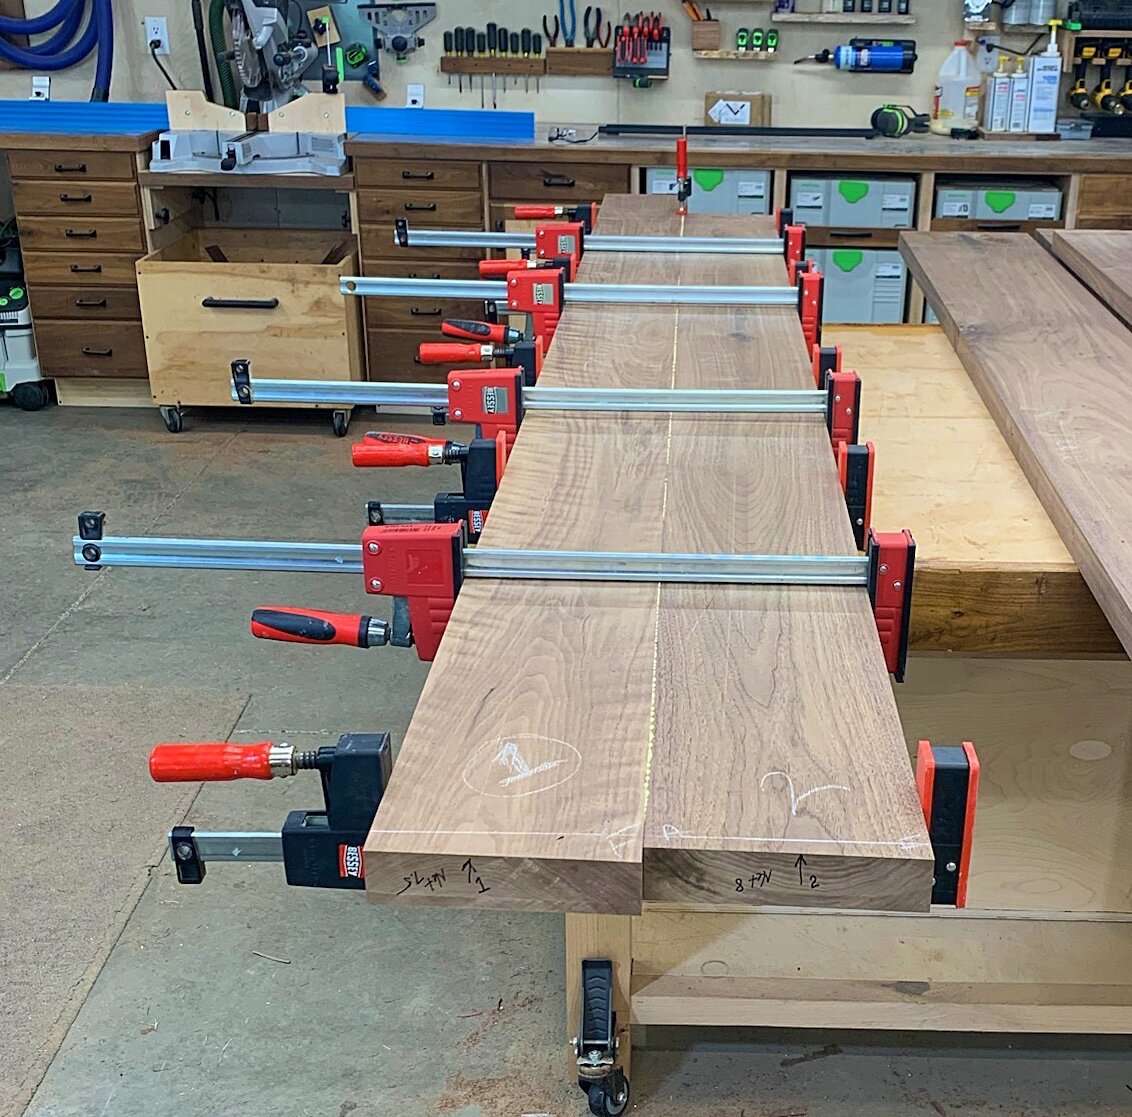
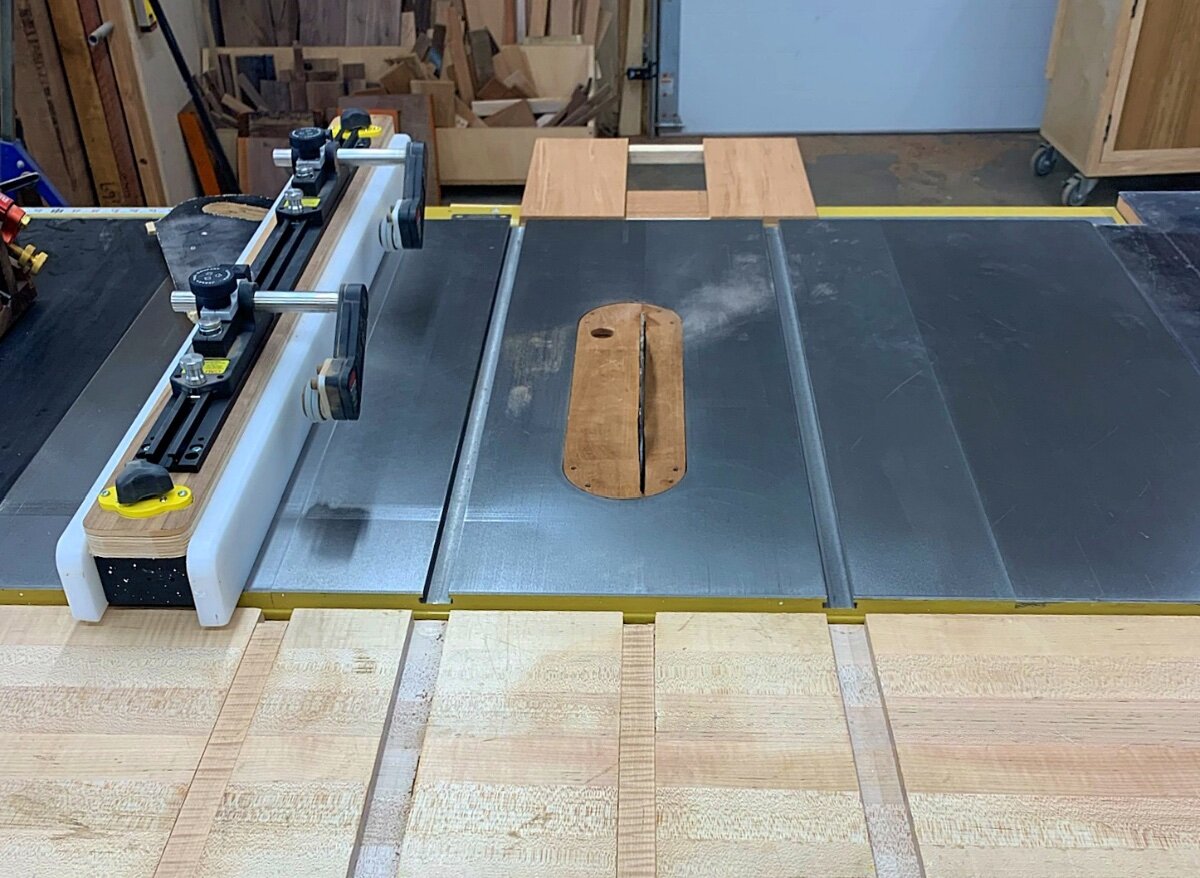
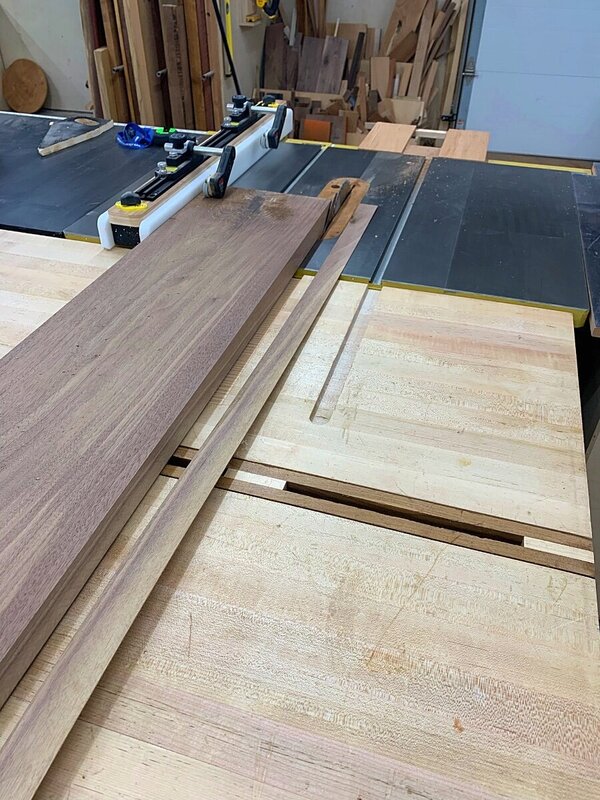
I ran one edge through the jointer, cut to just a smidge over final width and then ran a pass over the jointer on that edge before glue up. If you're not getting the results you want from your jointer, there's some things you can do.. Set the jointer up.. Lots of videos out there but, the most important thing is to ensure that the fence is 90 degrees to the bed. Even with my jointer, I still check the fence each day before using it. With these large pieces banging against it all day, I actually checked the fence a few times. Alternate faces.. If you look closely at my last picture, you'll see an F in one corner and an A in the other corner of each board. This is my note to do one edge "A"way from the fence and one side against the "F"ence.. If my fence is off, this will cancel out that small angle for a perfect glue joint. If you're running smaller pieces, fold them like a book and run them together at the same time. This will do the same thing as the last point but, do them both at the same time.
-
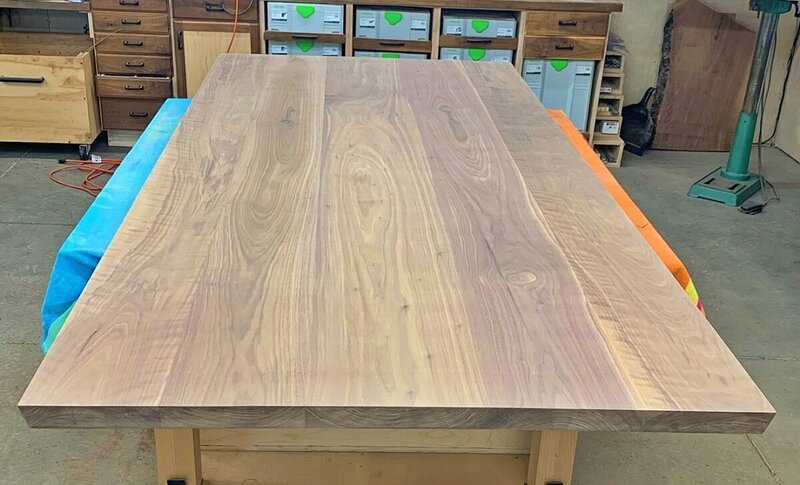
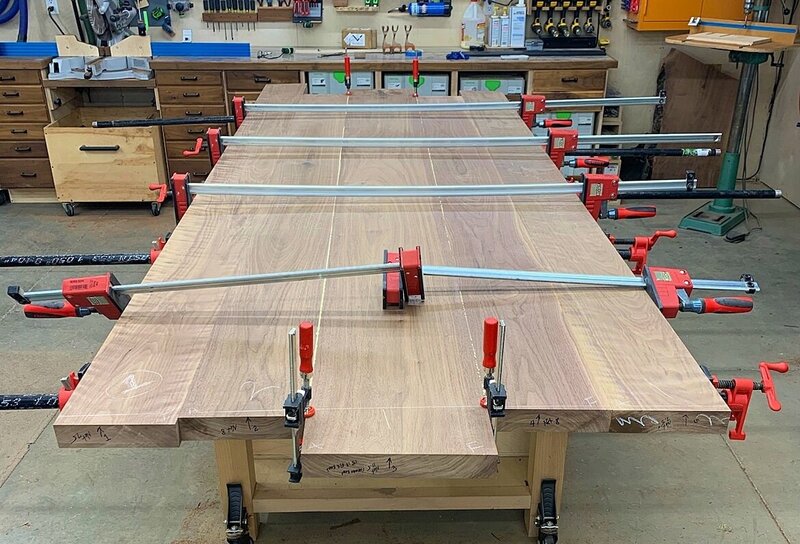
Long shop day! Especially without any help to move these big pieces around! So, I'll just start there.. One of the first things I had to do was to actually joint some edges. Getting these things through the jointer and keeping them square to the fence was a challenge so, I tossed the mag fence on and it worked like a charm!\ Of course I had to rip these to final width and the stock guides and infeed support really paid off! With everything final milled and my seams looking good, it was time for one last look.. For what it's worth, I did flip the direction of one board after the final milling purely for grain continuity. All of this had taken me most of the day but, I wanted to get the glue up in. I decided to do it in 3 sections so I wasn't trying to wrestle all this by myself. No dominos, the alignment was actually really good so, didn't need them. And that's where it sits as of this typing.. I will pull it out of clamps and flip it over before bed tonight while I've got my wife to help.. I have a small epoxy fill on the bottom as well as a bunch of sanding. I can also lay out for the extrusion as well as the legs that showed up in the shop today.


-
Anywhere around 1 3/4 will be great but, I'll take what I can get within reason.. It is a long span so, it's important to maintain as much thickness as possible.
-
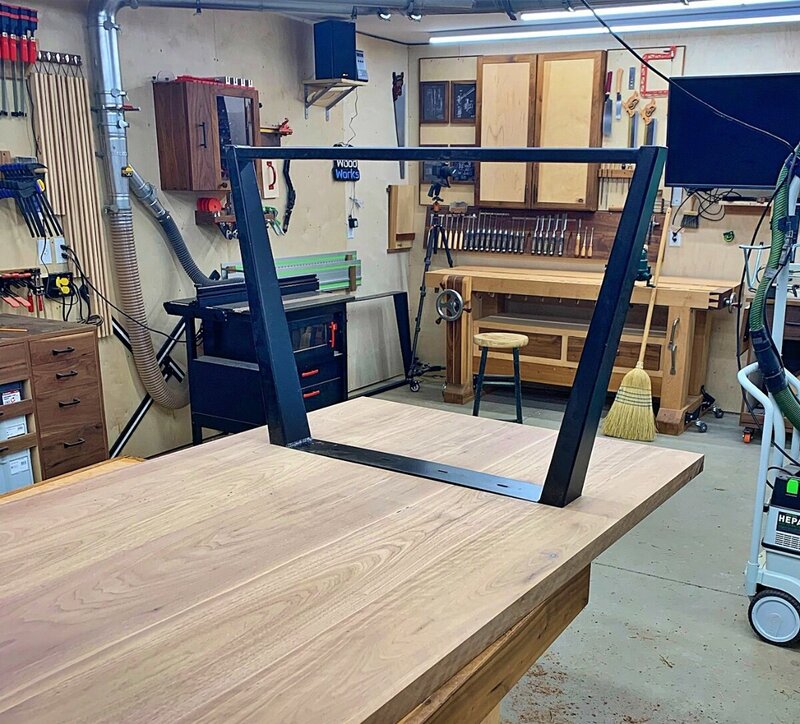
This isn't glued together yet.. Still a fair share of work to be done before the glue up but, I'm pretty happy with the rough milling process! The powder coated legs will be delivered later this week.. Once the table is complete, we'll wait for a nice sunny day, load it on a trailer, and deliver it to the client. If needed, the legs will be removable.
-
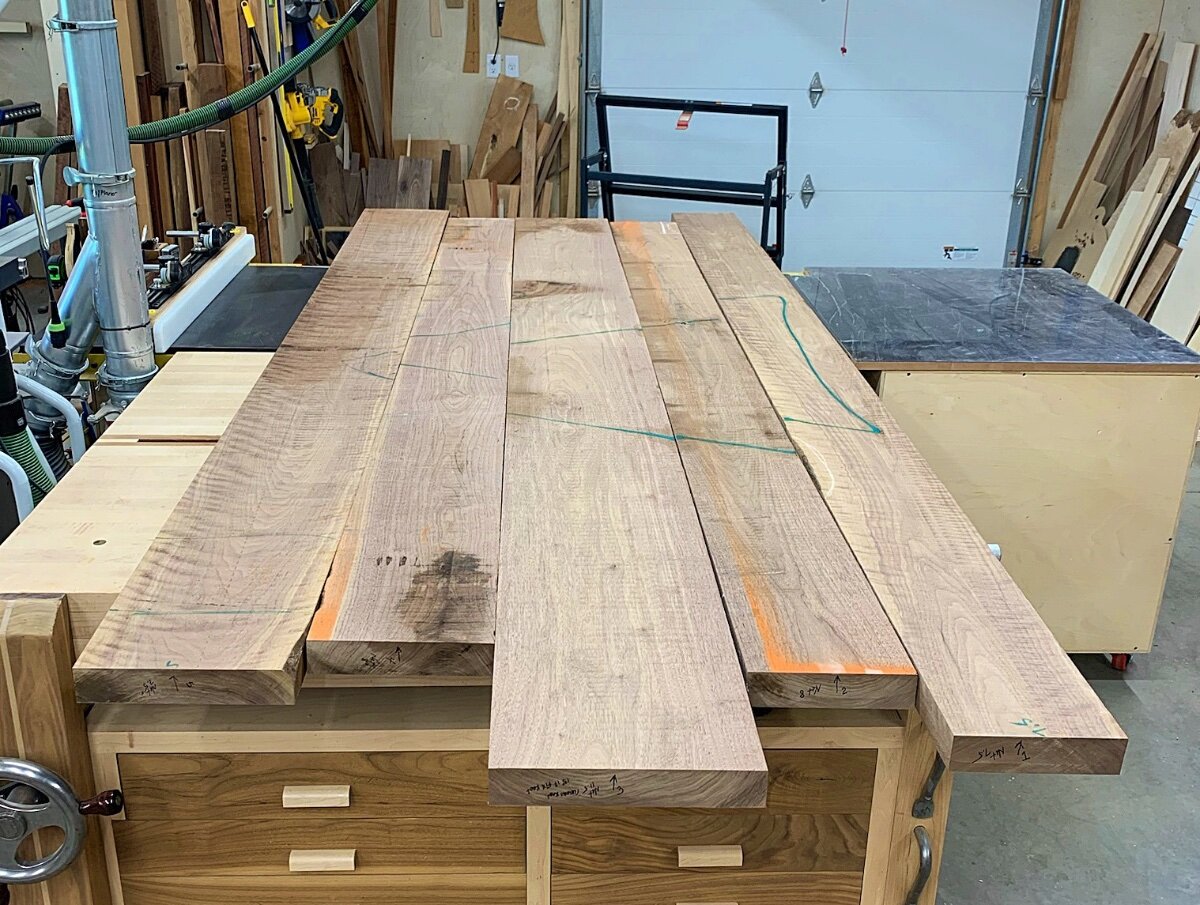
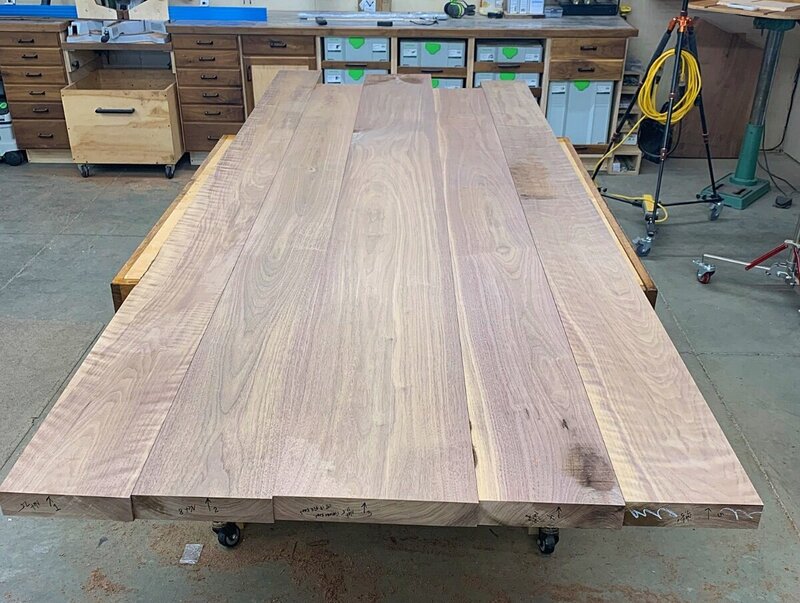
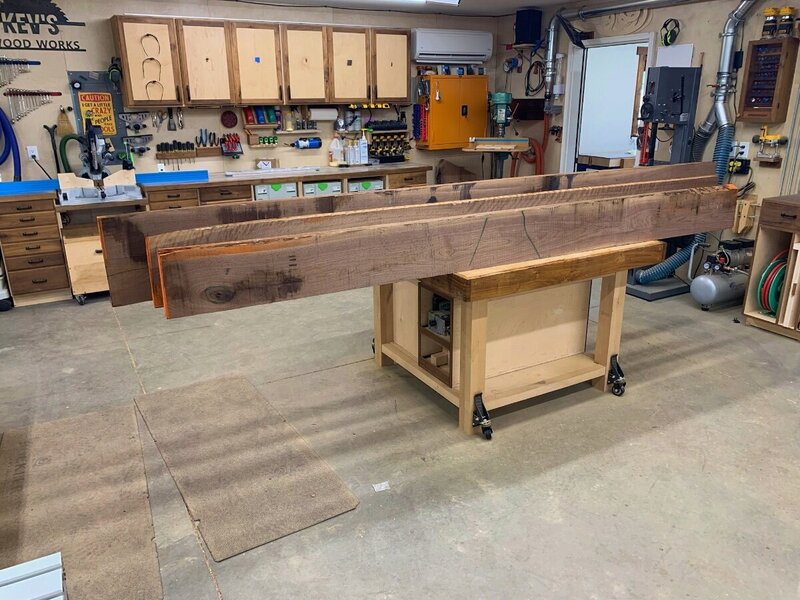
I knew this would be a long day of physical labor but, DAMN! I started by putting a couple of my tracks together and getting a straight line rip on each piece.. This helped me determine the sides where I knew I needed to remove some defects. Overall, the material was very good! Next, I actually had to move my jointer to have enough room to get a flat face. I didn't square up the corner because there's still a bit to remove and I didn't want to over do it on the initial milling. Some of these boards were still at ~9' long.. I'll leave the jointer here until all the milling is complete. I did rip the other side of each board to get it a little closer. The infeed support and stock guides paid for themselves for sure! There's one knot that needs filling so, I taped off the top side and filled from the bottom since the bottom was considerably larger than the top.. So, currently, it's at about 1 7/8" thick, still 1 1/2" over width, and several inches too long because I wanted the ability to slide the boards a little for best grain match.. Not too bad for first day back in the shop!


-
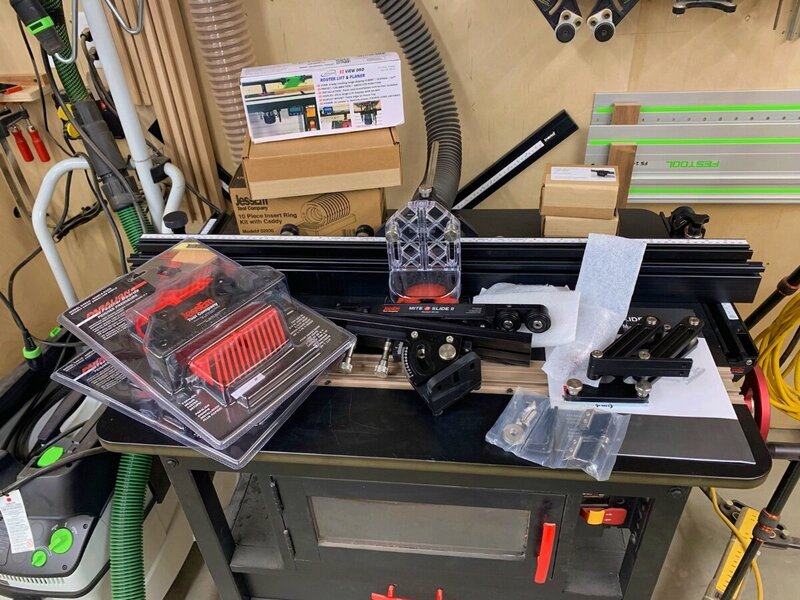
Not sure how this one didn't get posted but, by now I'm sure you all saw the video? Well, I decided to go a bit further and ordered some more goodies for this table while I was gone.. More to come on this project!
-
Ok, this table is first on the list to get out of the shop.. These are some really large pieces! Goal for today is to get these broke down a little bit and rough milled. I'll update with more pictures as it progresses.
-
Last shift in this plant! Will be home Saturday afternoon!
-
Looking like I'll be done here in the next 10 to 12 days.. Ready to be home for a while!
-
Nice job on the cabinet boxes! That really filled up the base nicely!
-
Not sure if someone is contemplating a bench but, this is pretty nice hardware if you are. Pricing is comparable to Benchcrafted. https://hovartercustomvise.com