Every purchase made through our Amazon Affiliate Page helps support this site
Kev
-
Posts
6,324 -
Joined
-
Last visited
-
Days Won
583
Content Type
Profiles
Forums
Downloads
Gallery
Events
Store
Articles
Blogs
Everything posted by Kev
-
I hate working with pressure treated!
-
About all I'm doing for today to stay out of the heat.. I'll probably make a box store run to pick up the rest of the material and go at it again tomorrow morning.. All framed in and ready for facia and roof material.. My "bird blocking" could have been a little better but, it's an open roof anyway.

-
Mine is a Generac with the Gentran so it kicks in automatically. It's run off of propane but, that's the only thing in my house that uses propane. I wish I had access to natural gas as that would allow me to get rid of the tank in my yard. It fires itself up once a week as a test to ensure everything is working properly and I barely hear it.
-
Being honest, I don't know much about them but, I'll be happy to answer questions if I can.
-
Yes, house and garage..
-
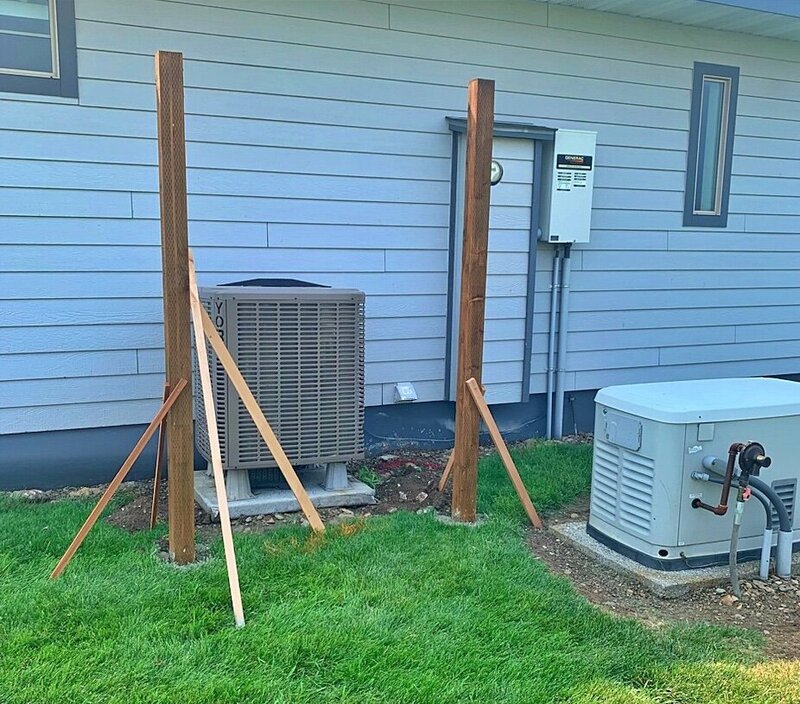
Last winter while I was gone for work, we had the motor go out on the heat pump for our house. We were fortunate to be able to get somebody out quickly durning a MT snow storm and replace for us. We've actually been using the same company for yearly servicing on both our units (one for the shop as well) since we moved here. When he came out for the yearly servicing this year, I was actually home and got the chance to talk with him a bit. He told me that between the harsh winter that we had as well as the pitch of our roof on that side of the house, he believe the motor froze up and then burned out. He recommended a roof structure over the unit so that this didn't happen again in the future. So, I'm not very far into it yet but, it is kind of nice to work a project again where close enough is good enough.. 🤣 Got the poles set today and will start on the actual framing tomorrow.
-
Since this is a bit of a sales pitch, I thought I'd put it here in the classifieds. Using my affiliate page really helps me out! I realize that not everyone understands how to do this so, wanted to toss in a quick tutorial as well as some additional links that aren't on my site yet. It's a very simple process and costs you nothing. Start HERE on my affiliate page.. This will open up your Amazon account. From there, if you don't see what you want on my page or need to search for an item you know isn't on my page, simply search Amazon as you normally would and make your purchases accordingly. All this does is tell Amazon that I referred you to their site and give me a small kickback on whatever you purchase at no additional cost to you. Many content creators have an Amazon Affiliate page and this is a great way to support them! Here's a few items that may not be on my page yet. Clicking any of them will also open up your Amazon but give me credit for the referral. Power Tools and Accessories Laguna 14BX Bandsaw - https://amzn.to/355ri05 Laguna 18BX Bandsaw - https://amzn.to/3DCAk5M Carter Mag Fence - https://amzn.to/3qbHevR Carter Fence Alignment Tool - https://amzn.to/3s1WHPm Bow Vertical Resaw Featherboard - https://amzn.to/3q8g4pI Magswitch Feather Board - https://amzn.to/3YixGeW UHMW Miter Slot Runner – https://amzn.to/2Rv0Bi6 Festool Kapex - https://amzn.to/3qf5PQl Supermax 19/38 Drum Sander - https://amzn.to/43UMyS1 Laguna 24/36 Lathe - https://amzn.to/3OjEHI3 Tormek T-8 - https://amzn.to/47hRR0y Rikon Slow Speed Grinder - https://amzn.to/3KnJqHo CBN 180g Wheel - https://amzn.to/45dcOIy Jessem Stock Guides for TS - https://amzn.to/3YmFHzx Jessem Stock Guides for RT - https://amzn.to/3rZE3HT Rikon Hollow Chisel Mortiser - https://amzn.to/3OEcJYD California Air Tools Compressor - https://amzn.to/43Mxk1m Handheld Power Tools Festool TS 75 - https://amzn.to/3OHZKpa Festool TS 55 - https://amzn.to/43Nu0mx Festool RO90 - https://amzn.to/3QhelZM Festool 150/5 - https://amzn.to/3YiwiJg Festool OF1400 - https://amzn.to/3Yg5ARJ Festool OF 1400 Edge Guide - https://amzn.to/47hKwyk Bosch 1617 Router - https://amzn.to/3DLoqGF DeWalt Trim Router - https://amzn.to/3KpIX7L Hand Tools Narrex Chisels - https://amzn.to/3QihKaJ Klein Screw Drivers - https://amzn.to/44NZ9rm Marking and Measuring White Pencils – https://amzn.to/3QFaNAT DFM Square - https://amzn.to/44SEdiW PEC Double Square - https://amzn.to/3qbJ4Nh Stanley Fatmax 16’ - https://amzn.to/3OF1y1S Glues Titebond Original - https://amzn.to/3pnSnVz CA Glue - https://amzn.to/3chT6Sz West System Epoxy - https://amzn.to/3YhJ6j6 Transtint Dye - https://amzn.to/3OFMUaK Finish and Prep Preppin’ Weapon Sanding Blocks - https://amzn.to/3rZEou9 Sanding Blocks - https://amzn.to/3fVsPMh General Finishes High Performance - https://amzn.to/3z5AYp6 General Finishes Arm-R-Seal - https://amzn.to/3uV62V9 General Finishes Hard Wax Oil - https://amzn.to/3rTOIUE Rubio Monocoat - https://amzn.to/44PLvUR Natura One Coat - https://amzn.to/3OEBfZP Fiddes Hard Wax Oil - https://amzn.to/3OEo4rD Renaissance Wax - https://amzn.to/45umpLd Fuji Q4 - https://amzn.to/3DFEb1T Work Holding Mini Deluxe Hold- Down Clamp - https://amzn.to/3uWmXGI T-Track – https://amzn.to/3Kn9ZfT Flip Stop - https://amzn.to/3w0lQr8 Toggle Clamp - https://amzn.to/34RqkEp Hold Downs - https://amzn.to/3uW4dHp Dog Hole Clamps - https://amzn.to/44R9hzw Bessey 31” Parallel Clamp - https://amzn.to/47clnox Bits and Cutters Timberwolf ¼” Blade - https://amzn.to/3pnR1dr Forest Dado Stack - https://amzn.to/3z5d5h8 Whiteside ½” Spiral Router Bit - https://amzn.to/3Kos5hC Whiteside ¼” Shank Router Bit Set - https://amzn.to/3OCrDyC Timberwolf ¼” Blade - https://amzn.to/3pnR1dr Aircraft Tool Supply Countersink Kit - https://amzn.to/3vVFiVH Hardware Figure 8 Fasteners - https://amzn.to/2TWvqgs Blum Drawer Glides - https://amzn.to/2RCZhto Safety Gear 3M Ear Muffs - https://amzn.to/3DB1Oc9 Safety Glasses - https://amzn.to/3KkmwR1 Shop Storage DeWalt Battery Storage - https://amzn.to/3qgugNk
-
Thanks everyone! I was definitely over thinking this one! My fence is perfect for mounting something to so, that's what I did. Just some T-Track hardware from my jig drawer. Then, I verified that the fence stayed accurate with everything on it. It's just not much weight but, it stored the items I wanted to store there. I moved the push paddles to a drawer at the table saw since I tend to use them more there anyway. I may look into @Chet's suggestion to add to the jointer but, I'll worry about that storage in the future..

-
Yea, considering all option.. Looking forward to seeing what @Woodenskye (Bryan) is doing.. I could potentially attach something to the back side of the fence without creating any new holes in the base of the planer..
-
Certainly a thought I was considering.. Do you happen to have a picture?
-
Thanks! I'll have to look into the floats! I don't have a pork chop on the Hammer, it's a euro.. So, I tend to set things on the end of the bed. I've knocked them off more times than I care to remember and cussed them a few times when hauling something heavy to the machine and realizing they're in the way when I get there..
-
Obviously, there's not a lot of accessories that go with a jointer.. I have a set of paddles (which I dislike) and a push pad with a heal on it that I do like. After that, the only other things I need to store is a couple of different sized blade guards. It seems a waste to build an entire cabinet to store just a few things but, it also seems a waste to have all that space and not do something with it.. Curious what everyone else is going for storing their jointer accessories? Thanks in advance!
-
Interesting approach to removing the bees!
-
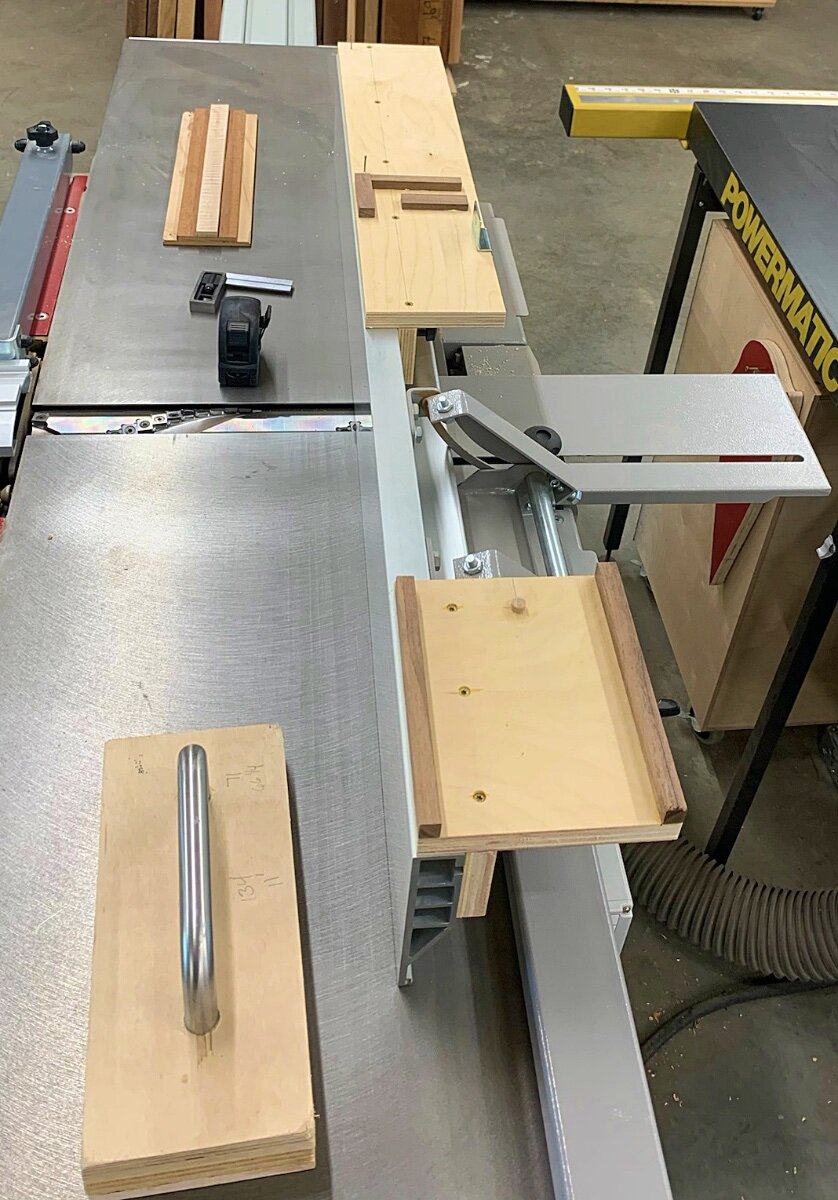
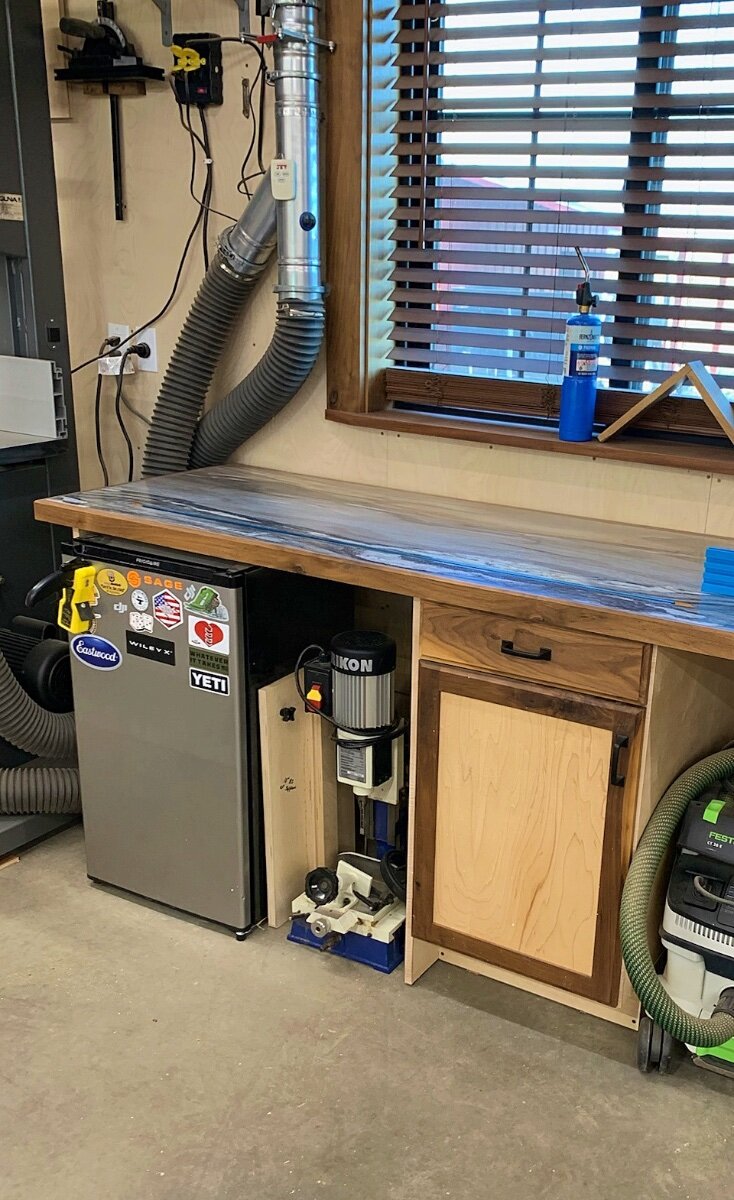
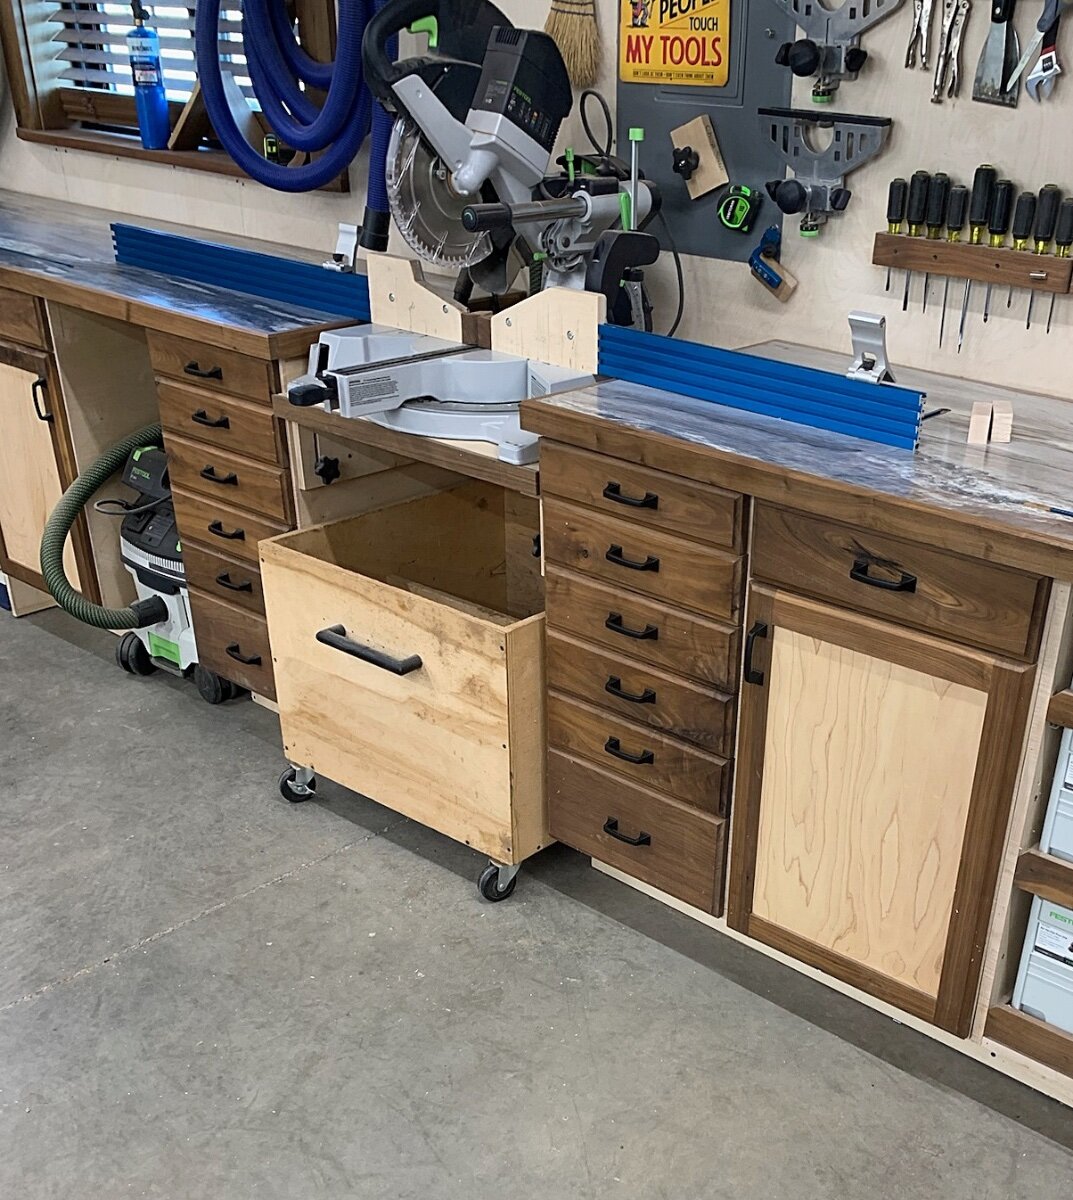
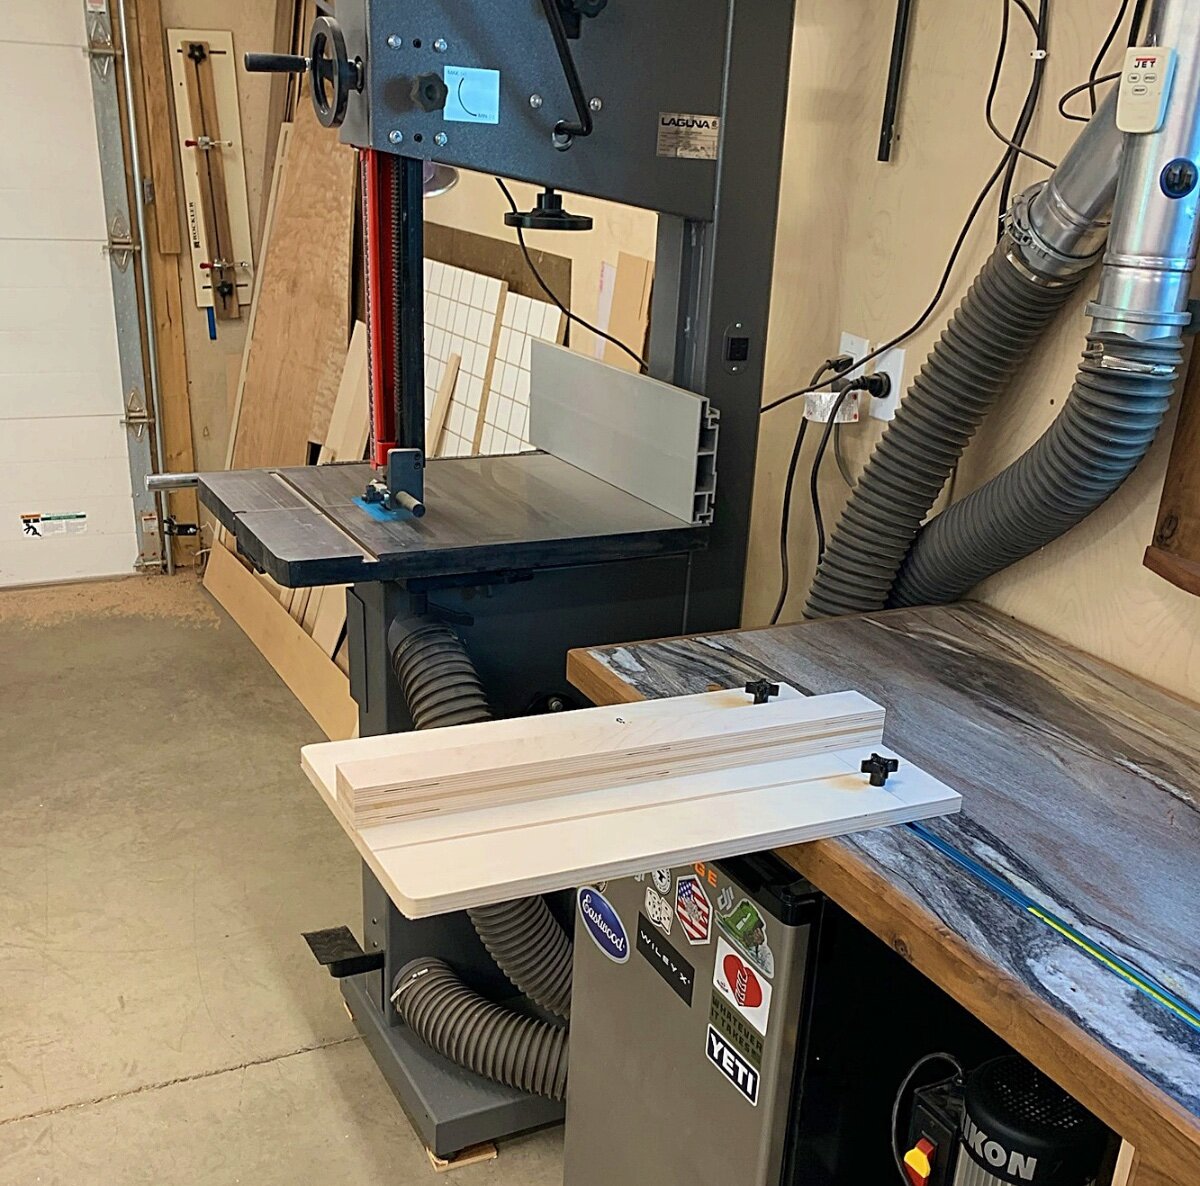
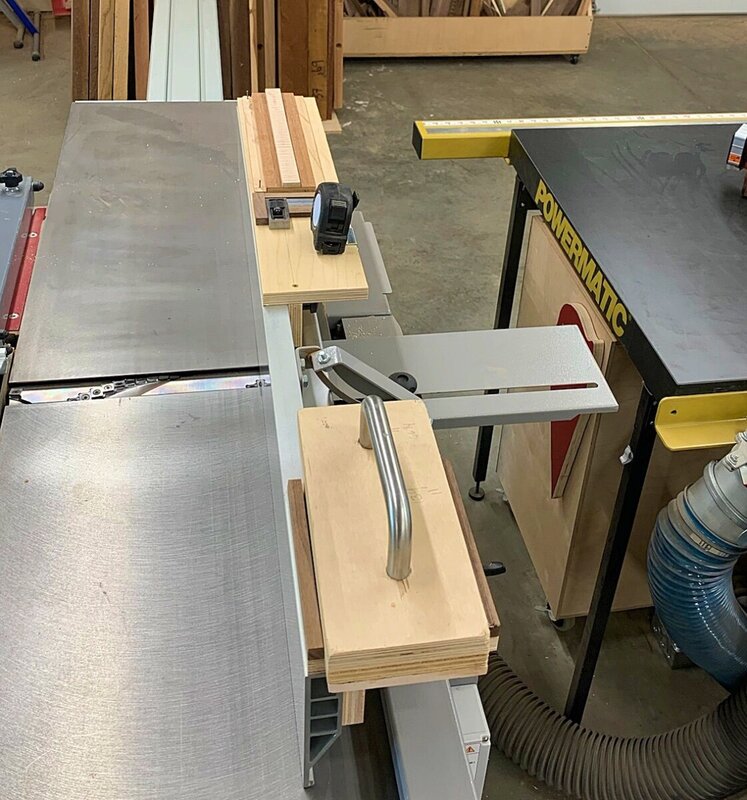
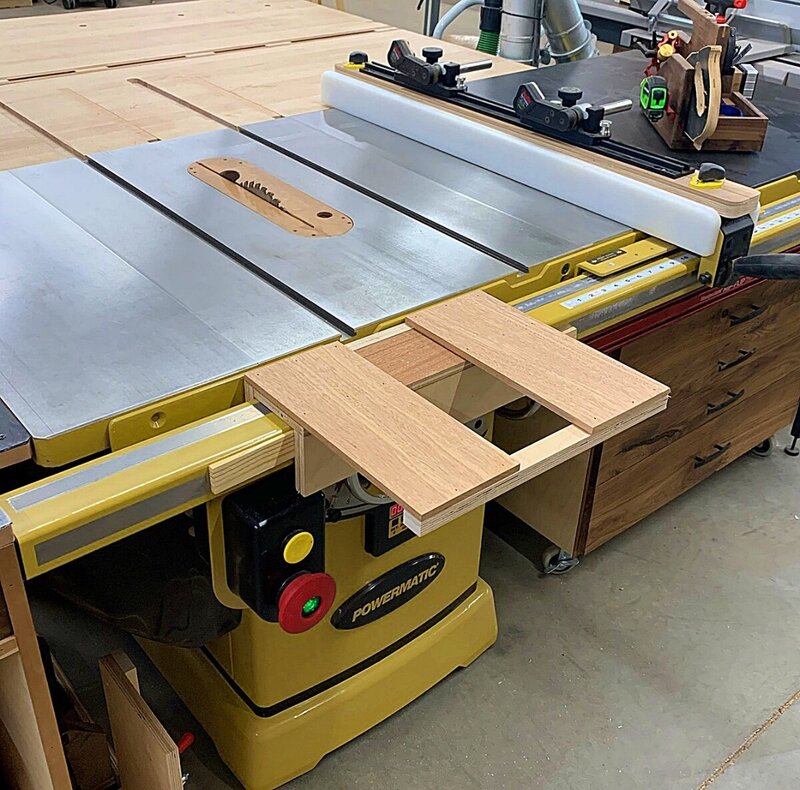
Been a rough couple days... When I was young, I had a severe allergy to bee stings. Nothing that effected my breathing but, regardless of the sting location, the swelling in my face made it impossible for me to function for several days. I'm a little older now and have been stung a few times with, for the most part, none of the effects that I got when I was much younger. Yesterday was a different story! I saw the bee's nest above the garage where I park my truck. I didn't think much of it as I wasn't messing with them or disturbing them in any way. Well, just walking through the opening, I got stung right next to my eye.. I sensed right away that this one could be trouble and shut everything down for the day and headed to the house to just stay calm and relaxed for the rest of the day. The swelling started immediately even though I had taken some Benadryl and it wasn't long before that eye was nearly swollen shut. When I woke this morning, the eye was completely swollen shut and the entire left side of my face was severely swollen. Still no issues with breathing. Got my coffee and did my normal morning routine with just one eye.. As the morning went on, the swelling started to go down and I could finally see with both eyes.. I knew I wasn't going to do any filming with my swollen face looking as it did but, still wanted to get something in the shop accomplished and there were a few things on my list. I started simple! I have been wanting to get my HCM off of my miter station and stored down below by my refrigerator. I had a couple TS jigs there previously that just needed a new spot on the floor between the TS and my sled rack so, this was an easy starting point! From there, I've been having issues with the drawer pulls that I've been using in this shop since it was new. Although I liked the pulls I chose for the shop, because of the overhang on each side of the mounting post, they have a tendency to snag my mic cable a lot and it's not a cheap replacement if I break that mic. My kids had gotten me an Amazon gift card for my birthday so, I ordered some new pulls for the shop with it. I was able to order 25 pulls with their gift but, the problem is that I have 72 pulls in my shop! Anyway, I changed out the most offending ones that had a tendency to snag my mic cable. At this point, the swelling in my eye had gone down a bunch so, I wanted to take on some outfeed support for my 18" bandsaw. Pretty simple really and it works off of the stop block track in my miter station. Allows me to slide it anyplace I need to in the track and provide some much needed OF support at the bandsaw. And, last on my list today was some infeed support at the table saw. I had another set up for this with the last saw but, never got around to creating it for this saw. The last couple big projects had me wishing I had this support but, I didn't take the time mid project to build it. Got that done today! Instead of adding toggle clamps to secure it in place, I simply use a could shims to lock it in place and it works great! So, now I've got both eyes back and the swelling has been reduced greatly! So, my wife has brought home a can of bee spray so I can take another chance of swelling up again and remove the nest.. If anyone's really interested in how bad the swelling was, let my know and I'll drop a pic of my swollen ugly mug up here for you all to chuckle at!


-
As long as he's enjoying himself!
-
The maple I got was earmarked for the cradle... There was a little left over... 🤣
-
I actually have a few of those left.. Yes, its super wide!
-
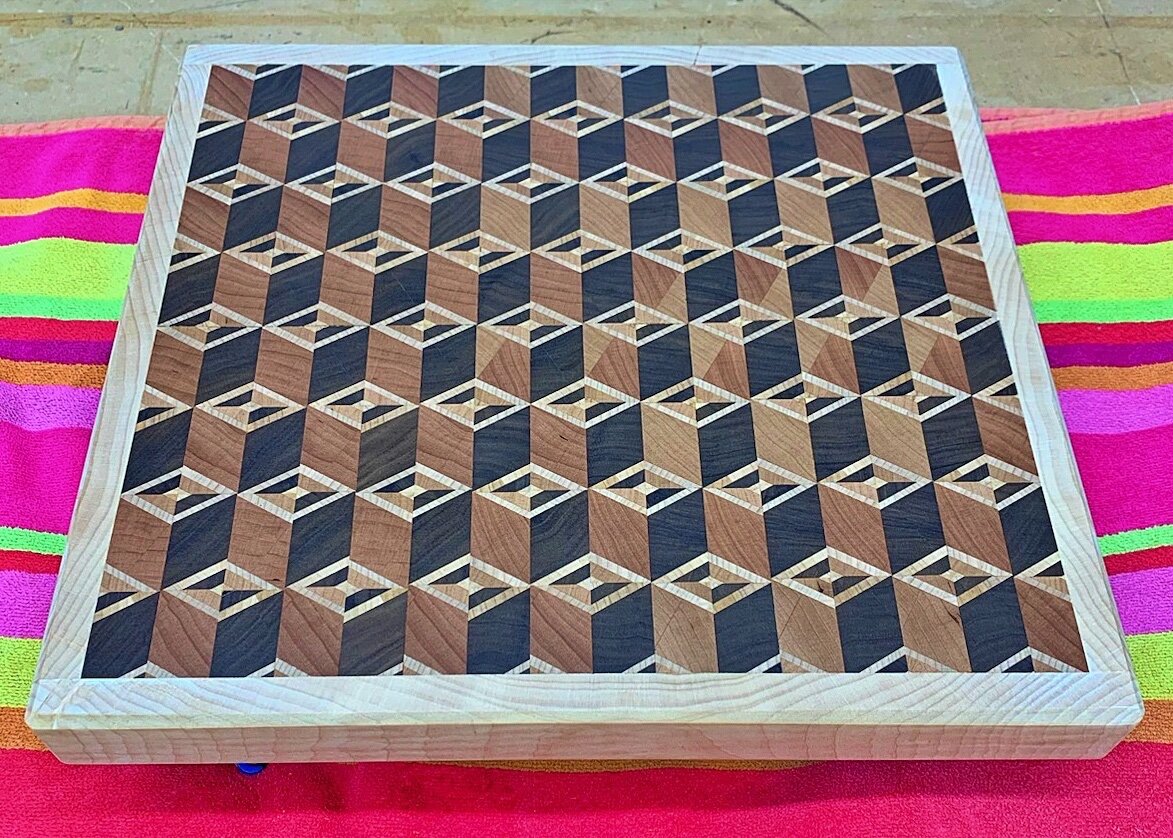
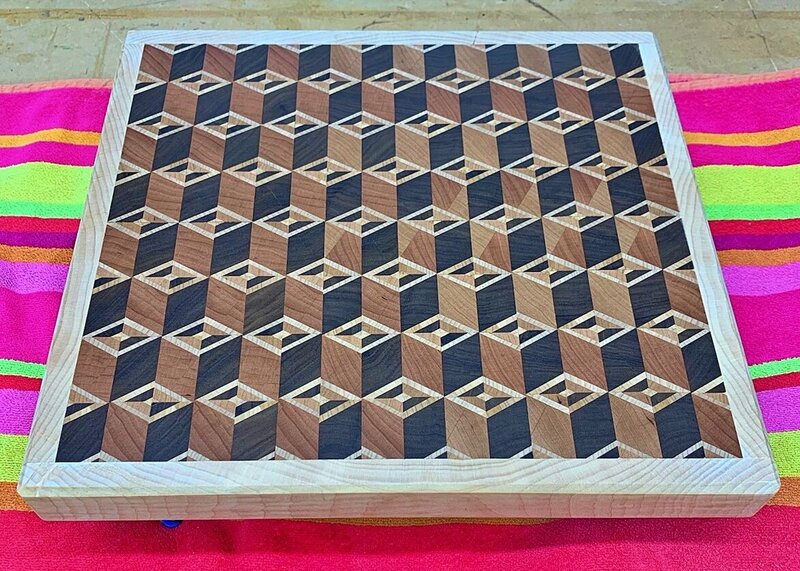
This one is 13" x 14" but, there's really no limit to how big you can make them. From memory, I think I started with about 16" pieces so, would just need to boost that up if you want a larger board.
-
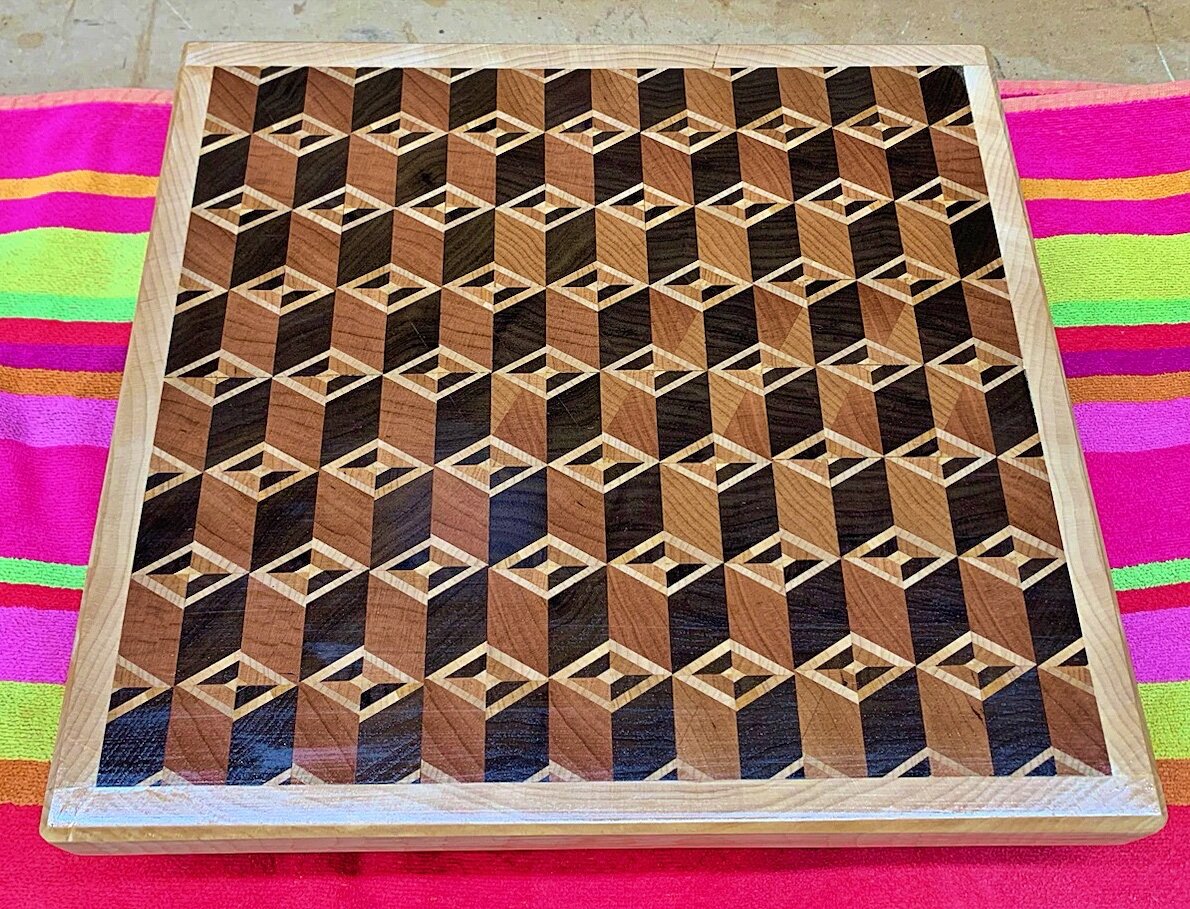
Finish is cured up a bit now...
-
Let the sanding begin! This is where I really like those dog hole clamps! General Finishes Wood Bowl finish applied.. Still wet in this pic but, I'll grab another after it cures.


-
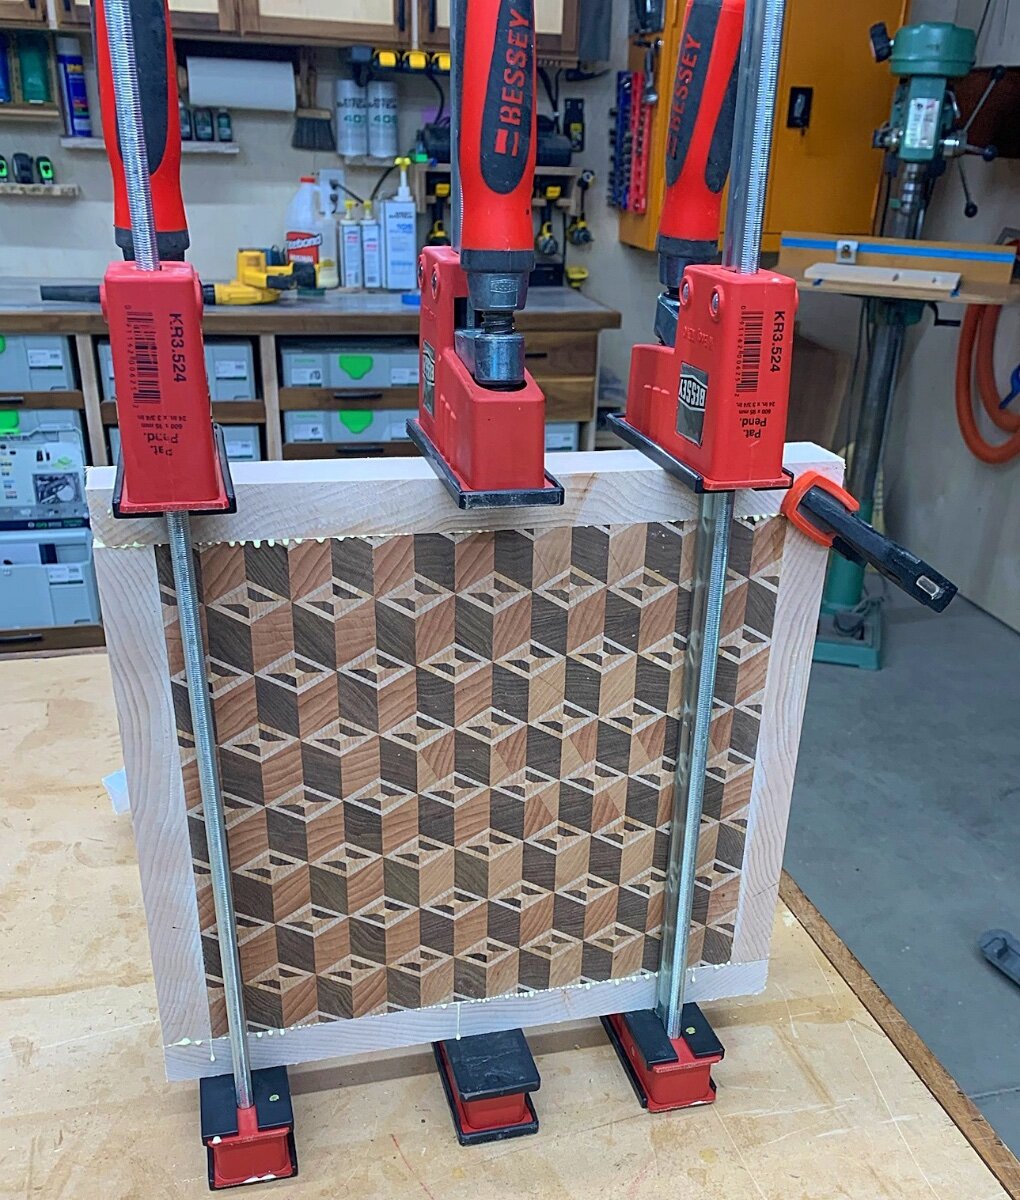
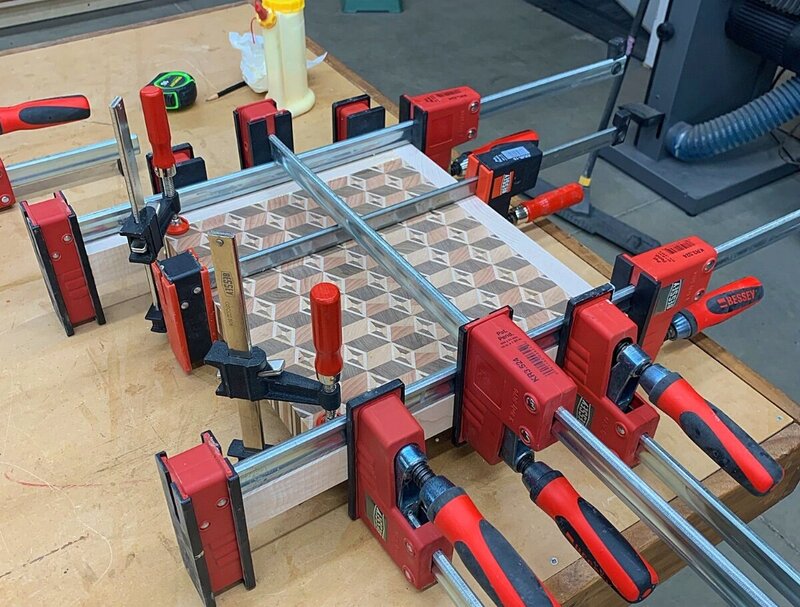
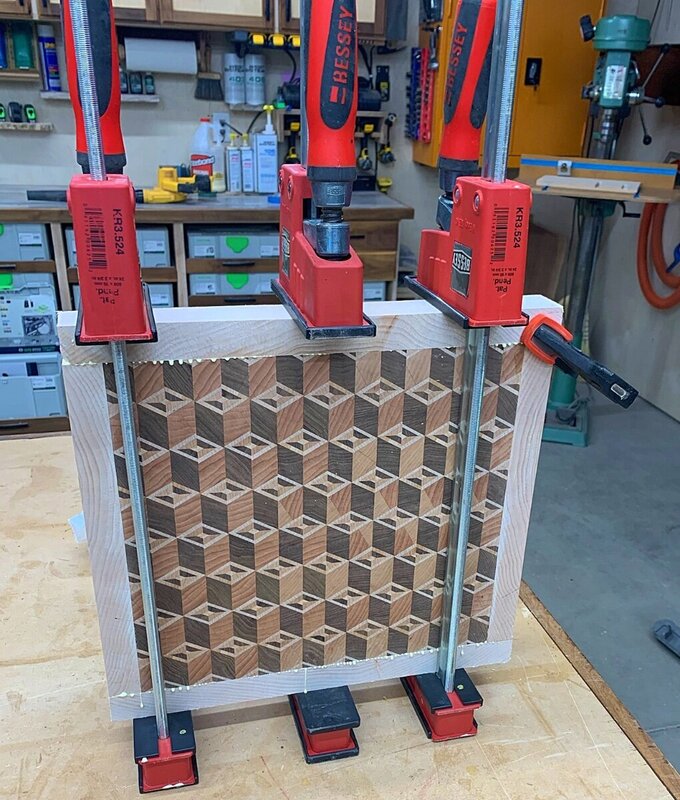
Thought hard over the night about applying a border to this one.. I knew that if I were going to border the entire board, it would have to be end grain or I'd most likely have wood movement issues. I looked at all the scrap in the shop and definitely had enough to make just about any end grain boarder I wanted but, it would be a lot of work. Or, I have a really nice (and large) piece of figured maple (from @Spanky) where I could get end grain with just one cut. So, that's what I'm doing.. Here's the first glue up getting just the 2 ends. I clamped the other side board in place to help with alignment so that I don't have to trim too much off of the board itself. Yes, that maple board is that wide.. And, here's the other sides added.. Just gotta let the glue dry, clean it up, add a chamfer, and apply finish..
-
For those that haven't seen it, Marc (The Woodwisperer) has an Instagram post about this.. I need to figure out if/how this would work into the way I do things but, will probably place an order to see. Thanks @Chet for the heads up!
-
Just an update... There's a potential of a work conflict so, those that are coming, please give me a week or 2 before booking any flights. Apologies ahead of time and I'm hoping these dates are still good but, I don't want to have to refund anyone for flights. My day job pays for all this stuff so, I have to give them the first option of my time. For the record, I just learned of this 5 minutes ago..
-
Yea, I'm betting it never sees a knife either which is why I don't like making them. Regardless of how it looks, it's still end grain and will hold up to years of use! I'll make a decision on the edge treatments soon.. In the meantime, here's the link to the video that I followed..
-
I saw it on a YT video and just went for it..lol. I can draw up a pattern or just link the video if you'd like? I'm seriously considering your thought as I just want to be done with this one! Although, I'm also considering an end grain border around it as well...