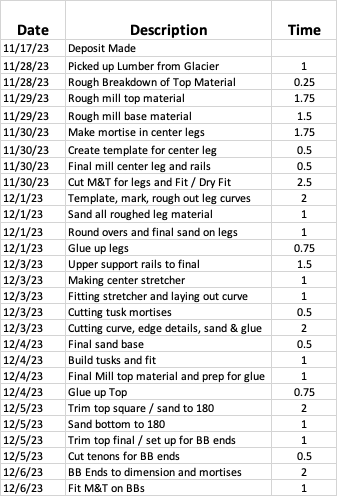
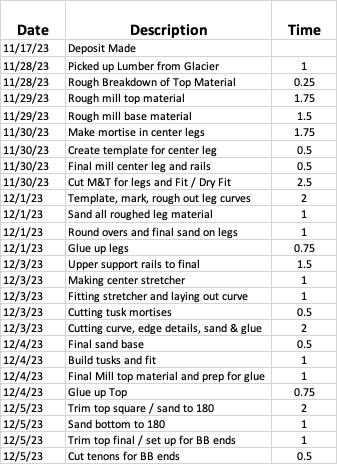
Every purchase made through our Amazon Affiliate Page helps support this site
Kev
-
Posts
6,324 -
Joined
-
Last visited
-
Days Won
583
Content Type
Profiles
Forums
Downloads
Gallery
Events
Store
Articles
Blogs
Everything posted by Kev
-
Hmmm... 🤫
-
Here it is surface dry.. Still needs to cure over night though.. Maybe some Rubio tomorrow????

-
Thanks for the confirmation.. I know it's the best available where I live.. Apparently, we were the first ones to connect to it.
-
That one is still a little wet.. I'll snag one in a few minutes dry..
-
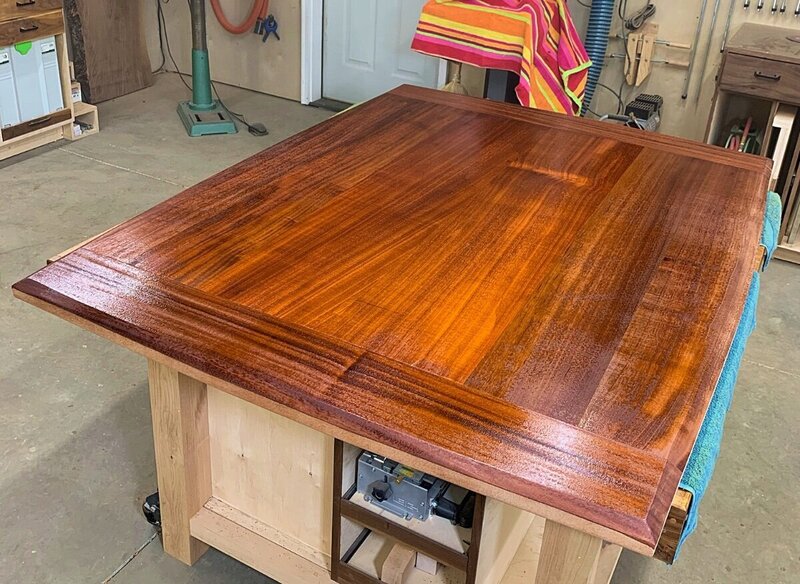
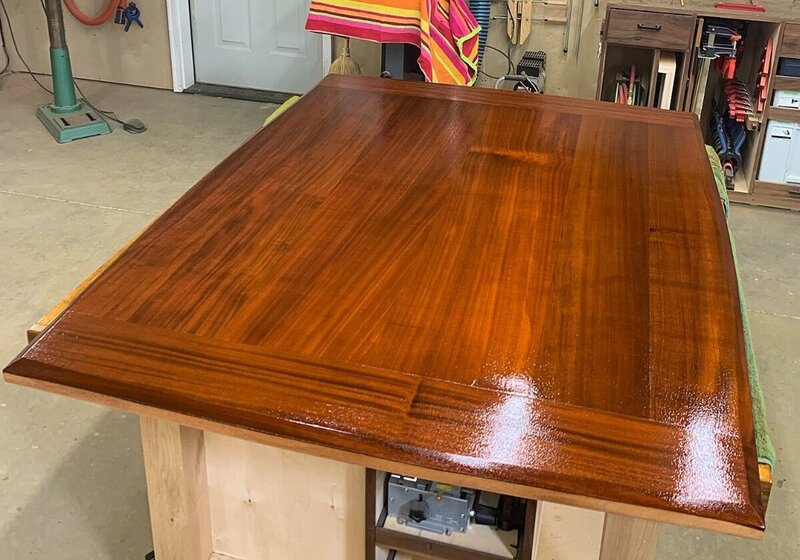
Got the table flipped over this morning and got going on the finish.. I'm not sure why or how but, I ended up with a couple light spots towards the middle of the table.. After turning handles at the lathe all day with @Ray Martin, I sanded the table most of the way back and tried to darken those spots up.. Then I reapplied the shellac. The spots are still there but, I did make some progress to hiding them.. No change in the client time today.. Even though I had extra work to do on the top, that's on me..


-
We have always had internet service, it just wasn't up to snuff for what I do.. When I needed to upload a video, I would usually get it going and then head to bed.. Sometimes it would still be uploading in the morning when I got up.. The speeds were just horrible. This is also something I was fighting with the server which is why my sites are currently being hosted on another server. I'm hoping to be able to pull things back here soon, we'll see. Not dealing with the headaches is also appealing!
-
She loved the color.. I decided to let the Shellac cure for the night and I'll go after the top tomorrow.. She also brought some color samples to see them next to the top as she decides how she wants to do the base.. She didn't really like what she had so, I gave here a glazing lesson and offered a couple suggestions to try.. More samples coming...
-
As you know, I had limited shop time today as I was having my internet installed.. I still managed to get the finish completed on the bottom except for the Rubio.. I won't do that until both sides are ready to go.. I started off by shooting a layer of Amber Shellac over the Potassium Dichromate.. I followed this up with a burnt umber glaze. Then, I shot another coat of shellac. Here's a wet picture followed by a dry picture.. Client should be arriving shortly and approving the final color and then I'll flip it over and do the top.. Here's where we're at.. Since I have to repeat the process on the other side, I already added that to today's estimate.. Total: 38.25. About 4 hours left on the budget to apply the Rubio, install the top, and do the final finish on the base.. Looking like the estimate is pretty close!


-
Back up and running.. I'm certainly no expert when it comes to internet speeds and stuff but, I'm told these numbers are pretty good especially considering where we live..

-
Just waiting for them to show up and get the new fancy internet going.. Fingers crossed! Oh, I may be off line for a bit today.. 🤣
-
@Ray Martin I have some more of those drop cloths if you need them.. Should have thought about that yesterday when you were here.. Looking great! Will be moving in before you know it.
-
Yes.. So many times we end up with changing grain directions and end up with tear out in those areas. Although this bit doesn't completely solve that issue, it does go a long way to helping.. Think of it like a planer with straight knives vs a planer with a helical head..
-
They come in different sizes.. You're correct for that one and then I have another that's a little longer as well.. I needed to go pull my batteries off of the charger anyway so, needed to go to the shop.. I try and not leave batteries in the chargers over night..
-
@Coop, hopefully these pictures better explain my answers to your questions... Compression bit.. This one is a Whiteside and is still dirty from today's use... You'll note that it cuts in both the up cut as well as the down cut. So, works a little better on woods with changing grain directions.. The finish.. If you go back and look at the video "shop tweaks", this is where I first tested this finishing technique with Potassium Dichromate.. Here's a picture of the inside lid from the rag box that I did in that video.. Looks a lot like the table top in the current project.. And here's the full effect of the full finishing process except for a final top coat of whatever you choose.. So, in this case, the client wanted that darker color on the African Mahogany but, with the feel of Rubio Monocoat. So, the plan is to add the Rubio to this after the final coat of Shellac.. I hope that explains it a little better?


-
I'll start with the "finish".. This isn't really the finish. Potassium Dichromate is more like a pre-finish conditioner that react very specific to the tannins in African Mahogany. The goal being a darker and more consistent finish like you'd see with traditional Green & Green furniture. There's still 4 more layers of finish to apply and 3 other products to go... A "compression bit" is like a spiral bit but, rather than having an up cut and a down cut, you have both. I'll grab a picture for you when I go back to the shop..
-
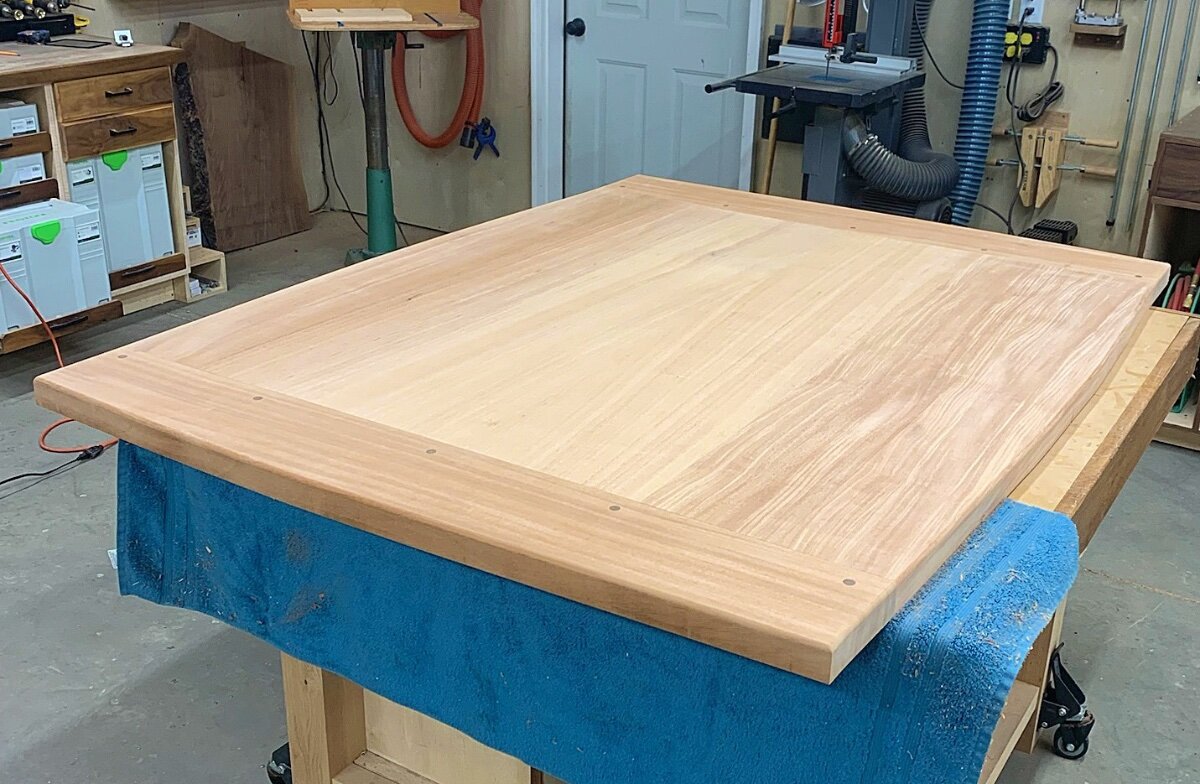
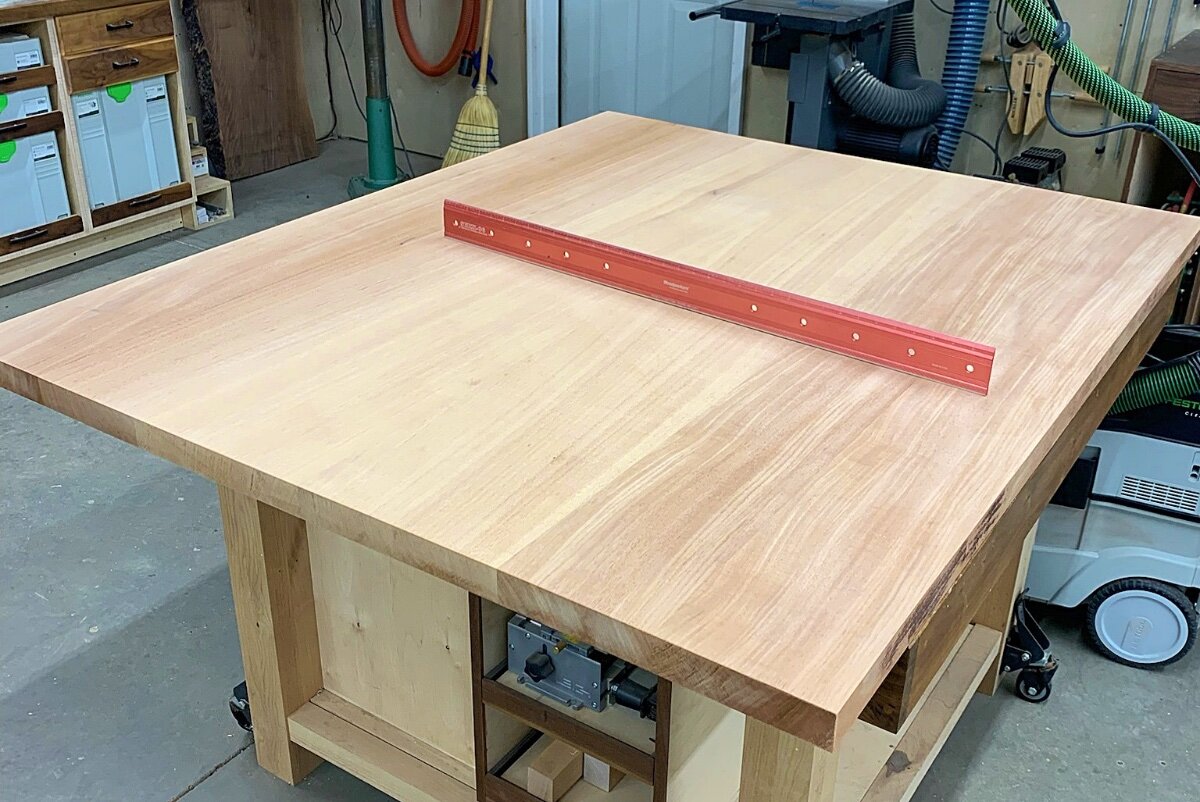
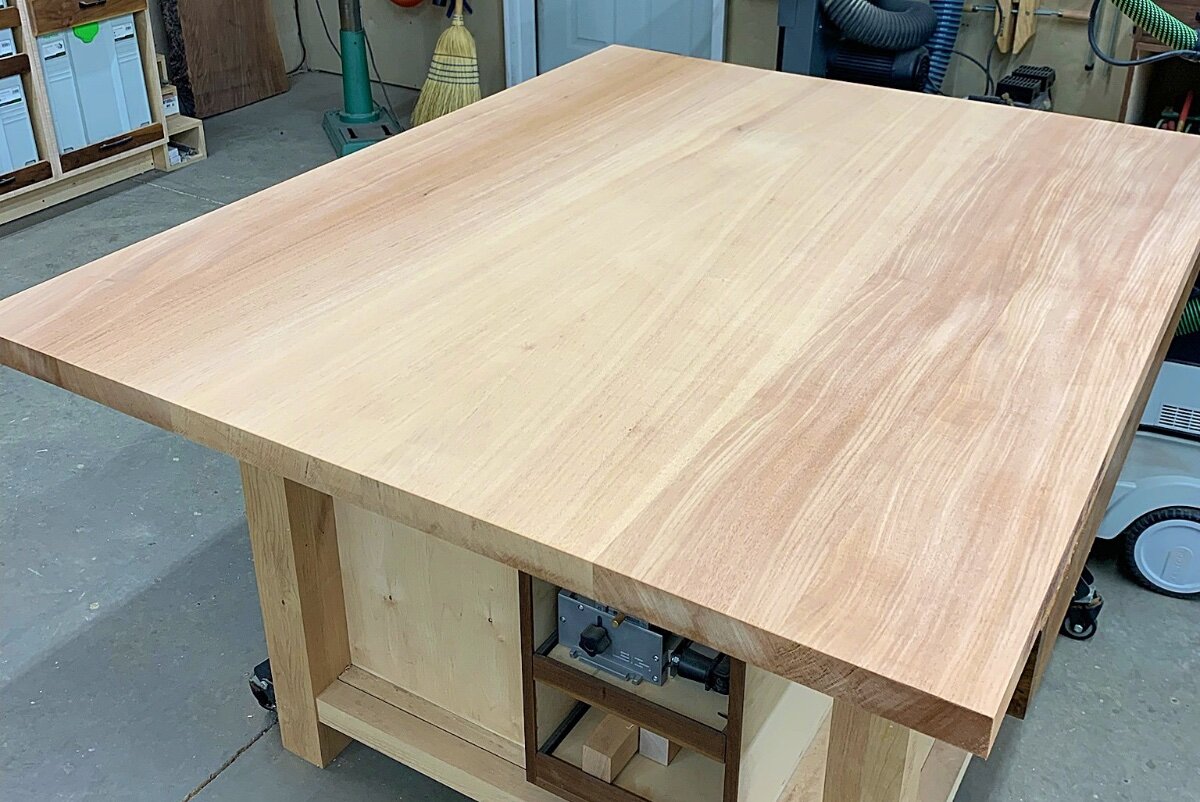
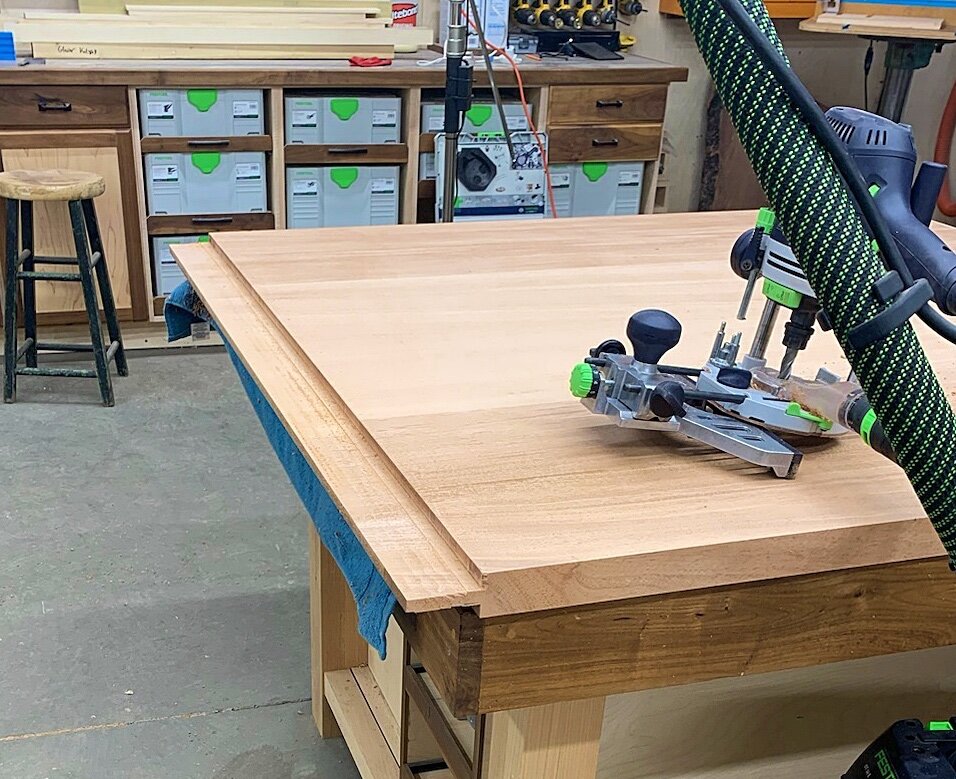
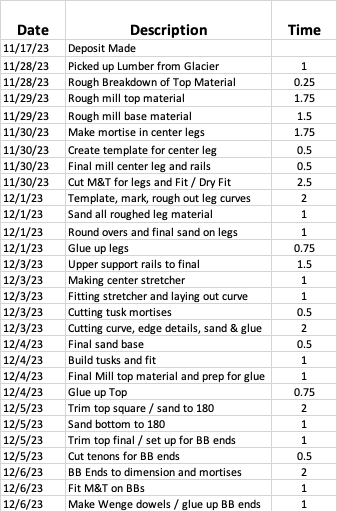
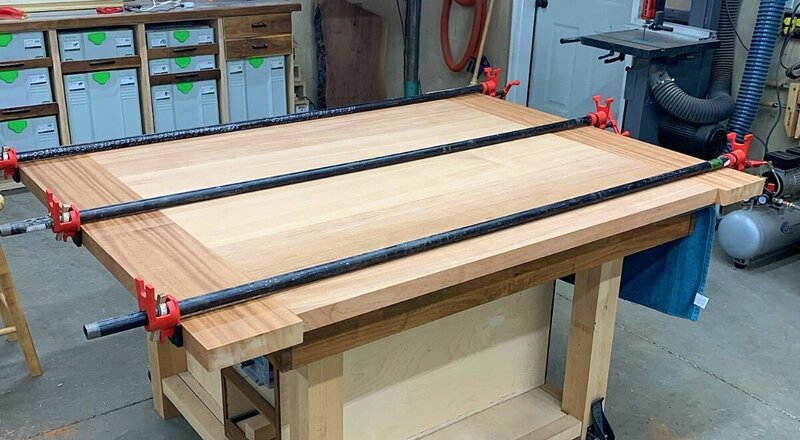
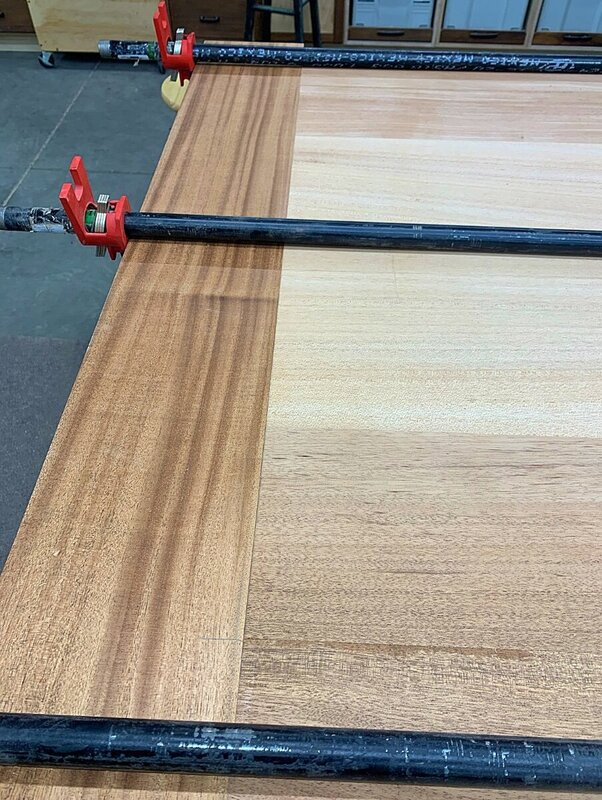
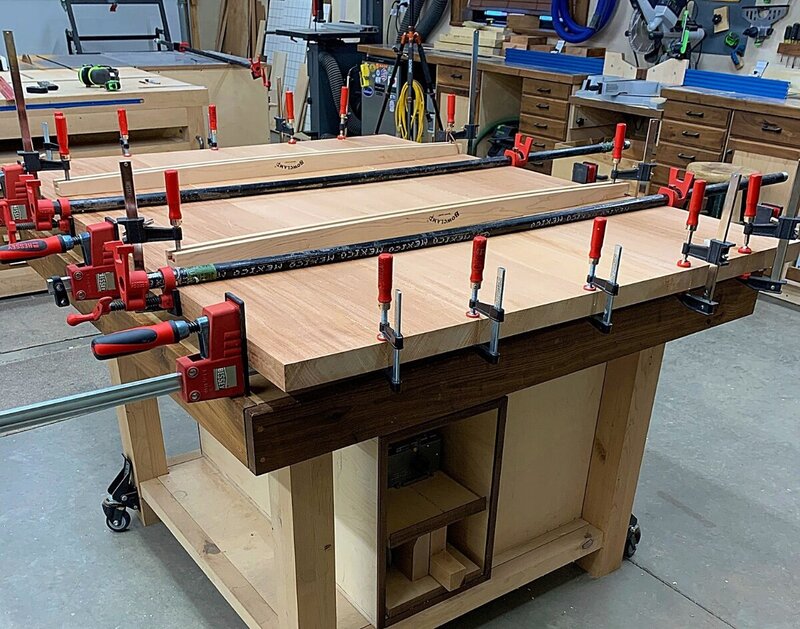
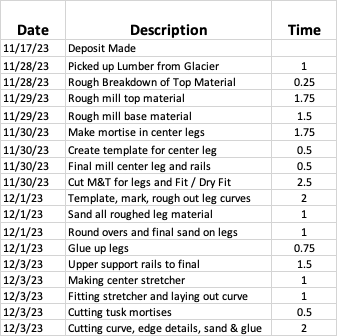
Another amazing day in the shop where things just went to plan! Started off the day getting the top out of clamps and building templates/laying out for the curves.. I cut these as close as I dared with the jig saw watching the blade deflection the whole time. Then I flush trimmed to the template using a compression bit.. Worked really well! Then, I flipped the top over and started working on the chamfers for the bottom. Thanks @Ray Martin for stopping by and helping me flip this beast over! Once again, I used the hand held power planer to get close to my lines and then just finished with the sander to dial everything in.. I went back to the base briefly and cut for 3ea figure 8s on each side to attach the top to the base.. I applied the first coat of Potassium Dichromate to the bottom and the wood was really drinking it up.. Here's a pic right after application. And, here's a pic about 45 minutes later as it dried out.. I really like how it evened out the color differences between the boards. I'll follow this up tomorrow with a coat of Shellac before moving on with the finishing.. I want to mostly complete the underside before moving to the top side.. The finish picked by the client is really dark so, I want to be sure she's 100% happy with the color before I apply it to the show face.. I will flip this over tonight and make a couple small repairs on the top.. As I sanded that this morning, I noticed a couple Wenge dowels that chipped on the top. I want to dab some blackened epoxy in them tonight and let them cure over night.. Here's where the project is.. Total 35.75 - About 6.5 hours left on the budget.


-
Got the top flipped over when my wife got home so, got a little more work in! Finished the milling on the BB ends, made the Wenge dowels (Lathe to rough and plate to finish diameter), and got it glued up.. Still a bit of sanding to do as I left that side just a smidge heavy.. Hopefully, I'll be starting to shape the top tomorrow in prep for finish! Total: 32.25 - About 10 hours left on the budget
-
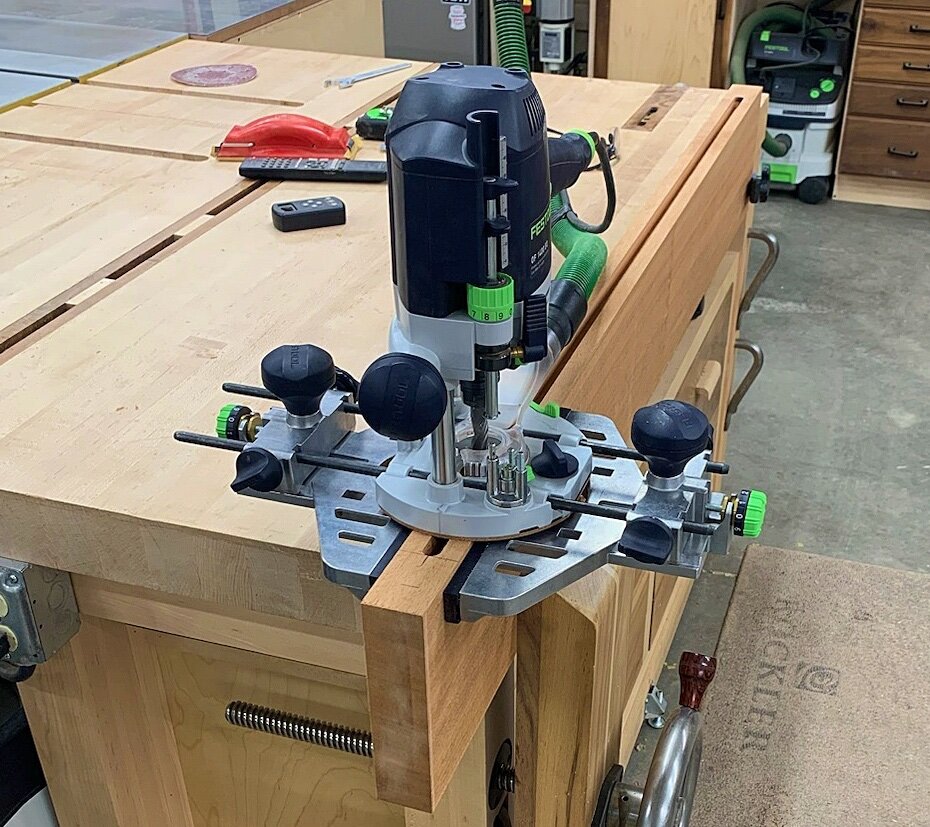
Got a nice early start today but, now I'm dead in the water until I can recruit some help to flip this beast over! Started by cutting the mortises in the breadboards.. This really maxed out my bit so, I took lots of smaller passes. Even with a 1/2" shanked bit, I just didn't want to over stress this Whitside spiral bit. Dual edge guides as usual. I trimmed the tenons and finally got the first dry fit.. This is the bottom and I'm really hoping the top looks just as good 😅 I cut these so that they're flush on the bottom and have a little extra on the top. I'll use the drum sander to dial them in. The table is also currently 3.5" longer than the design. I can trim these BBs down or leave it. I've tossed this out to the client to see if she wants the table a few inches longer. And, where things are at... Total: 31.25 hours.. About 11 hours left on the budget.

-
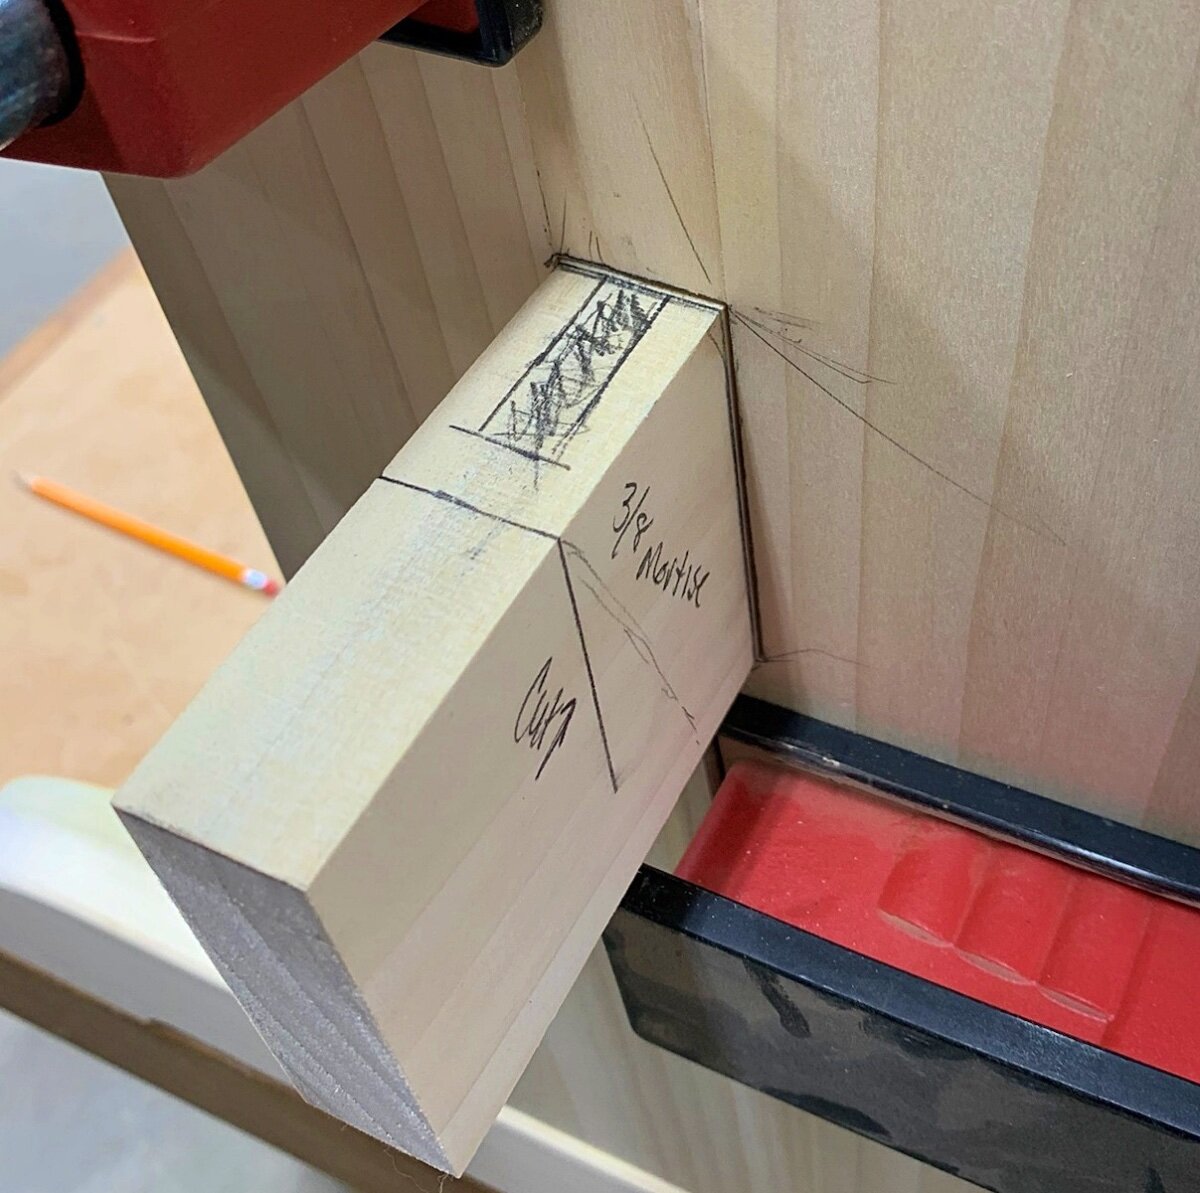
Fairly typical.. The BB ends will be 5 1/4" wide. I'll trim the ends of the tenons so that they're hidden inside the mortises. I made the tenons at 2 1/2" wide because that's the length of my longest 1/2" bit. They're 1/2" thick and centered on the top. I'll peg them in 3 or 4 locations.. I need to look at the layout and see how it looks.. The center pin and tongue will be glued with the outside ones being done as a draw bore and no glue. These will be installed from the top and done in Wenge since the client wants them to be seen. The only "tricky" part is that the client wants slightly curved edges on all 4 sides of the table top. So, I just have to be sure to remove enough of the tenon to leave enough meat on the BB to account for the curve and not expose a tenon. There's also a chamfer going on the underside to consider as well. Will just require some thought and planning before deciding how much tenon to cut back.
-
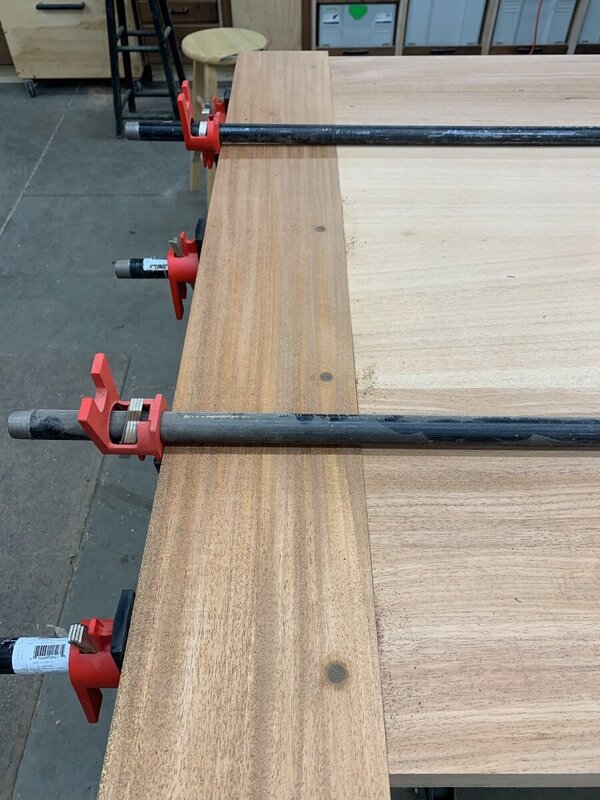
Well, more progress today although the bulk of the day was sanding! I got the tops out of clamps, marked them up, and just started sanding! Although this is the top, the bottom looks very much the same way.. After cutting the top to final size, I laid out and cut the tenons for the breadboard ends with a router and an edge guide.. I'm sure there will be some clean up needed but, I won't know for sure until I cut a test mortice and check it. Total: 28.25 hours - About 14 hours left on the budget.
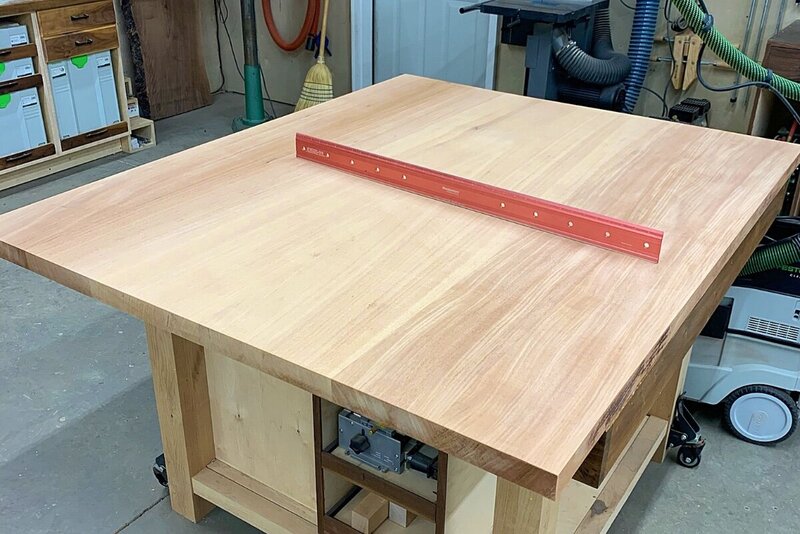


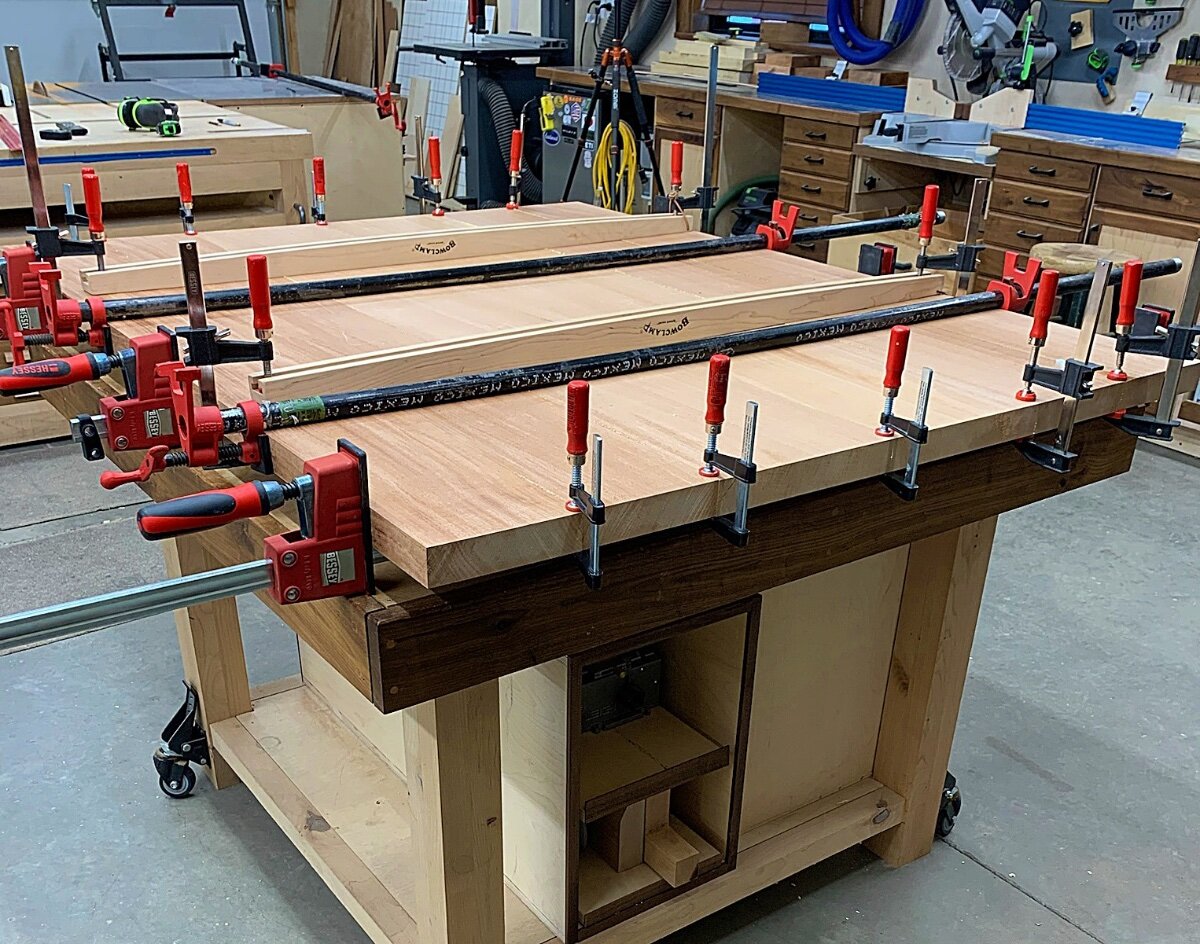
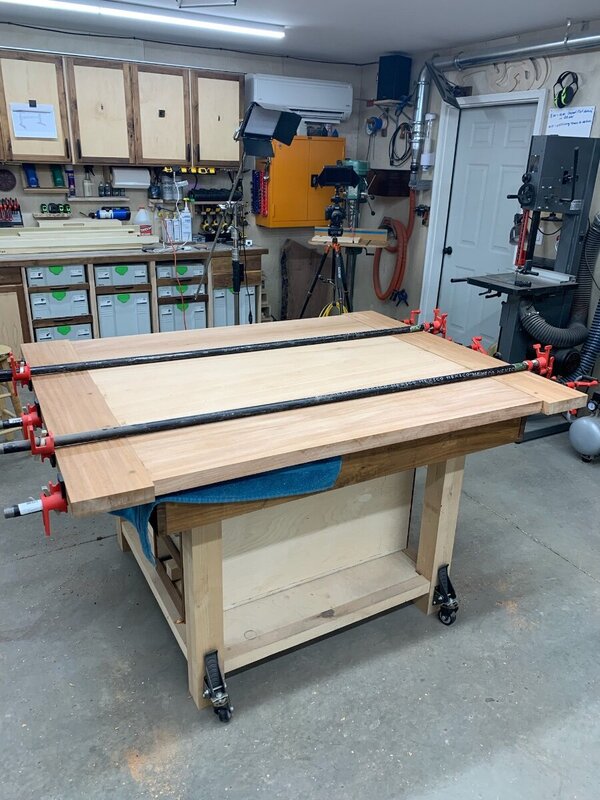
-
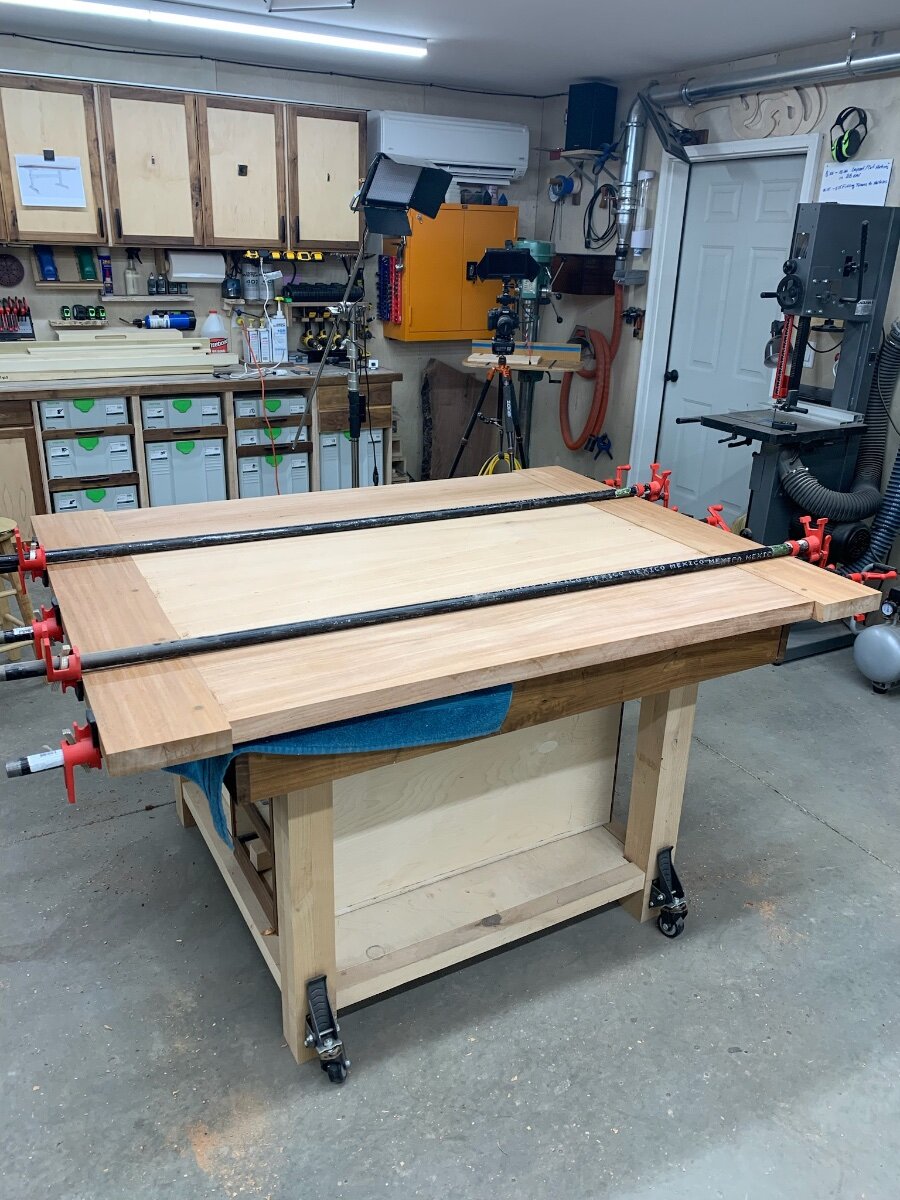
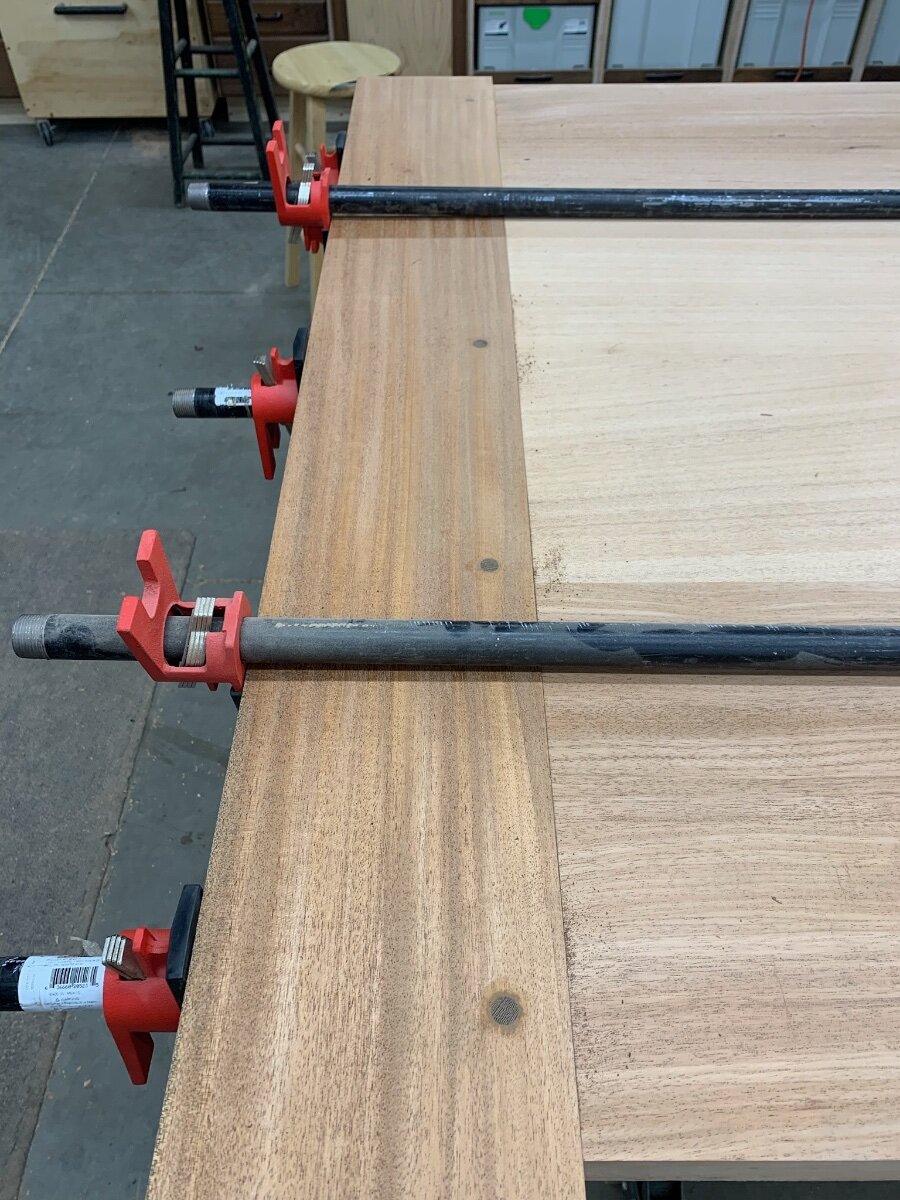
So, I've put the shaping option out to the client along with some suggestions to change the top of the tusk out a bit and she'd like a little time to think on it. Thanks @Woodenskye (Bryan) for the suggestion! With those done (for now) I moved towards getting the top glued up. I put the lumber back on the assembly table and aligned them per witness marks. I then applied a clamp so that I could use the track saw to get the top closer to final length. This made it a bit easier to final mill the top since the boards were a little shorter and lighter. So, top is still about 1.5 inches wider and longer than its final but, I did manage to glue it up.. For the most part, everything came together pretty nicely. There will still be lots of sanding I'm sure! Short day in the shop today! Either waiting on glue or client decisions but, I'll take it! Total: 23.75 hours. About 18.5 hours left to stay on budget.
-
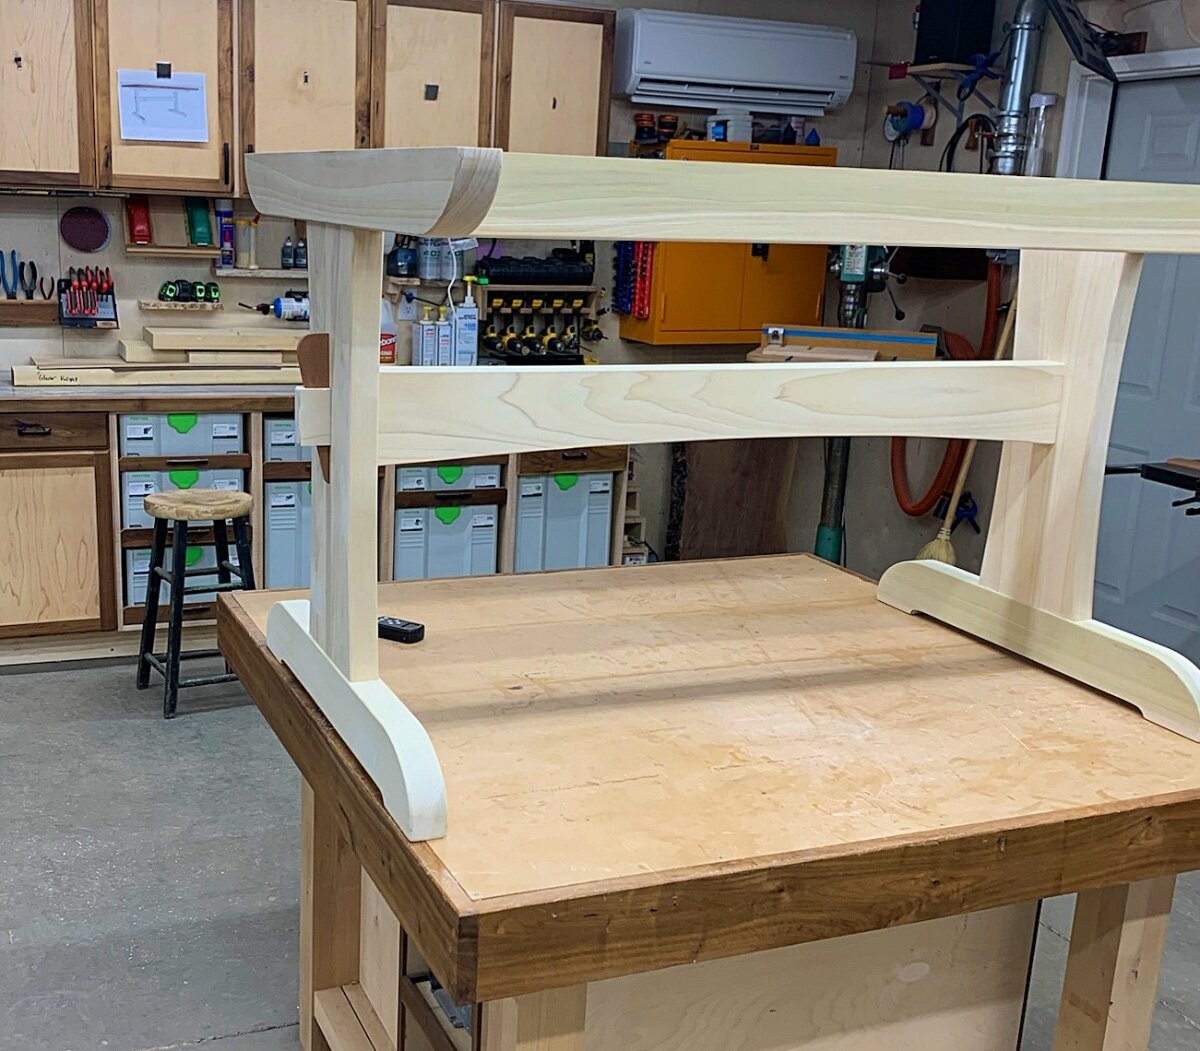
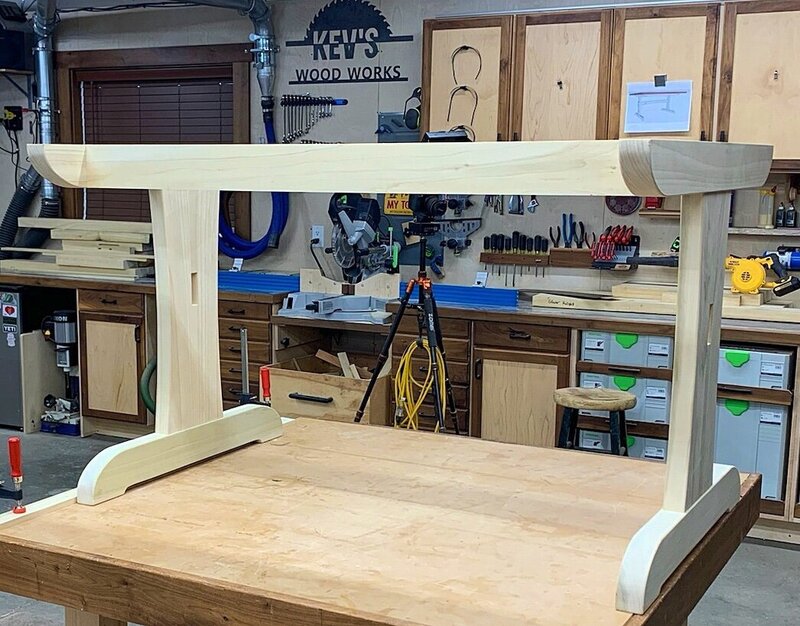
I showed them to the client as well as my wife and then shortened them a bit.. I didn't add any additional shape to them but, I could..

-
Looking for some opinions as I work on the Tusks this morning.. Obviously, I'll reach out to the client as well but, I think these are just a little too long on the top?


-
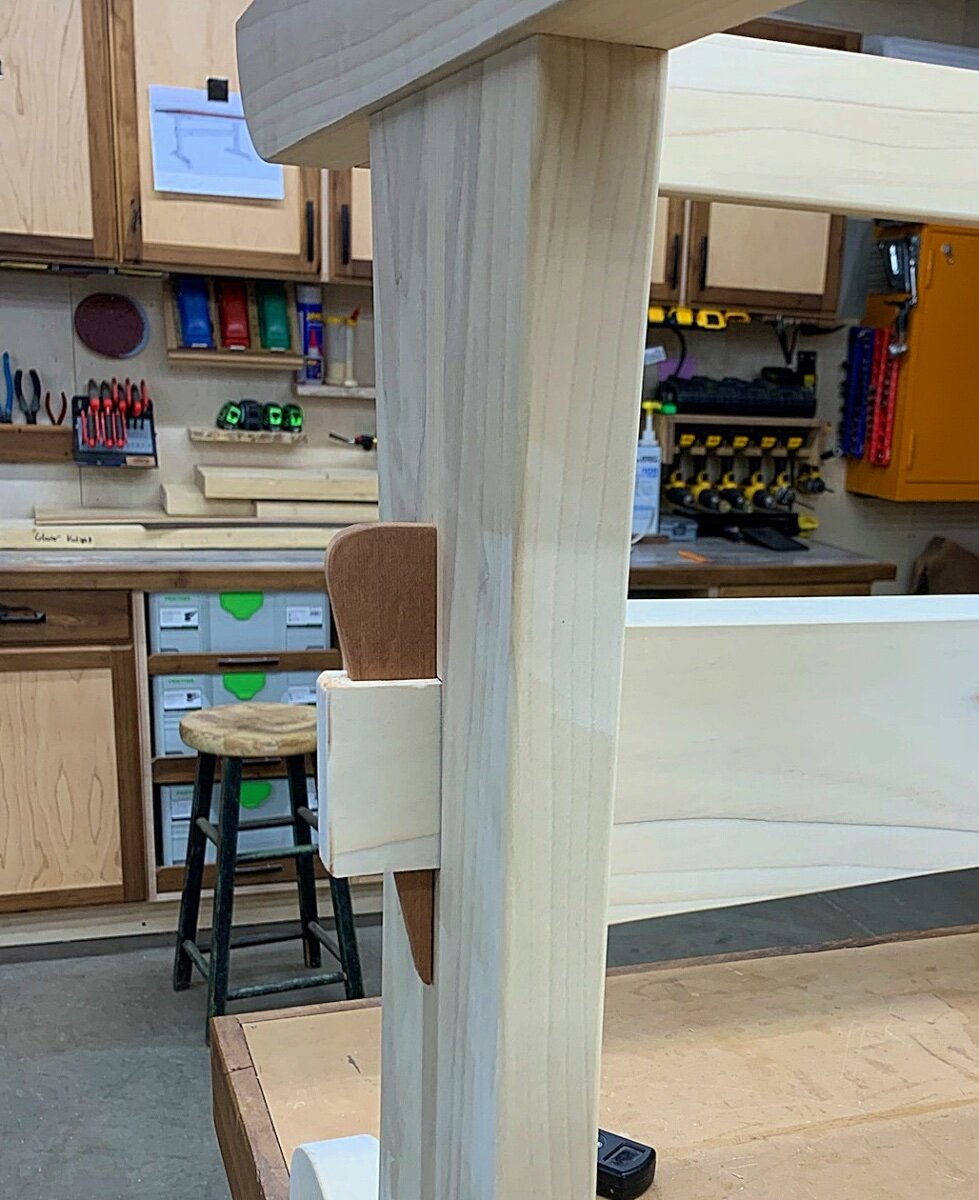
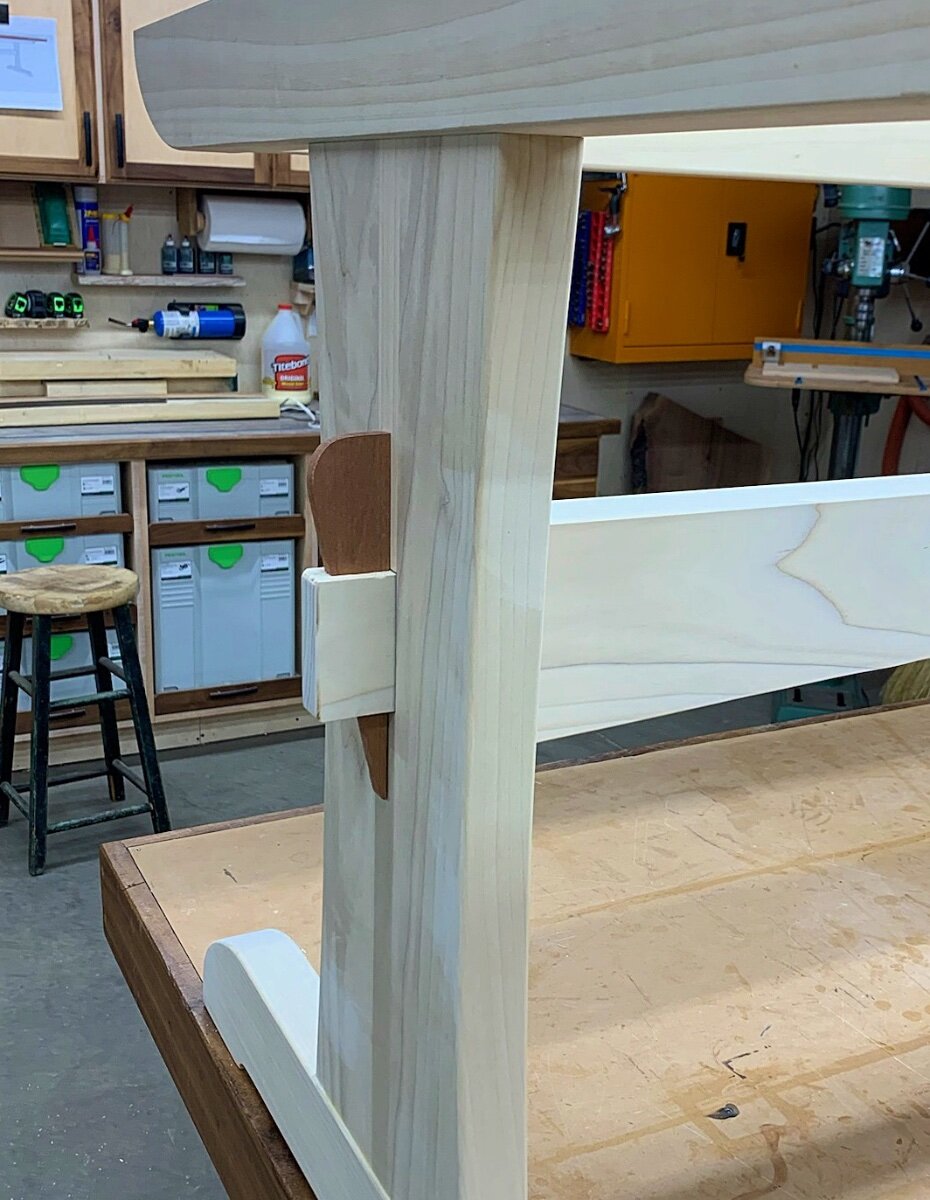
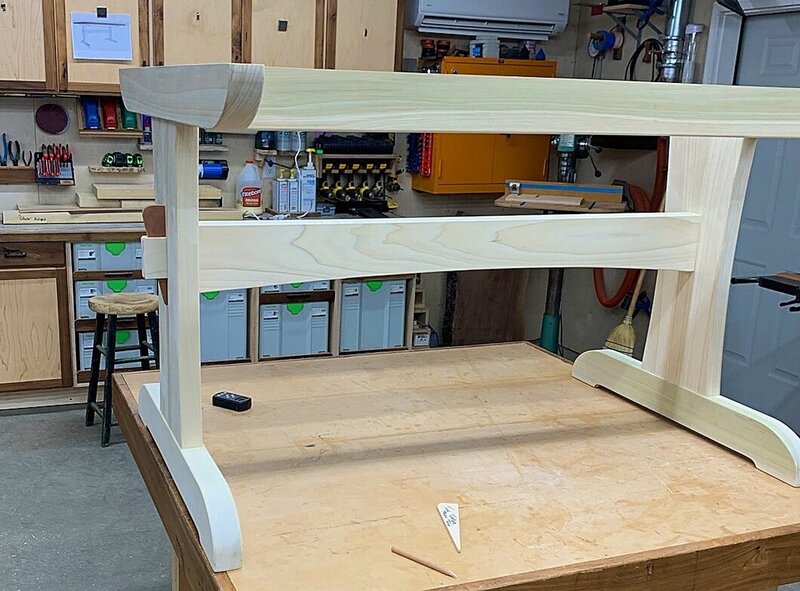
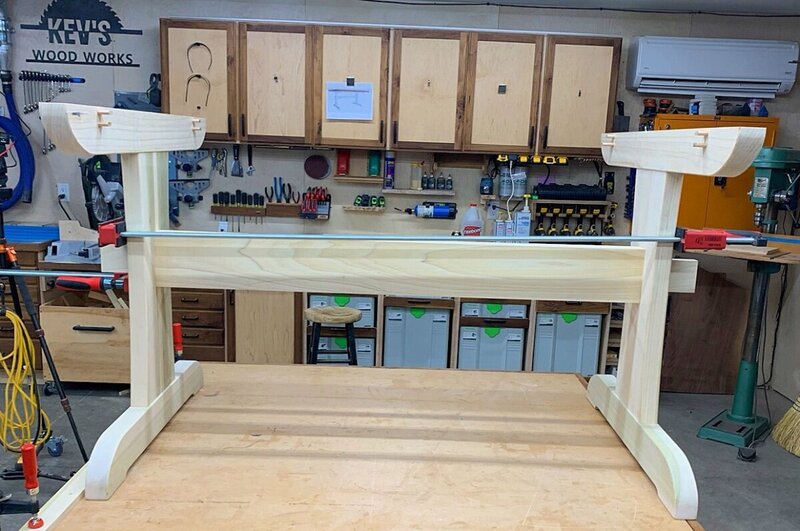
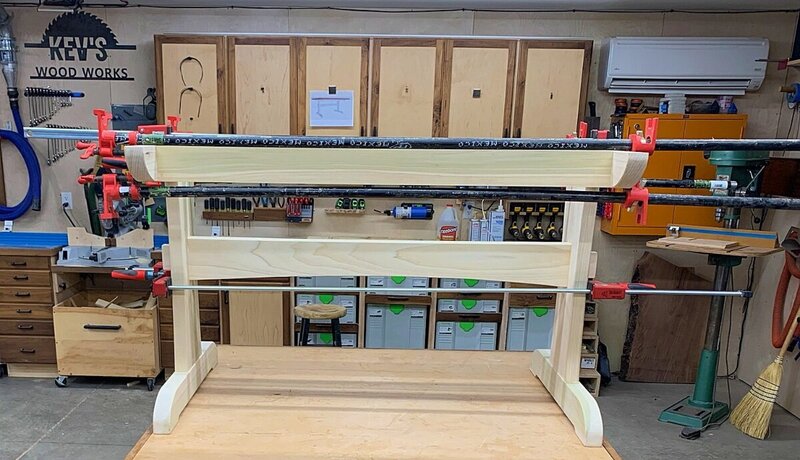
Back to the table today and another great day in the shop! Got a lot accomplished! I started off this morning with the Domino fitting the top rails.. I also had to do the final milling on these to get them to final size. Once those were fitting nicely, I was able to grab the final measurements for the center stretcher and get it final milled (Except length). I also cut the tenons which each were just a smidge different so, I had to final fit each on individually. I purposely left the tenons extra long so that I could have a good look at the dimensions I wanted for the tusks. I had noticed the difference in the size of the mortises when I was cutting the tenons on the stretcher so, wasn't a big deal to cut them a little larger and then fit then with the rabbeted block plane and some sanding. I was happy with how they came out.. Next up, I went to the Hollow Chisel Mortiser to cut the mortises for the tusks.. I didn't grab pictures of this but, if anyone really wants to see pictures, I did get it on video so, I can grab some still shots from there. I have to transfer the video material tonight anyway so, not really a big deal. Next, I cut the stretcher to final lengths and chamfered the ends as well as cut the curve. I also applied the rounders to all the pieces and did a bit more sanding. Then, it was off to final glue up! Previously, I had widened the centers of the legs a bit and decided the stretcher needed a little extra "beef" as well. Fortunately, I had left enough extra on it that I didn't have to mill a new piece. It's actually 1" wider than the design. And, that's where it will sit for the night! Time for some shop clean up and a fresh day tomorrow. I'll most likely build the tusks tomorrow and do any touch up sanding so that the base can go off to paint. So, here's where things are on the time.. Total: 20.5 hours. Still about 21 hours left on the clock to build the top and finish.. Should be in good shape.

-
I'll try to get by again next week sometime to help out.. Back to the Trestle table tomorrow..